How to Create a Mystical Women in Photoshop

Creating a photo manipulation using Photoshop can be a lot of fun. Choosing the right photos is an important step in the process, In this tutorial we will show you how to do this using the layer mask , use of lighting effect, blending, creating a vignette use stroke and more. Let's get started!
Step 1: Prepare a model
Open the model stock image (Ctrl+O) then Right-click the background layer, select the layer from background:

The dialog box follow the settings as shown:


Step 2
Press (P) to activate Pen tool and then make a selection around the lady.

Press Del to delete the selected part:

Step 3
Press (V) to active Move tool and then drag the image to bottom canvas. Please see the picture below:

Step 4
Go to Filter>Blur>Surface Blur. see picture below:

The dialog box follow the settings as shown:

Step 5: Setting tone
Now we will set the tone, go to Image>Adjustments>Hue/Saturation. follow like shown in the screenshot below:

Go to Image>Adjustments>Levels. follow like shown in the screenshot below:

And then go to Image>Adjustments>Color Balance. follow like shown in the screenshot below:

Next, go to layer > new adjustment layer > Hue/Saturation. Make sure to give this adjustment layer a clipping mask:

Mask the adjustment layer so that it does not effect the lady layer:

Step 6
Create a new layer (Shift+Ctrl+N) with the setting shown in the screenshot. With burn and dodge tool, paint over the lady to define more shadow and highlight.


Step 7
Open the Dark sky in Photoshop. We will be using sky from this stock image so we will need to transfer it to our main canvas. Click the dark sky and press (V) to activate move tool and drag the image to the main canvas, press Ctrl+T to resize images and change layer name to "cloud".

Step 8
Now we will set the tone cloud. Go to Image>Adjustments>Levels. follow like shown in the screenshot below:

Next, go to Image>Adjustments>Color Balance. follow like shown in the screenshot below:

The result should be similar to this:

Step 9
Active the lady layer and then add layer mask from the bottom of layers palette.

Then take soft black brush with big size (about 300 px but it depends on your document size) and erase rough edge of water part:


The result should be similar to this:

Step 10
Create a new layer on the bottom lady layer and then fill the layer with black (# 000000). change layer name to "lens flare".

Go to Filter>Render>Lens Flare:

When the Lens Flare box opens, input the following:


Set this layer to Screen.

Step 11
Go to cloud layer then press Ctrl+J to duplicate layer, press (V) to activate Move tool and drag cloud copy image to canvas bottom and then Press Ctrl+T right-click and choose Flip Vertical, then drag cloud copy layer to top.

Set this layer to Soft Light.

Add layer mask to this layer from the bottom of layers palette.

Then take soft black brush with big size and erase rough edge of cloud part:

The result should be similar to this:

Step 12: Creating a Light Effect
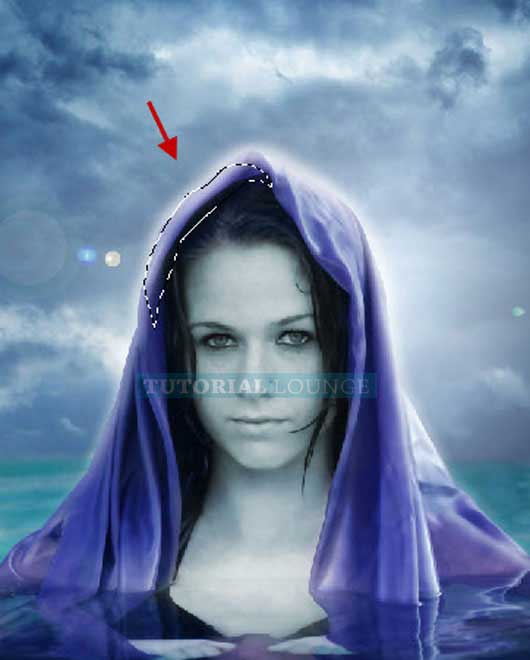
In this step, we will create a light effect in lady. Create another new layer on which we will create the light. Make sure to set the brush tool at 100% with 0% hardness and size 100 pixel. Then, set the foreground color to white color, Take the pen tool and create path a lady robe. After creating the path, right click on it to show the path command option box. Choose stroke path and use brush as the tool of stroking.
Create a New layer:

Setting Brush:

Create path a lady robe with Pen tool:

Right-click and choose Stroke path:


The result should be similar to this:

Go to Filter>Blur>Gaussian Blur:

Press (E) to activate Eraser tool and half erase of light part:

Reduce of opacity this layer to 79%:

Step 13
Open the Cosmos stock image (Ctrl+O) then drag with Move tool to main kanvas, activate the Transform tool (Ctrl+T), then while the "cosmos" layer is selected and then resize it as shown below:

Set this layer to Overlay and reduce opacity 74% with fill 86%.

Step 14
Next, open the Fantasy sky image, then drag with Move tool to main kanvas, activate the Transform tool (Ctrl+T), then while the "sky" layer is selected and then resize it as shown below:

Set this layer to Soft Light and reduce opacity 74% with fill 76%.

Step 15
Now go to Layer>New adjustment layer>Photo Filter.

When the Photo Filter box opens, input the following:

Step 16
Go to Layer>New Fill Layer>Solid color

When the Solid Color box opens, input the following:

Set this layer to Color and reduce opacity 68% with fill 59%.

Step 17: Creating Vignette
Create a new layer, rename this layer "Vignette" and then press Ctrl+A to selected all kanvas.

Now go to Edit>Stroke.

When the Stroke box opens, input the following:

Press Ctrl+D to deselect and then go to Filter>Blur>Gaussian Blur, When the Gaussian Blur box opens, input the following:

Reduce Opacity and fill to 80%.

Step 18
Stamp All Visible Layers (Ctrl + Shift + Alt + E), name the layer " mystical woman " press Ctrl+I to invert color.

Set this layer to Color.

Add a layer mask by clicking on the add layer mask icon at the bottom of the layer palette.

Press (G) to activate Gradient tool, choose linear gradient Foreground to transparent and then create a gradation from bottom to top.

Step 19: Setting tone
Go to Image>Adjustments>Color Balance. Use these settings:


And then use another adjustment: Hue/Saturation Use these settings:

Final Result
We are done...! here is the final result of this tutorial:

Copyright © . All Rights Reserved