How to Create a Cassette Tape Illustration from Scratch in Photoshop
You'll learn some great techniques like:
- Professional non-destructive workflows
- Mastering Photoshop's complex shape panel options
- Applying custom texturing and lighting to your illustrations
- Building up a complex, multi-layered composition for maximum realism.
Final Image
As always, this is the final image that we'll be creating:

Step 1
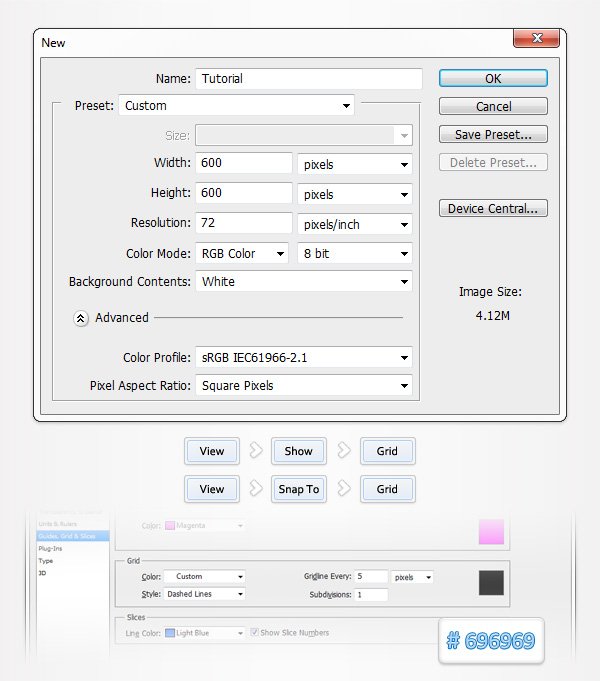
Open Photoshop and hit Control + N to create a new document. Enter all the data shown in the following image and click OK. Enable the Grid (View > Show > Grid) and the Snap to Grid (View > Snap To > Grid). For the moment you need a grid every 5px. Go to Edit > Preferences > Guides, Grid & Slices and focus on the Grid section. Enter 5 in the Gridline Every box and 1 in the Subdivision box. Also, set the color of the grid at #696969. Once you set all these properties click OK. Don't get discouraged by all that grid. It will ease your work later. You should also open the Info panel (Window > Info) for a live preview with the size and position of your shapes.
Step 2
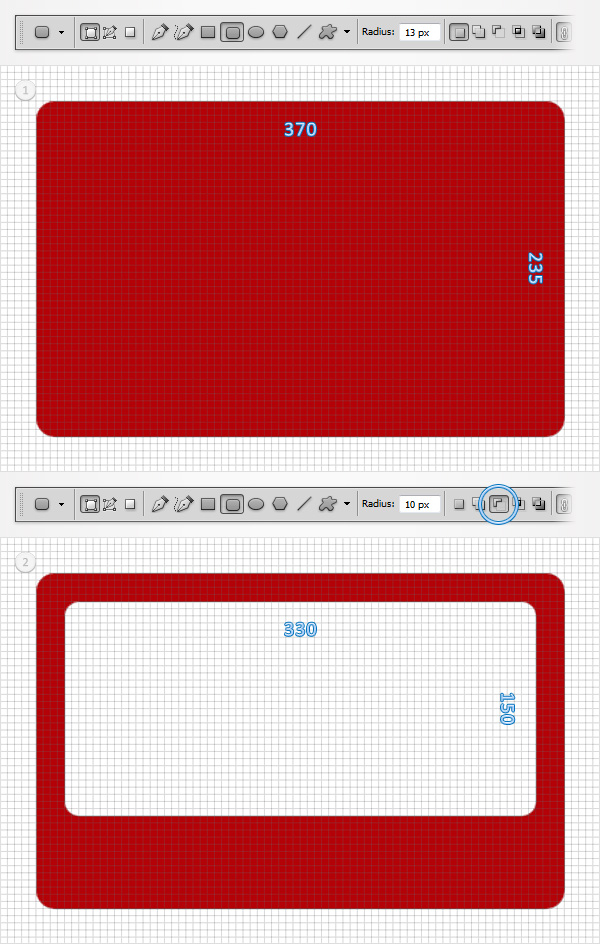
Set the foreground color at red, grab the Rounded Rectangle Tool, set the radius at 13px and create a 370 by 235px vector path. Select it and continue with the Rounded Rectangle Tool. Set the radius at 10px, check the "Subtract from shape area" button from the top bar and draw a 330 by 150px vector path as shown in the second image.
Step 3
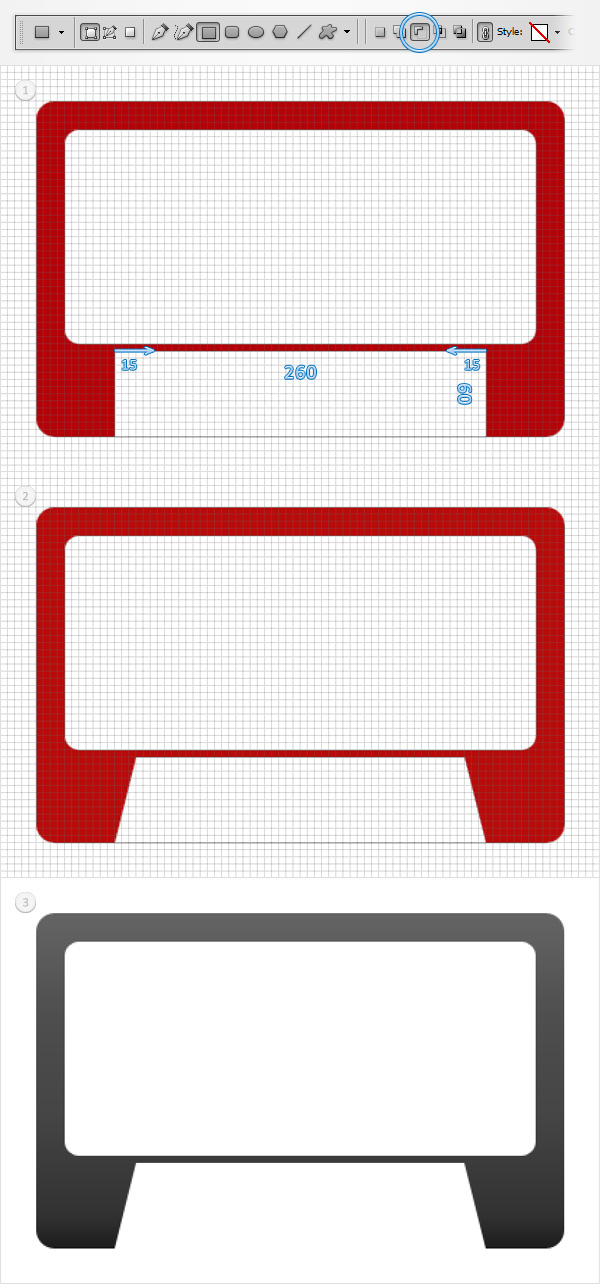
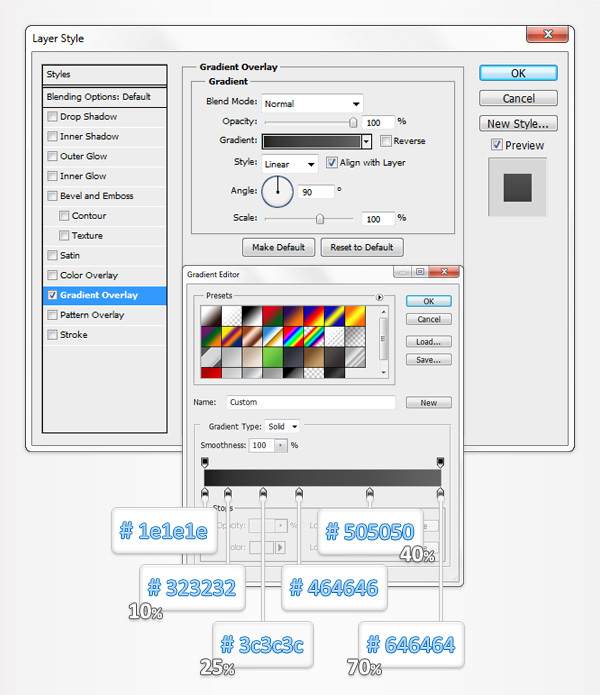
Make sure that the vector path created in the previous step is still selected and grab the Rectangle Tool. Check the "Subtract from shape area" button from the top bar and draw a 260 by 60px vector path as shown in the first image. Switch to the Direct Selection Tool and focus on this new rectangle. Select the top, left anchor point and move it 15px to the right then select the top, right anchor point and move it 15px to the left. In the end your vector path should look like in the second image. Move to the Layers panel and double click on this path to open the Layer Style panel. Activate the Gradient Overlay and enter the properties shown in the following image.
Gradient Overlay Blending Options Settings
Blend Mode: Normal
Opacity: 100%
Style: Linear
Angle: 90 degrees
Scale: 100%
Step 4
Grab the Rounded Rectangle Tool, set the radius at 13px, create a new 370 by 235px vector path and place it above the existing path. Select it, lower the Fill to 0% and open the Layer Style window. Activate the Inner Shadow and enter the data shown in the following image.
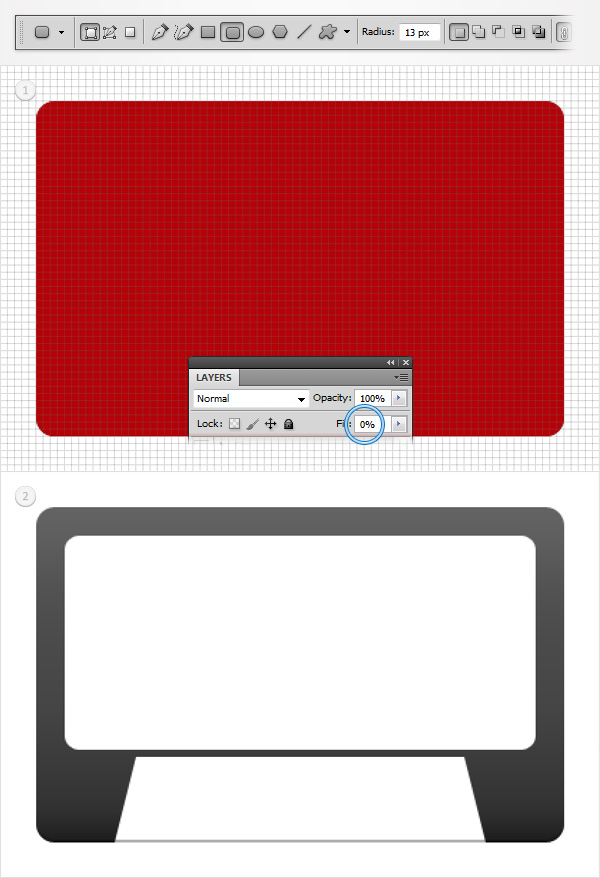
Inner Shadow Blending Options Settings
Blend Mode: Normal
Opacity: 30%
Angle: -90 degrees
Distance: 2px
Choke: 0%
Size: 0px

Step 5
Grab the Rounded Rectangle Tool, set the radius at 13px, create a new 370 by 235px vector path and place it above the existing paths. Select it, lower the Fill to 0% and open the Layer Style window. Activate the Inner Shadow and enter the data shown in the following image.
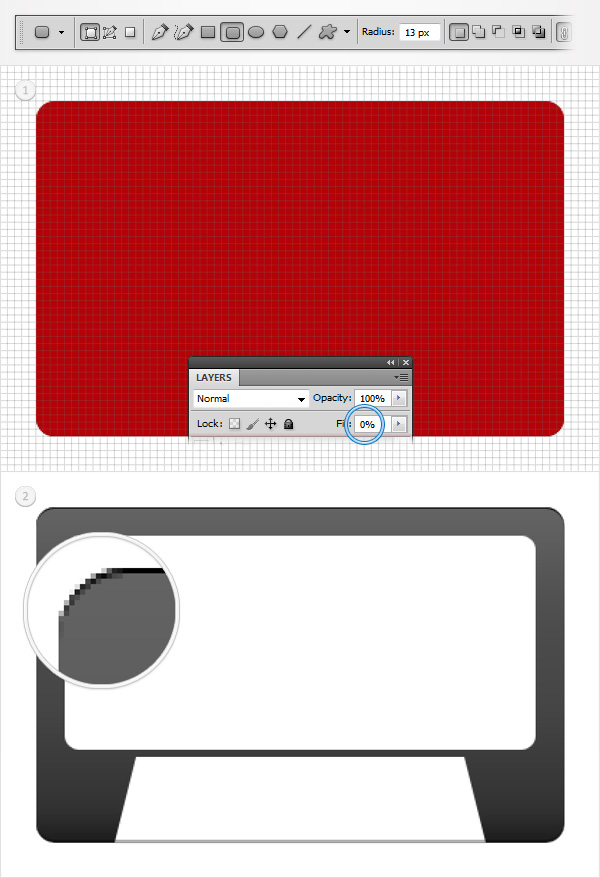
Inner Shadow Blending Options Settings
Blend Mode: Normal
Opacity: 100%
Angle: 90 degrees
Distance: 1px
Choke: 0%
Size: 0px

Step 6
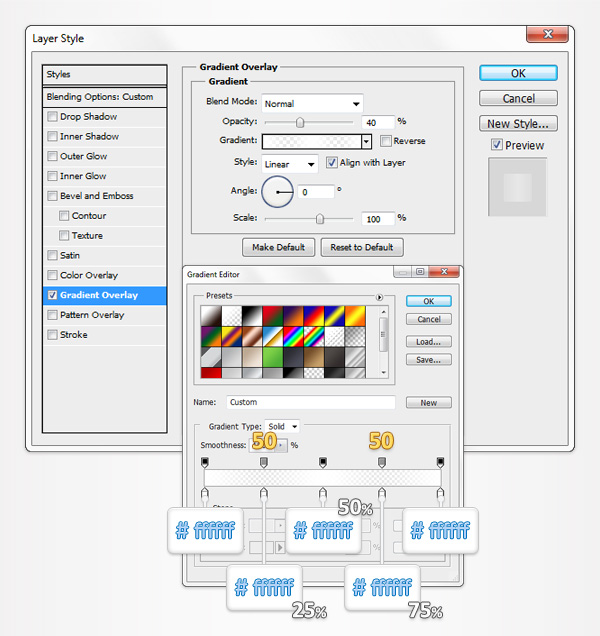
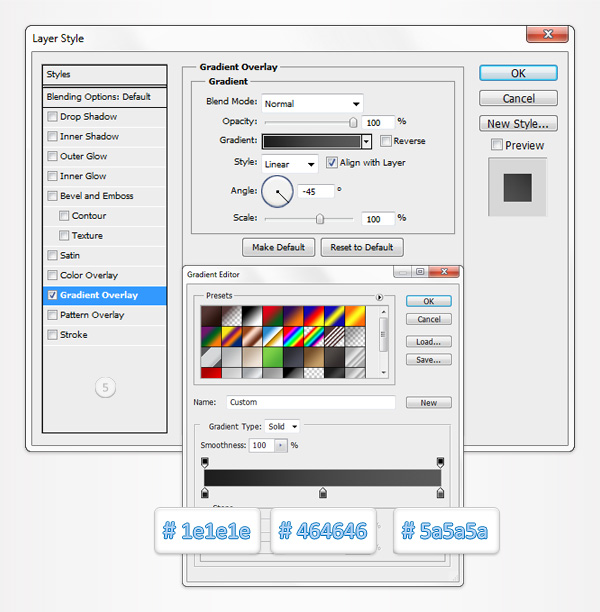
Move to the Layers panel, right click on the vector path made in the previous step and click on Convert to Smart Object. Select this new smart object, lower its Fill to 0% and open the Layer Style window. Activate the Gradient Overlay section and enter the properties shown in the following image.
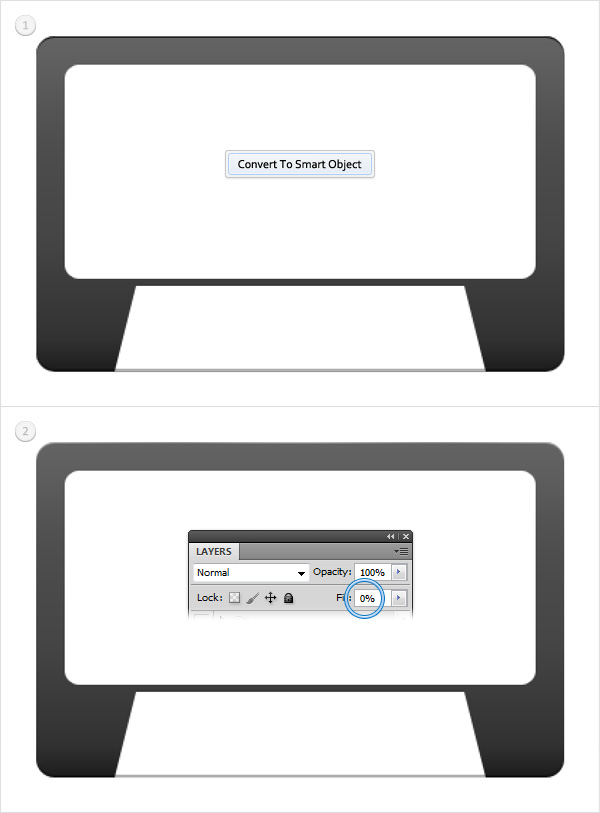
Gradient Overlay Blending Options Settings
Blend Mode: Normal
Opacity: 40%
Style: Linear
Angle: 0 degrees
Scale: 100%
Step 7
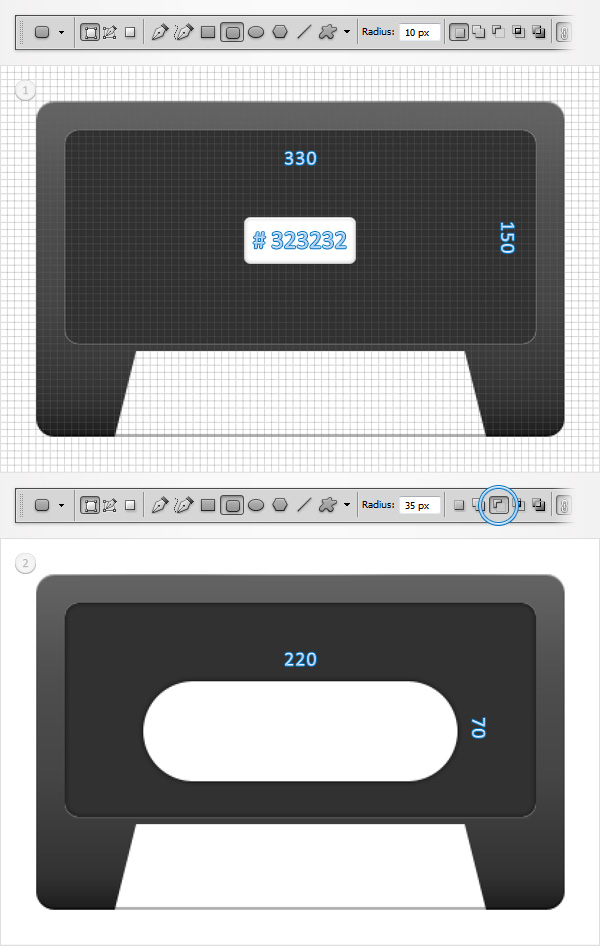
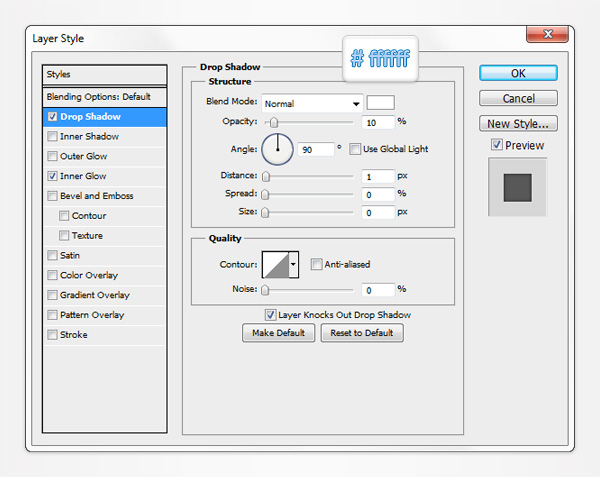
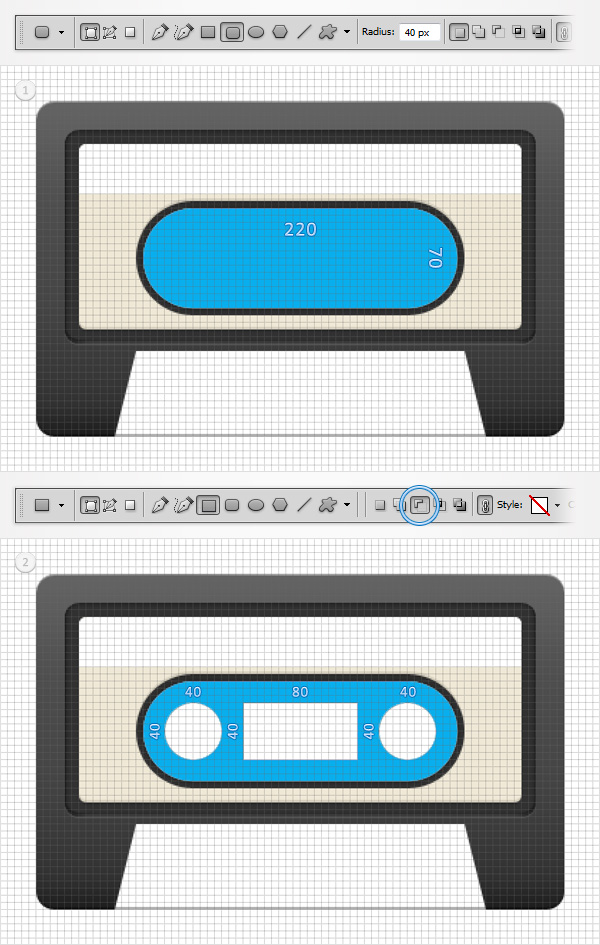
Set the foreground color at #323232, grab the Rounded Rectangle Tool, set the radius at 10px, create a 330 by 150px vector path and place it as shown in the fist image. Select it and continue with the Rounded Rectangle Tool. Set the radius at 35px, check the "Subtract from shape area" button and draw a 220 by 70px vector path as shown in the second image. Open the Layer Style window for this new vector path and enter the properties shown in the following images.
Drop Shadow Blending Options Settings
Blend Mode: Normal
Opacity: 10%
Angle: 90 degrees
Distance: 1px
Spread: 0px
Size: 0px
Inner Glow Blending Options Settings
Blending Mode: Normal
Opacity: 30%
Choke: 0%
Size: 5

Step 8
Grab the Rounded Rectangle Tool, set the radius at 10px, create a new 330 by 150px vector path and place it as shown in the fist image. Lower, its Fill to 0% then open the Layer Style window and enter the properties shown in the following image.
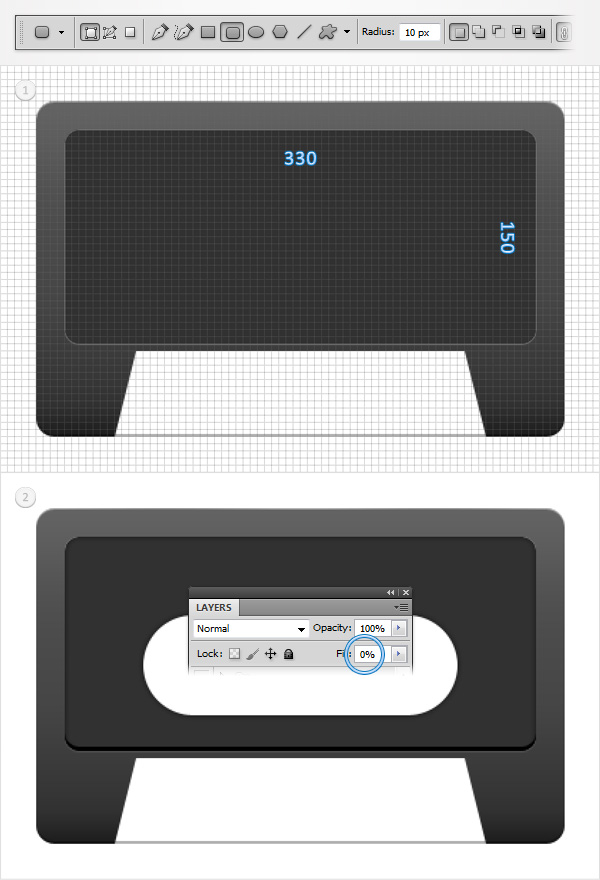
Inner Shadow Blending Options Settings
Blend Mode: Normal
Opacity: 100%
Angle: -90 degrees
Distance: 3px
Choke: 0%
Size: 0px

Step 9
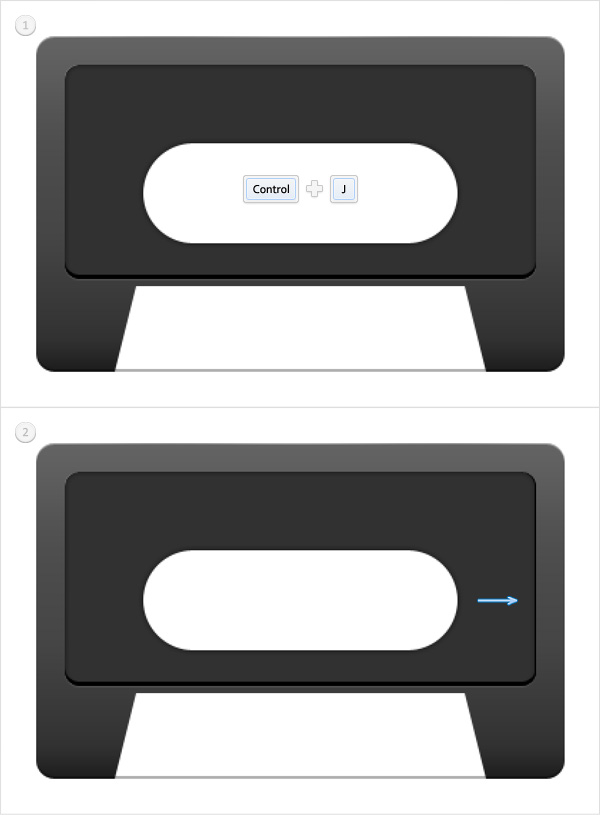
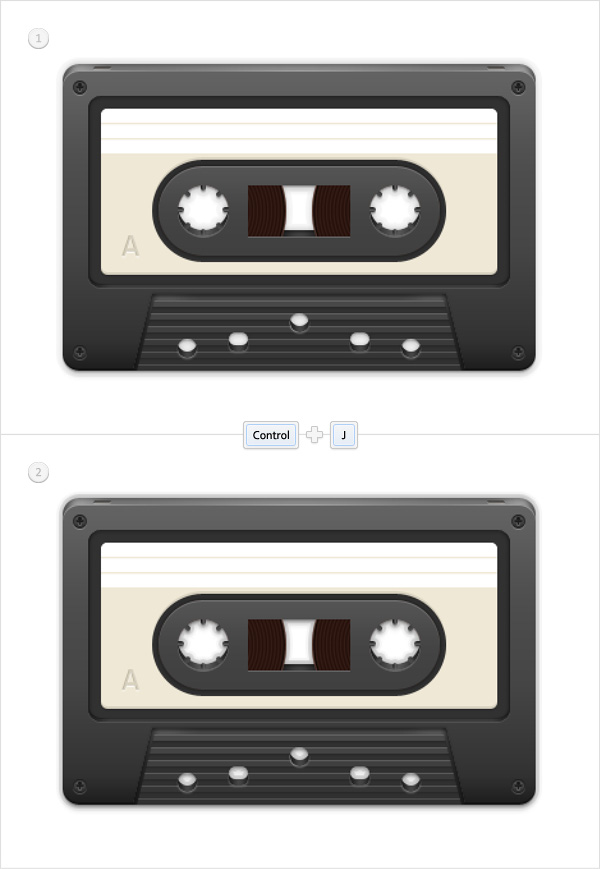
Reselect the vector path made in the previous step and duplicate it (Control + J). Select this copy, open the Layer Style window, focus on the Inner Shadow and enter the data shown in the following image.
Inner Shadow Blending Options Settings
Blend Mode: Normal
Opacity: 100%
Angle: 0 degrees
Distance: 1px
Choke: 0%
Size: 0px

Step 10
Reselect the vector path made in the previous step and duplicate it (Control + J). Again, select this copy, open the Layer Style window, focus on the Inner Shadow and enter the data shown in the following image.
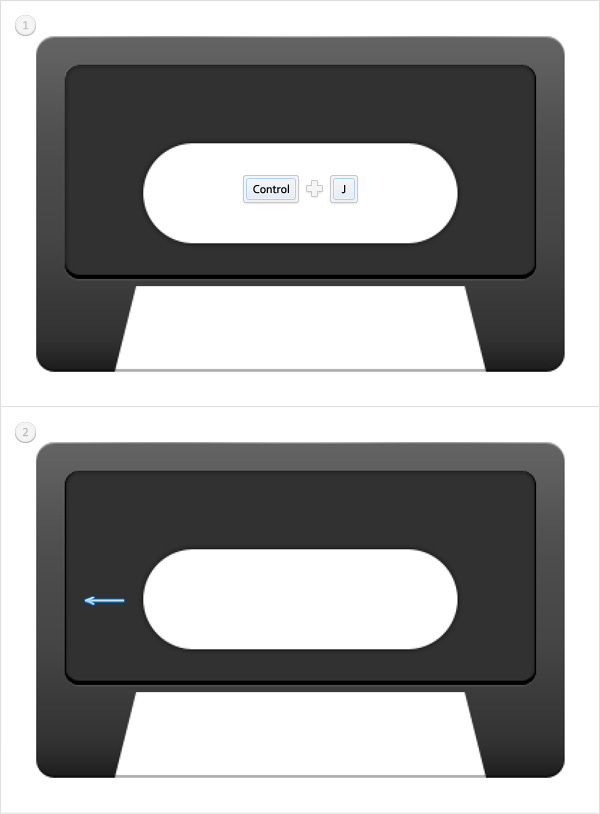
Inner Shadow Blending Options Settings
Blend Mode: Normal
Opacity: 100%
Angle: 180 degrees
Distance: 1px
Choke: 0%
Size: 0px

Step 11
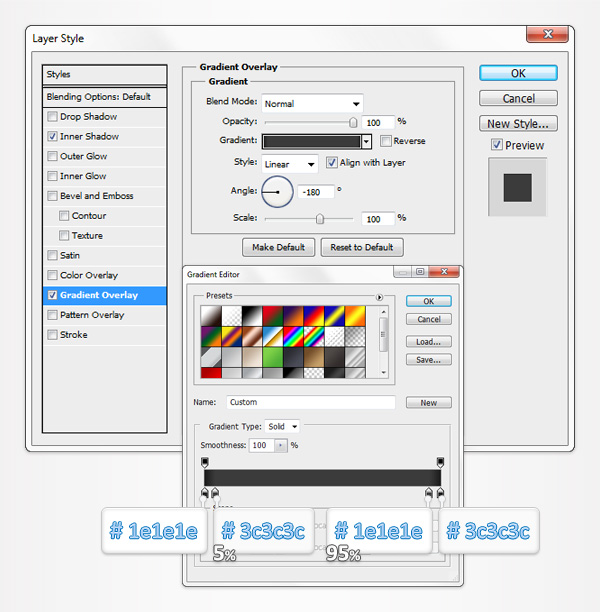
Reselect the three vector paths made in the last three steps and turn them into one simple smart object. Open the Layer Style for this new smart object and enter the properties shown in the following image.
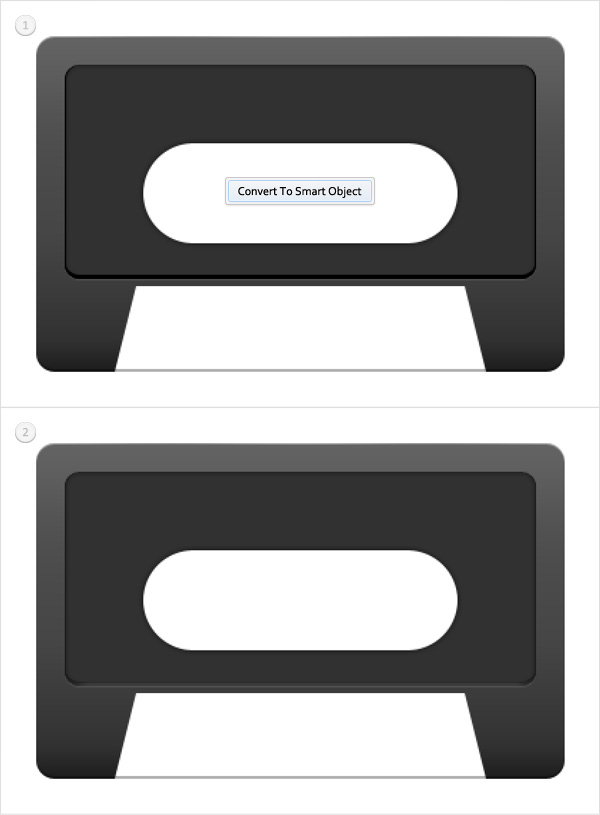
Inner Shadow Blending Options Settings
Blend Mode: Normal
Opacity: 25%
Angle: 90 degrees
Distance: 1px
Choke: 0%
Size: 0px

Gradient Overlay Blending Options Settings
Blend Mode: Normal
Opacity: 100%
Style: Linear
Angle: -180 degrees
Scale: 100%
Step 12
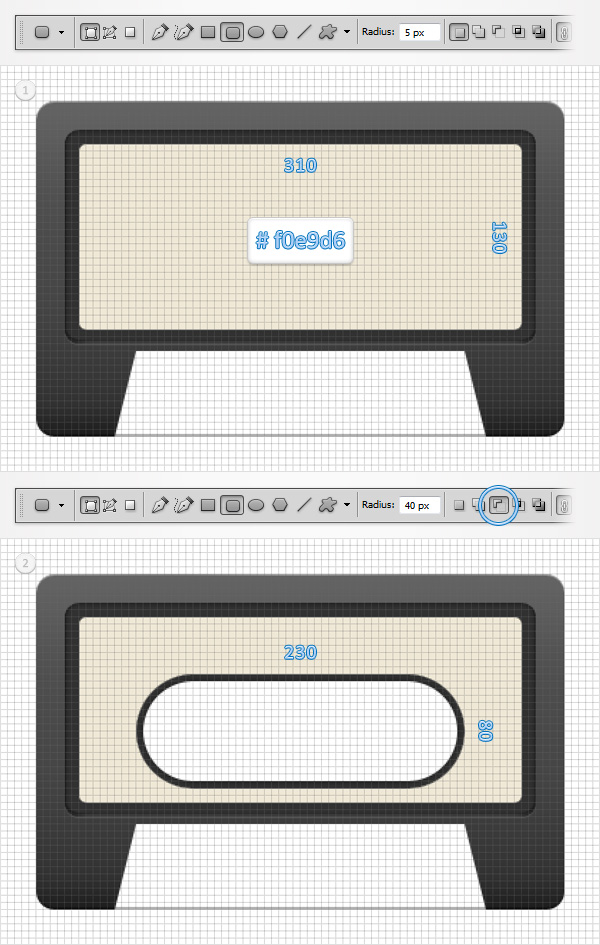
Set the foreground color at #f0e9d6, grab the Rounded Rectangle Tool, set the radius at 5px, create a 310 by 130px vector path and place it as shown in the fist image. Select it and continue with the Rounded Rectangle Tool. Set the radius at 40px, check the "Subtract from shape area" button and draw a 230 by 80px vector path as shown in the second image.
Step 13
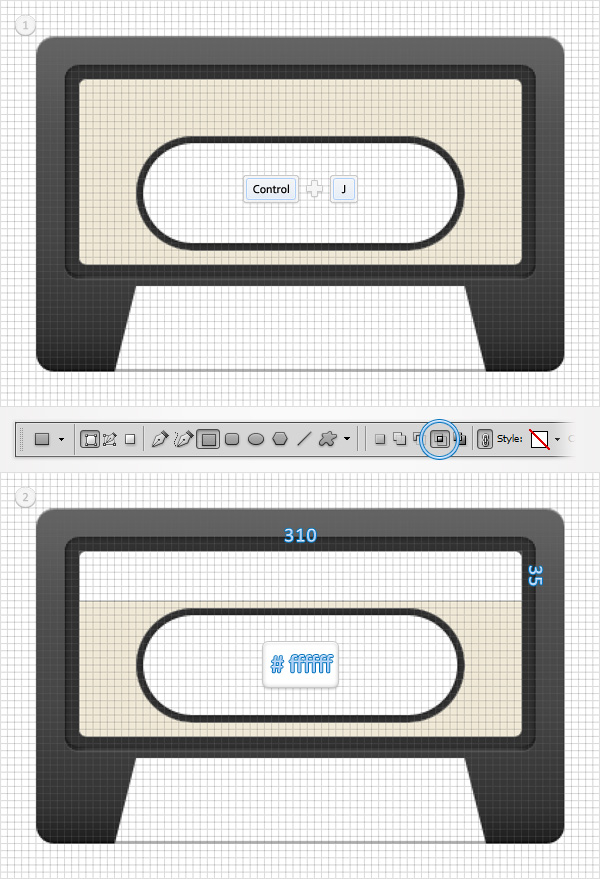
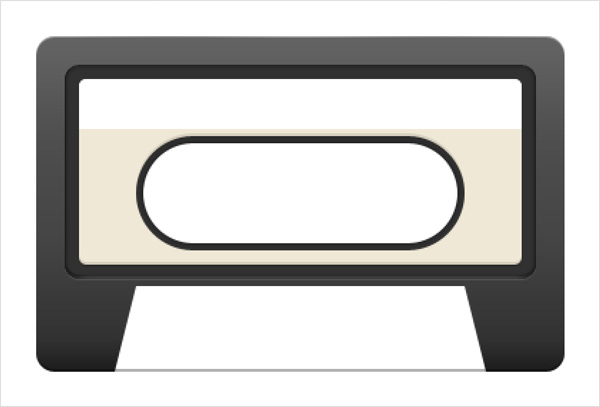
Reselect the path made in the previous step and duplicate it (Control + J). Select this copy, make it white and grab the Rectangle Tool. Check the "Intersect shape areas" button and draw a 310 by 35px vector path as shown in the second image.
Step 14
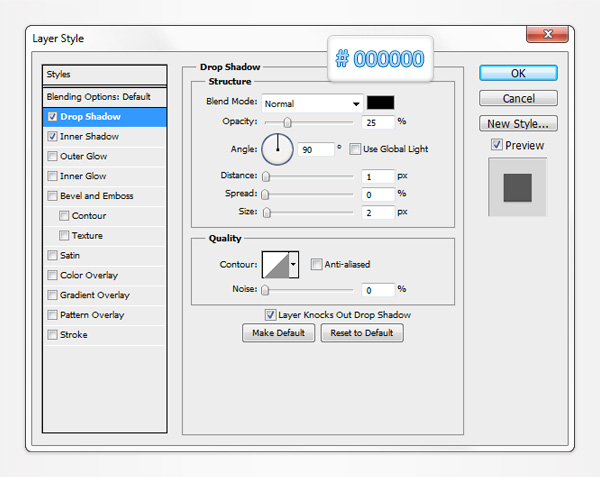
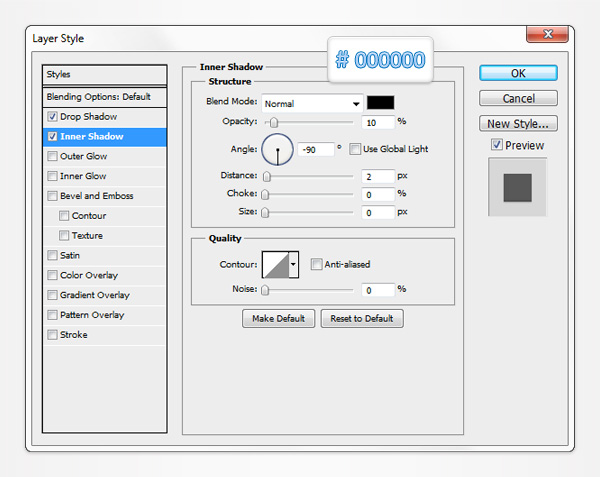
Focus on the vector path made in the twelfth step, open the Layer Style window and enter the properties shown in the following images.
Drop Shadow Blending Options Settings
Blend Mode: Normal
Opacity: 25%
Angle: 90 degrees
Distance: 1px
Spread: 0px
Size: 2px
Inner Shadow Blending Options Settings
Blend Mode: Normal
Opacity: 10%
Angle: -90 degrees
Distance: 2px
Choke: 0%
Size: 0px
Step 15
Pick a random blue for the foreground color, grab the Rounded Rectangle Tool, set the radius at 40px, create a 220 by 70px vector path and place it as shown in the fist image. Select it and switch to with the Rectangle Tool. Check the "Subtract from shape area" button and draw a 40 by 80px vector path as shown in the second image. Make sure that your vector path remains selected and grab the Ellipse Tool. Check the "Subtract from shape area" button and draw two, 40 by 40px vector paths as shown in the second image.
Step 16
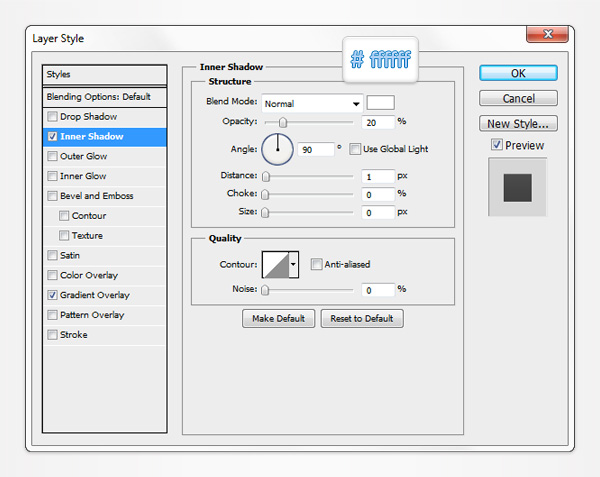
Focus on the vector path made in the previous step, open the Layer Style window and enter the properties shown in the following images.

Inner Shadow Blending Options Settings
Blend Mode: Normal
Opacity: 20%
Angle: 90 degrees
Distance: 1px
Choke: 0%
Size: 0px
Gradient Overlay Blending Options Settings
Blend Mode: Normal
Opacity: 100%
Style: Linear
Angle: 90 degrees
Scale: 100%

Step 17
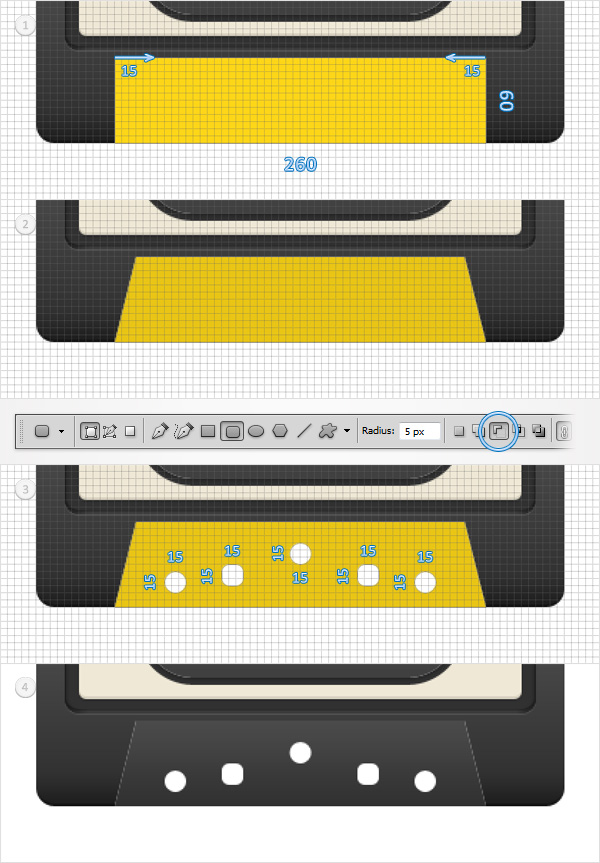
Pick a random yellow for the foreground color and grab the Rectangle Tool. Make a 260 by 60px vector path and place it as shown in the first image. Switch to the Direct Selection Tool and focus on the top side of this new rectangle. Select the top, left anchor point and move it 15px to the right then select the top, right anchor point and move it 15px to the left. This should turn your rectangle into a trapezoid. Select it and grab the Ellipse Tool. Check the "Subtract from shape area" button and draw three, 15 by 15px circles as shown in the third image. Keep focusing on this yellow path and grab the Rounded Rectangle. Set the radius at 5px, check the "Subtract from shape area" button and draw two, 15 by 15px vector paths as shown in the third image. Move to the Layers panel, open the Layer Style window for your yellow vector path and enter the properties shown in the following image.
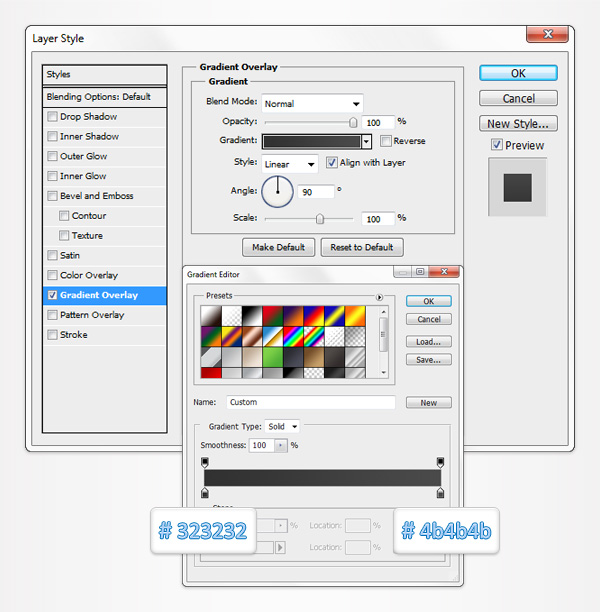
Gradient Overlay Blending Options Settings
Blend Mode: Normal
Opacity: 100%
Style: Linear
Angle: 90 degrees
Scale: 100%
Step 18
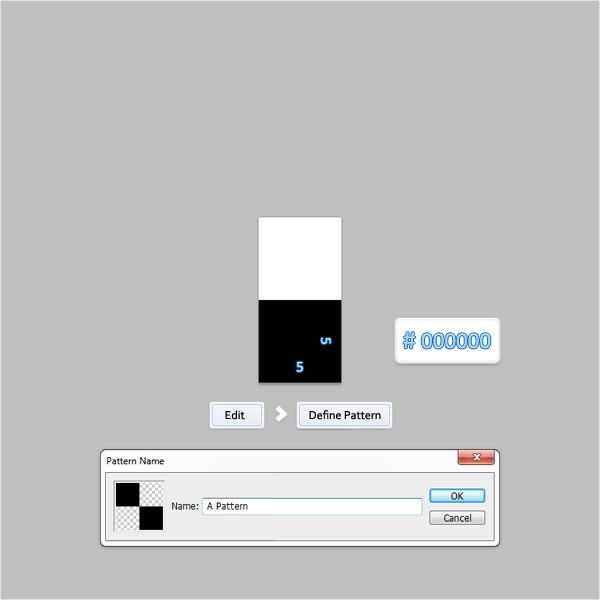
Next, you need to create your own simple pattern. First, hit Control + N to create a new document. Enter 5 in the width box and 10 in the height box then click OK. The Grid and the Snap to Grid should be are already enabled. First, move to the Layers panel and delete the "Background" layer. Next, set the foreground color at black and grab the Rectangle Tool. Create a 5 by 5px vector path and place it as shown in the following image. Finally, simply go to Edit > Define Pattern. Pick a name for your pattern, click OK and you got your pattern. Close this document and return to the first one.
Step 19
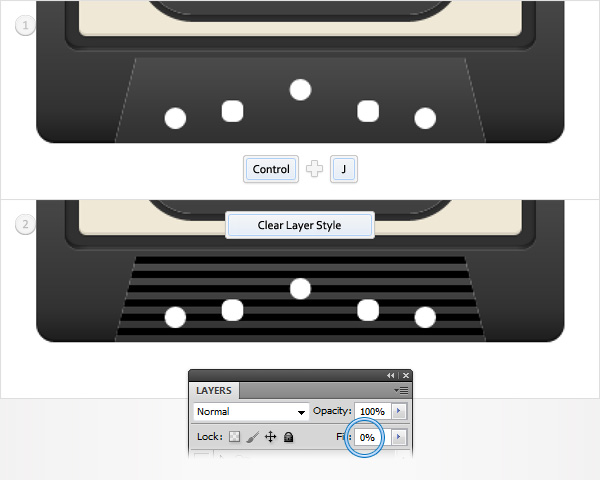
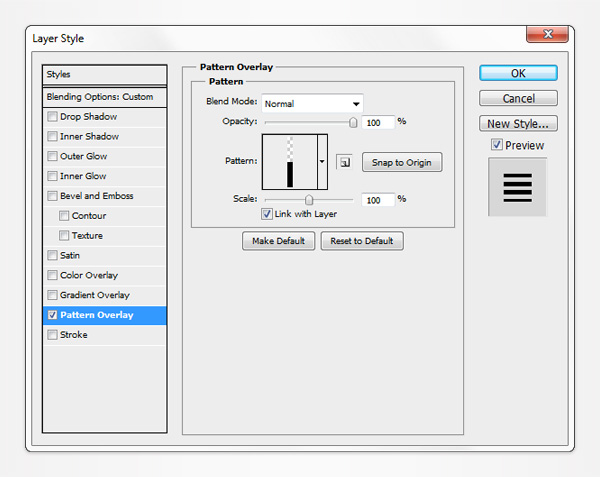
Reselect the vector path made in the seventeenth step and duplicate it (Control + J). Move to the Layers panel, right click on this new copy and click on Clear Layer Style. Now select it, lower its Fill to 0% and open the Layer Style window. Activate the Pattern Overlay section and enter the properties shown in the following image. Use the pattern made in the previous step.
Pattern Overlay Blending Options Settings
Blend Mode: Normal
Opacity: 100%
Scale: 100%
Step 20
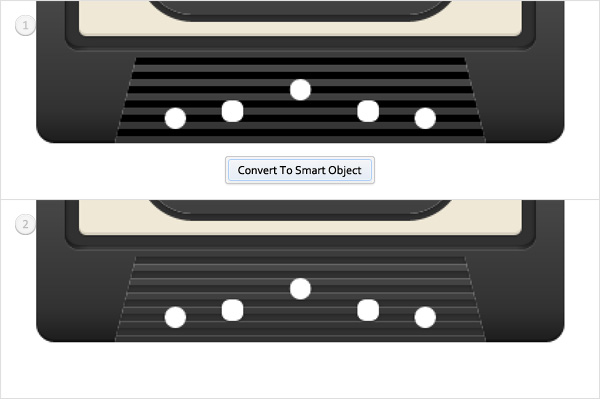
Reselect the vector path made in the previous step and convert it to a smart object. Select it, open the Layer Style window and enter the properties shown in the following image.
Drop Shadow Blending Options Settings
Blend Mode: Normal
Opacity: 15%
Angle: 90 degrees
Distance: 1px
Spread: 0px
Size: 0px
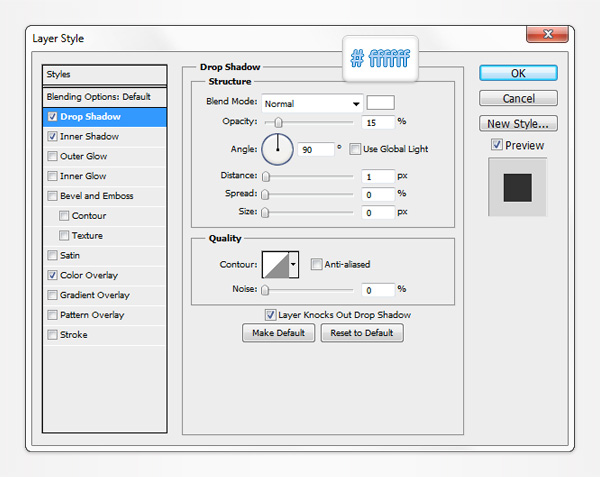
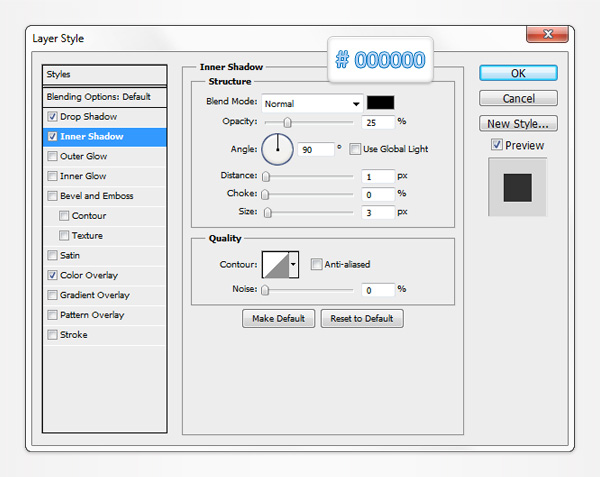
Inner Shadow Blending Options Settings
Blend Mode: Normal
Opacity: 25%
Angle: 90 degrees
Distance: 1px
Choke: 0%
Size: 3px
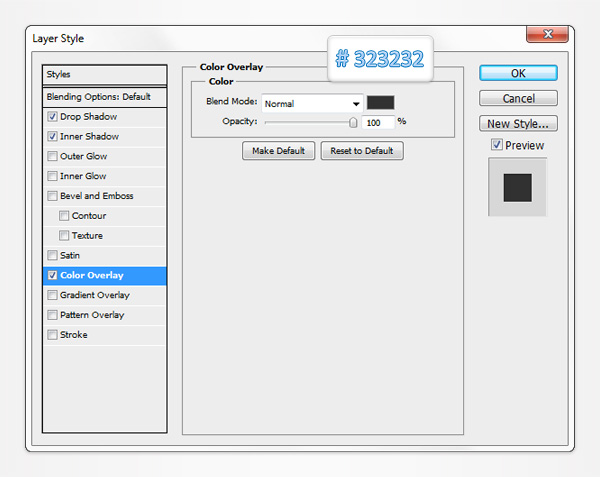
Color Overlay Options Settings
Blending Mode: Normal
Opacity: 100%
Step 21
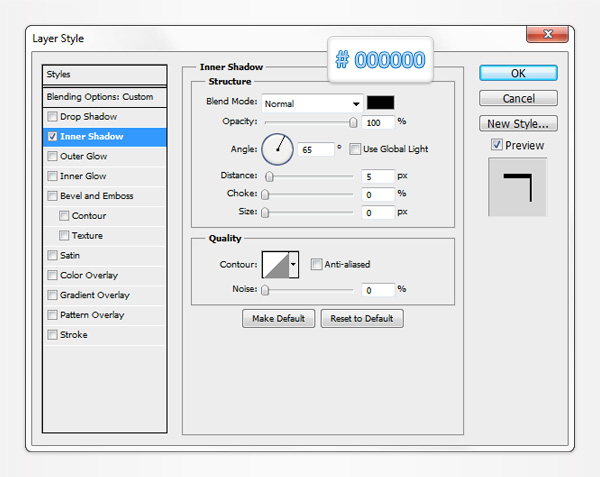
Re-draw that yellow trapezoid from the seventeenth step. Select it, lower the Fill to 0% then open the Layer Style window and enter the properties shown in the following image.
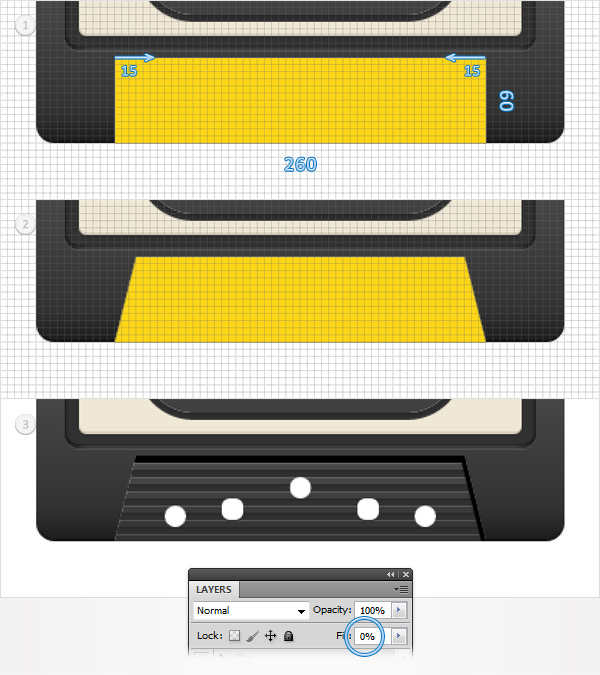
Inner Shadow Blending Options Settings
Blend Mode: Normal
Opacity: 100%
Angle: 65 degrees
Distance: 5px
Choke: 0%
Size: 0px
Step 22
Reselect the vector path made in the previous step and duplicate it (Control + J). Select this copy, open the Layer Style window, focus on that Inner Shadow and enter the data shown in the following image.
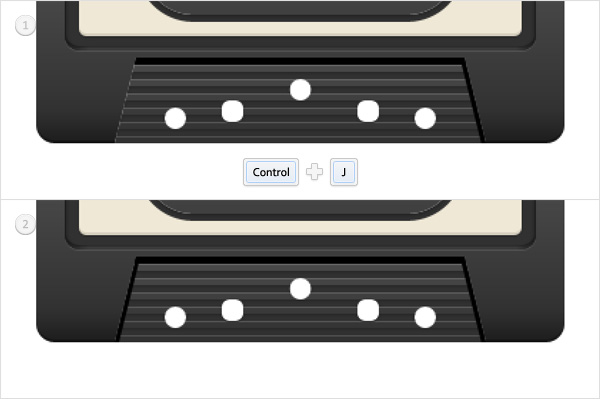
Inner Shadow Blending Options Settings
Blend Mode: Normal
Opacity: 100%
Angle: 180 degrees
Distance: 3px
Choke: 0%
Size: 0px

Step 23
Reselect the two vector paths made in the last two steps and turn them into a smart object. Open the Layer Style for this new smart object and enter the properties shown in the following images.
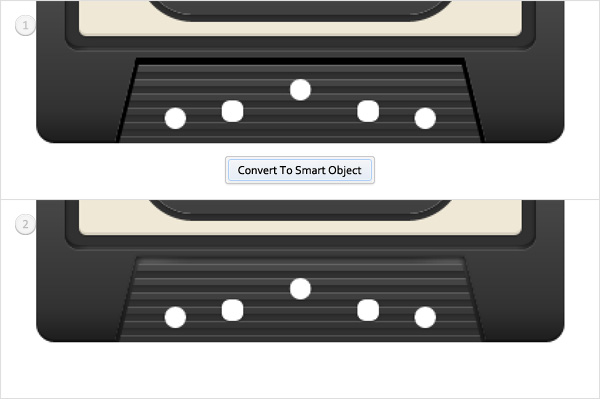
Drop Shadow Blending Options Settings
Blend Mode: Multiply
Opacity: 20%
Angle: -90 degrees
Distance: 1px
Spread: 0px
Size: 1px

Inner Shadow Blending Options Settings
Blend Mode: Multiply
Opacity: 40%
Angle: 90 degrees
Distance: 2px
Choke: 0%
Size: 2px

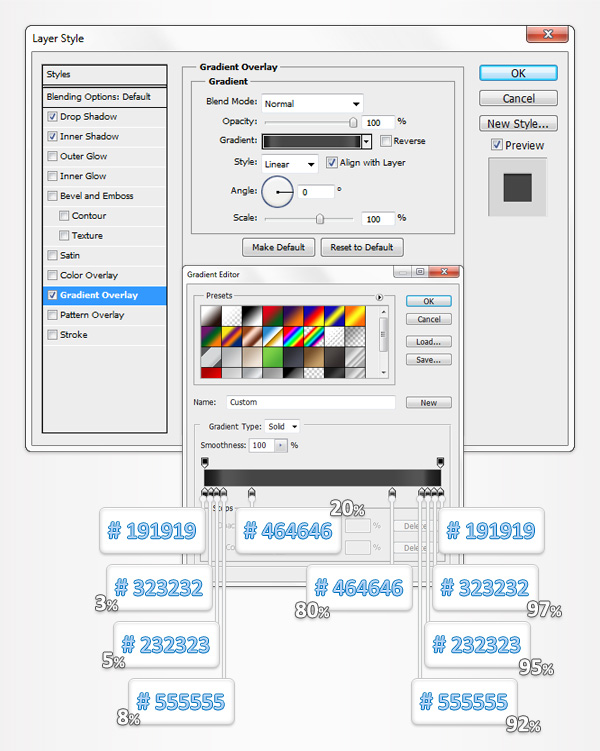
Gradient Overlay Blending Options Settings
Blend Mode: Normal
Opacity: 100%
Style: Linear
Angle: 0 degrees
Scale: 100%
Step 24
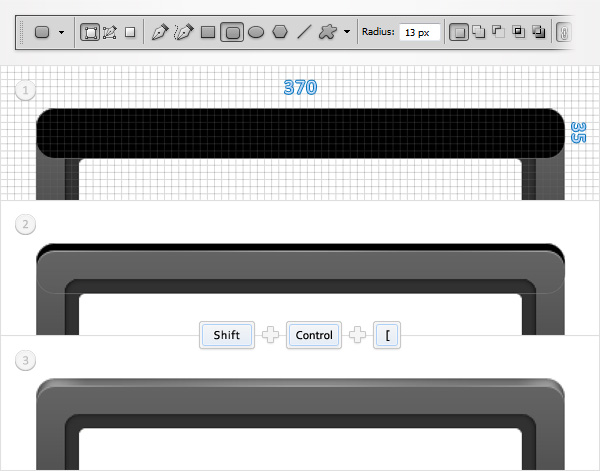
Grab the Rounded Rectangle Tool, set the radius at 13px, create a 370 by 235px vector path and place it as shown in the first image. Select it and send it to back (Shift + Control + [ ). Open the Layer Style window for this new shape and enter the properties shown in the following images.
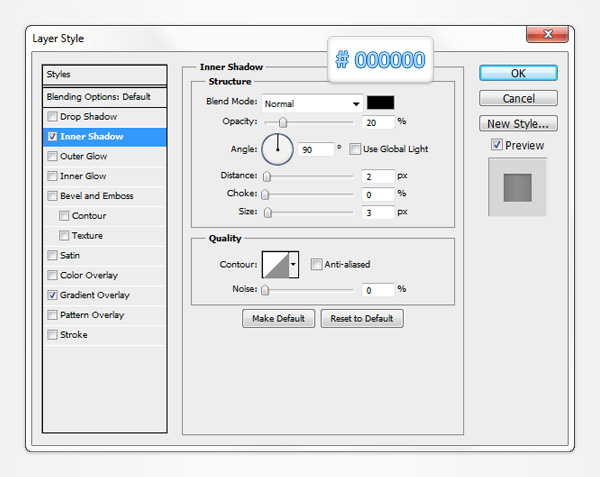
Inner Shadow Blending Options Settings
Blend Mode: Normal
Opacity: 20%
Angle: 90 degrees
Distance: 2px
Choke: 0%
Size: 3px
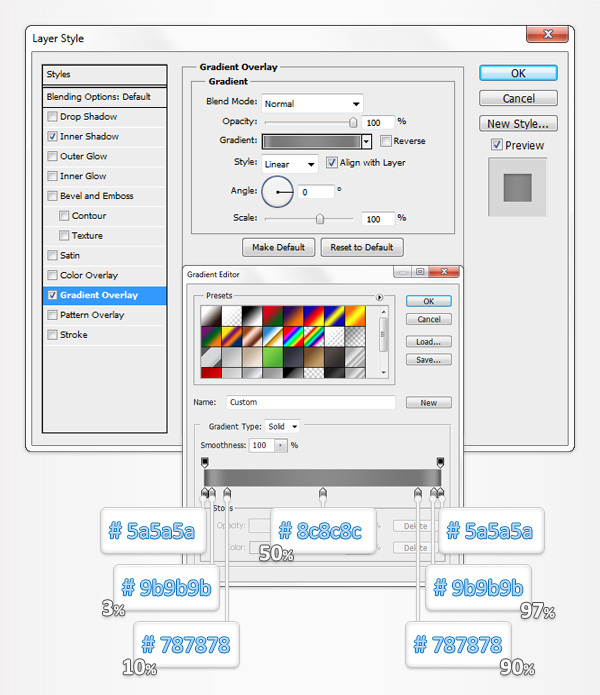
Gradient Overlay Blending Options Settings
Blend Mode: Normal
Opacity: 100%
Style: Linear
Angle: 0 degrees
Scale: 100%
Step 25
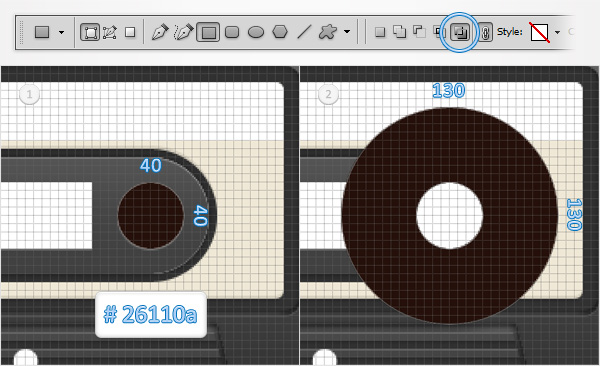
Set the foreground color at #26110a, grab the Ellipse Tool, create a 40 by 40px vector path and place it as shown in the first image. Select it and continue with the Ellipse Tool. Check the "Exclude overlapping shape area" button and draw a 130 by 130px vector path as shown in the second image. In the end tour vector path should look like in the second image.
Step 26
Open the Layer Style window for the vector path made in the previous step and enter the properties shown in the following images.

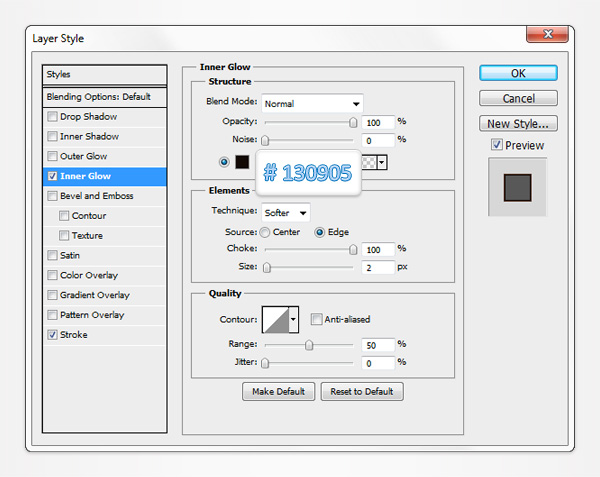
Inner Glow Blending Options Settings
Blending Mode: Normal
Opacity: 100%
Choke: 100%
Size: 2
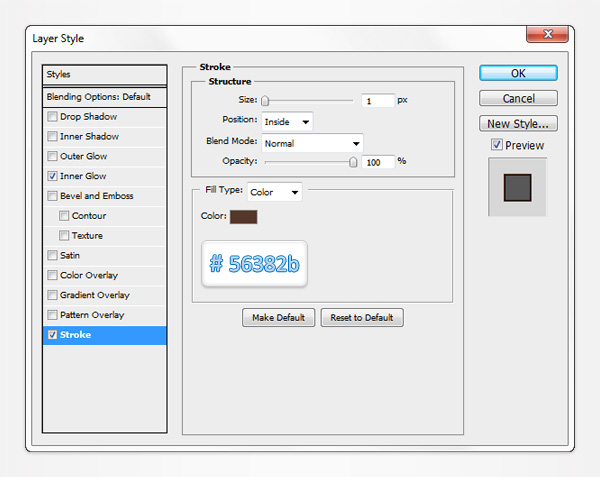
Stroke Blending Options Settings
Size: 1px
Position: Inside
Blend Mode: Normal
Opacity: 100%
Fill Type: Color
Step 27
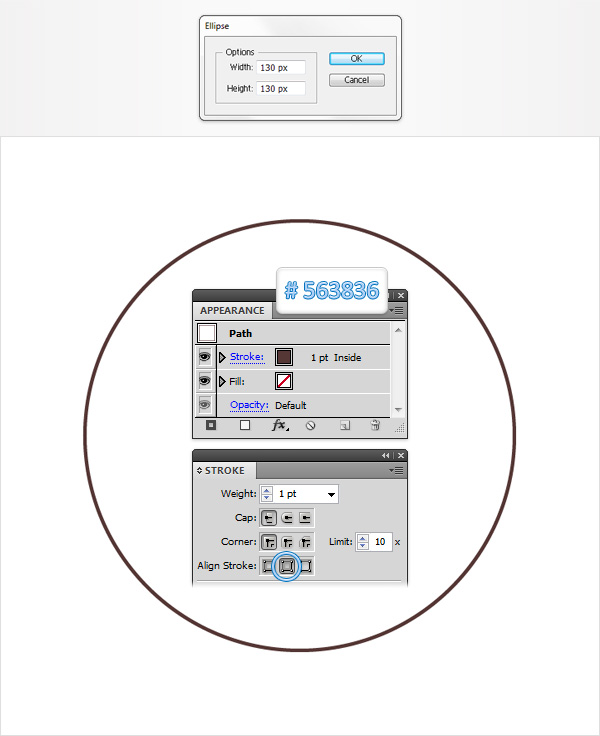
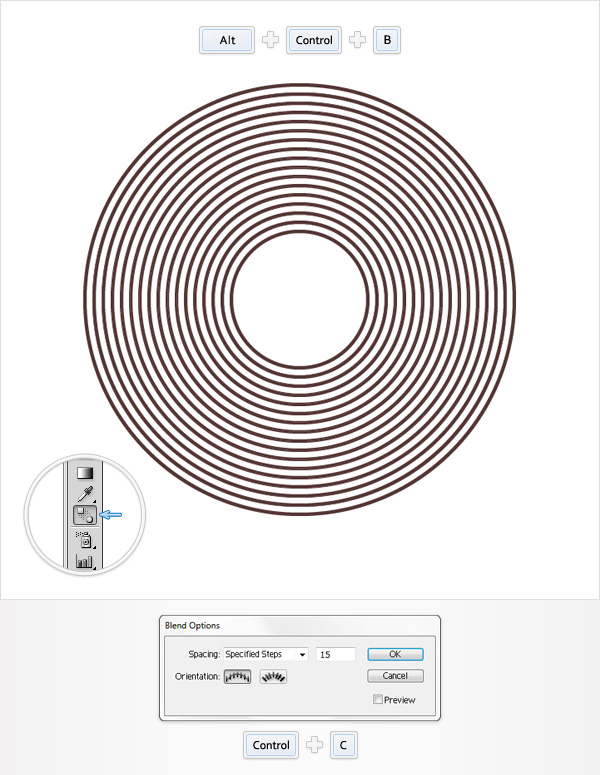
Leave your Photoshop file for a moment and open Illustrator. Hit Control + N to create a new document. Enter 150 in the width and height box Pick the Ellipse Tool(L) and simply click on your artboard. Enter 130 in the width and height boxes and click OK. This will create a 130px circle. Select it and open the Appearance panel (Window > Appearance). Remove the color from the fill and set the stroke color at #563836. Select the stroke from the Appearance panel, make it 1pt wide and open the Stroke panel (Window > Stroke). Focus on the Align Stroke section and simply click on the "Align Stroke to Inside" button.
Step 28
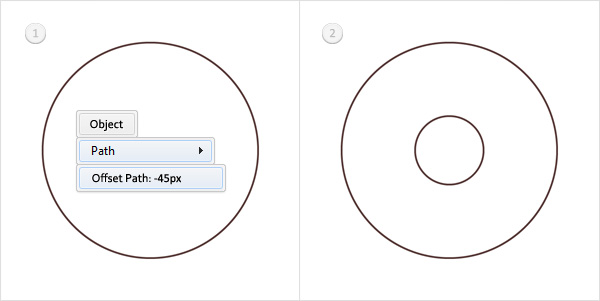
Reselect the circle made in the previous step and go to Object > Path > Offset Path. Enter a -45px Offset and click OK.
Step 29
Reselect both circles made in the last two steps, hit Alt + Control + B then double click on the Blend Tool from your Toolbar. Select "Specified Steps" from the Spacing drop down menu, enter 15 in the white box and click OK. In the end you should have a bunch of concentric circles. Select these shapes and hit Control + C to copy them.
Step 30
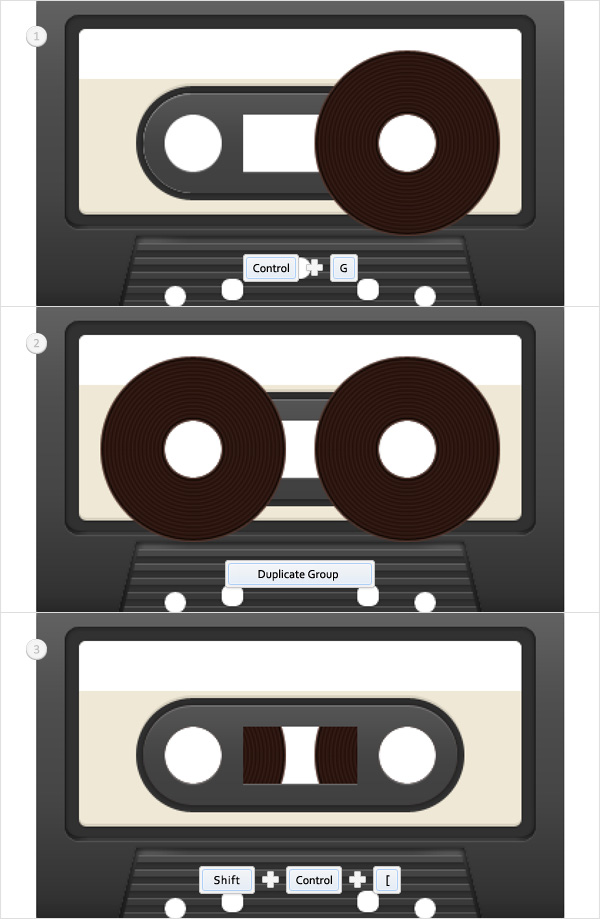
Return to your Photoshop file and simply hit Control + V to paste the concentric circles made in the previous step. Now, the Paste window will pop-up. Check the Smart Object box and click OK. Select this new smart object, lower its opacity to 30% and place it above your brown vector path.

Step 31
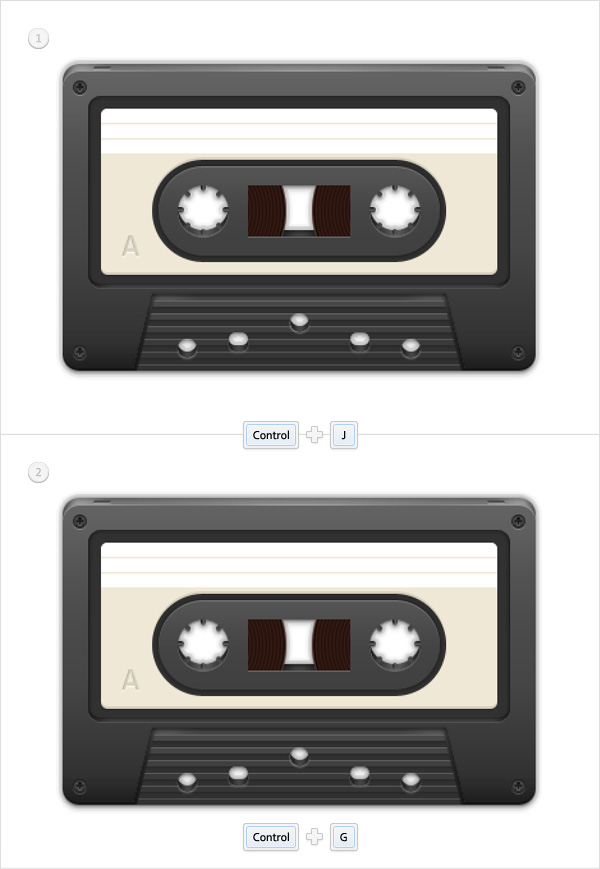
Reslect the smart object added in the previous step along with the brown vector path and group them (Control + G). Make a copy of this group and move it to the left as shown in the second image. Reselect both groups and send them to back (Shift + Control + [ ).
Step 32
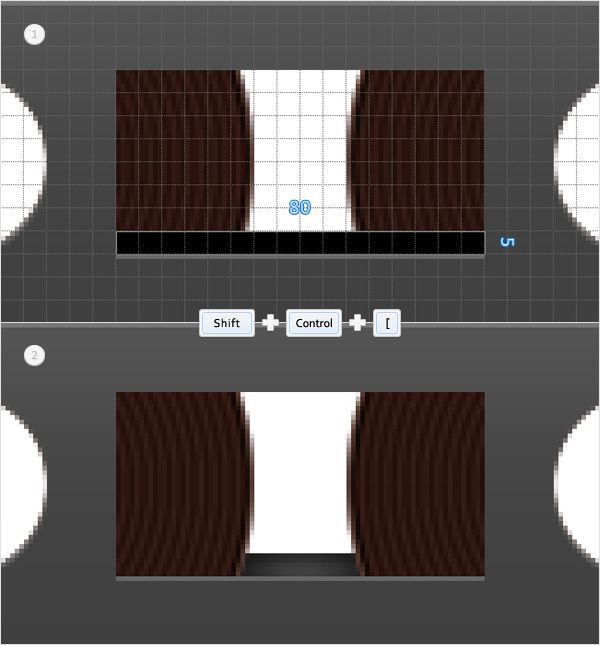
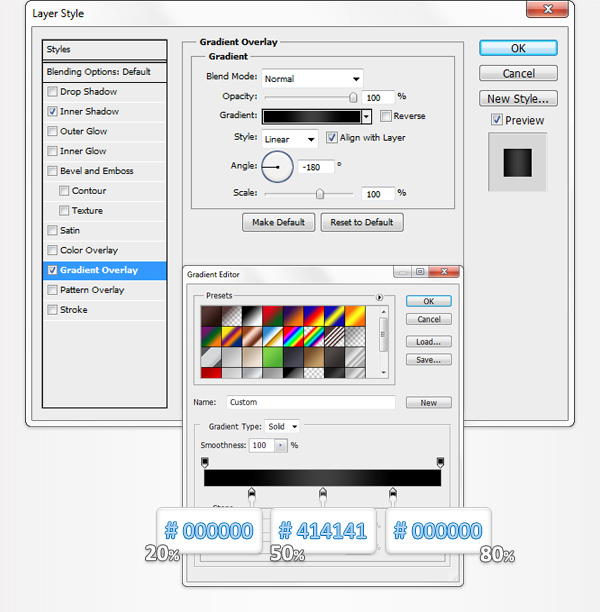
Pick the Rectangle Tool, create an 80 by 5px vector shape and place it as shown in the first image. Select it, send it to back (Shift + Control + [ ) and open the Layer Style window. Enter the properties shown in the following images and click OK.
Inner Shadow Blending Options Settings
Blend Mode: Normal
Opacity: 30%
Angle: 90 degrees
Distance: 2px
Choke: 0%
Size: 1px

Gradient Overlay Blending Options Settings
Blend Mode: Normal
Opacity: 100%
Style: Linear
Angle: -180 degrees
Scale: 100%
Step 33
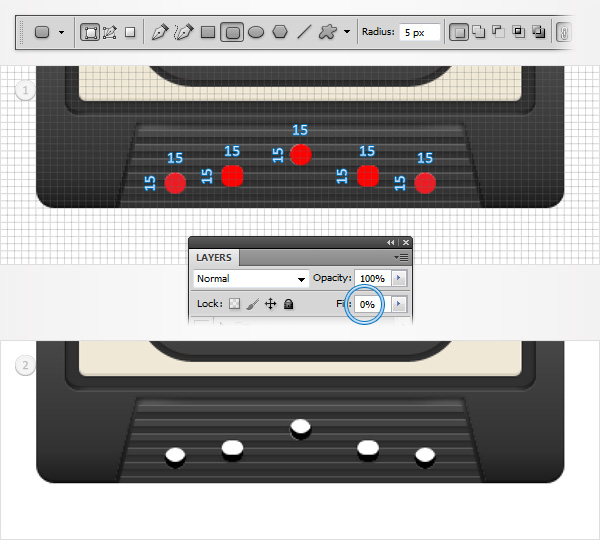
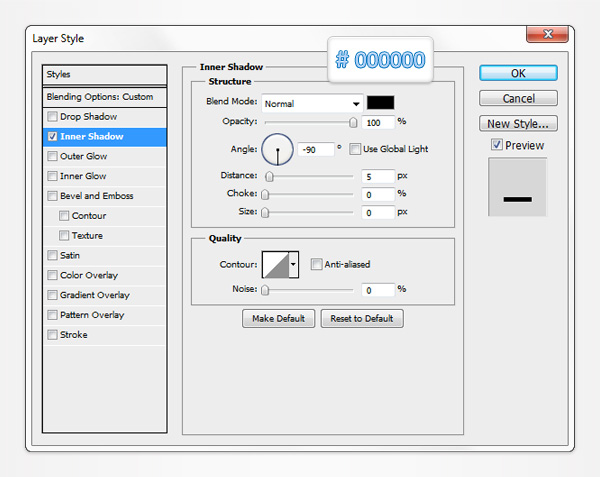
Set the foreground color at red. Grab the Rounded Rectangle Tool, set the radius at 5px, create two, 15 by 15px vector paths and place them as shown in the first image. Switch to the Ellipse Tool, create three, 15 by 15px vector shapes and place them as shown in the first image. Select one of these red shapes, lower its Fill to 0% and open the Layer Style window. Enter the properties shown in the following image and click OK. Move to the Layers panel and add the same properties for the remaining red shapes.
Inner Shadow Blending Options Settings
Blend Mode: Normal
Opacity: 100%
Angle: -90 degrees
Distance: 5px
Choke: 0%
Size: 0px
Step 34
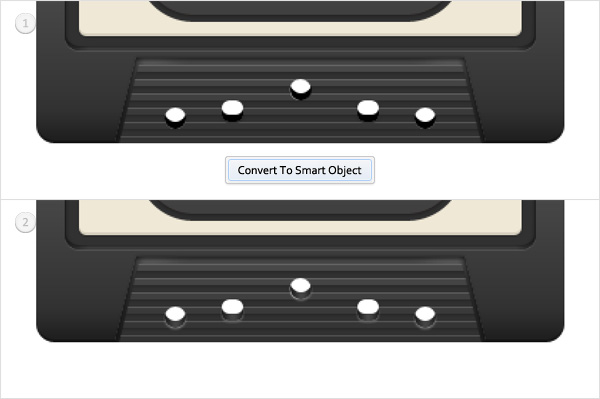
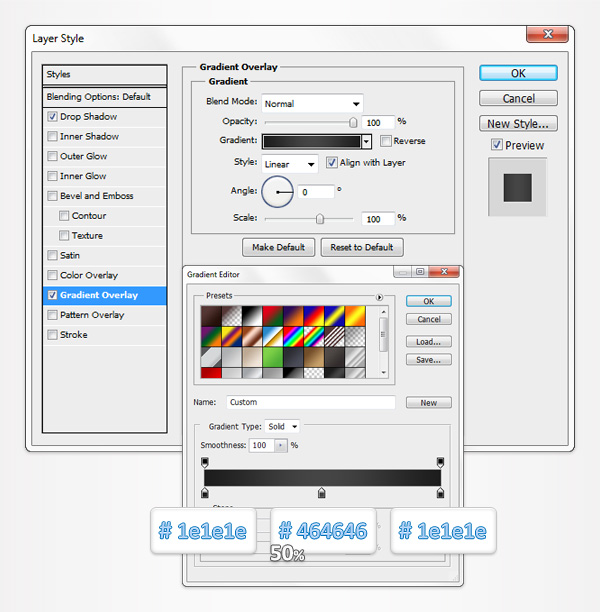
Select one of the vector shapes made in the previous step and convert it to a smart object. Open the Layer Style window for this new smart object and enter the properties shown in the following image. Repeat the same technique for the rest of the shapes made in the previous step.
Drop Shadow Blending Options Settings
Blend Mode: Normal
Opacity: 30%
Angle: 90 degrees
Distance: 1px
Spread: 0px
Size: 1px

Gradient Overlay Blending Options Settings
Blend Mode: Normal
Opacity: 100%
Style: Linear
Angle: 0 degrees
Scale: 100%
Step 35
Pick a random yellow for the foreground color, grab the Ellipse Tool, create two, 40 by 40px vector shapes and place them as shown in the first image. Select one of these new shapes, lower its Fill to 0%, open the Layer Style window and enter the properties shown below. Move to the other yellow circle and repeat the techniques.
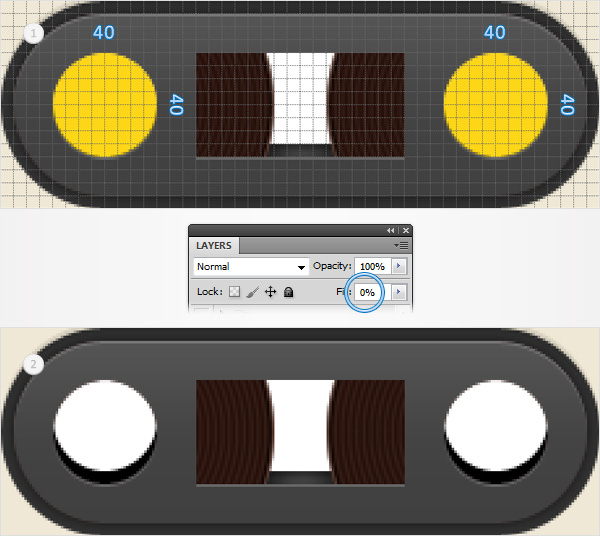
Inner Shadow Blending Options Settings
Blend Mode: Normal
Opacity: 100%
Angle: -90 degrees
Distance: 5px
Choke: 0%
Size: 0px

Step 36
Reselect one of the vector shapes made in the previous step and convert it to a smart object. Open the Layer Style window for this new smart object and enter the properties shown in the following image. Move to the other shape and repeat the techniques. Select both smart object and send them to back (Shift + Control + [ ).
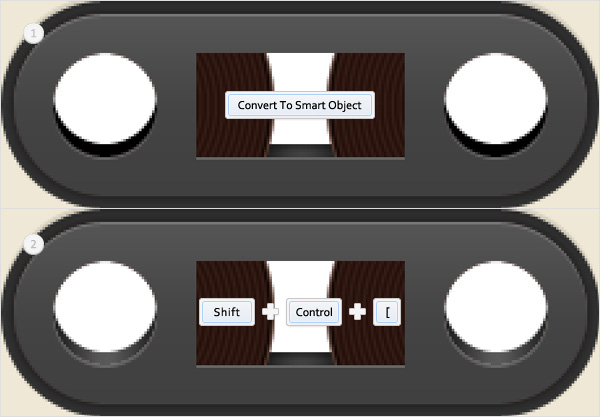
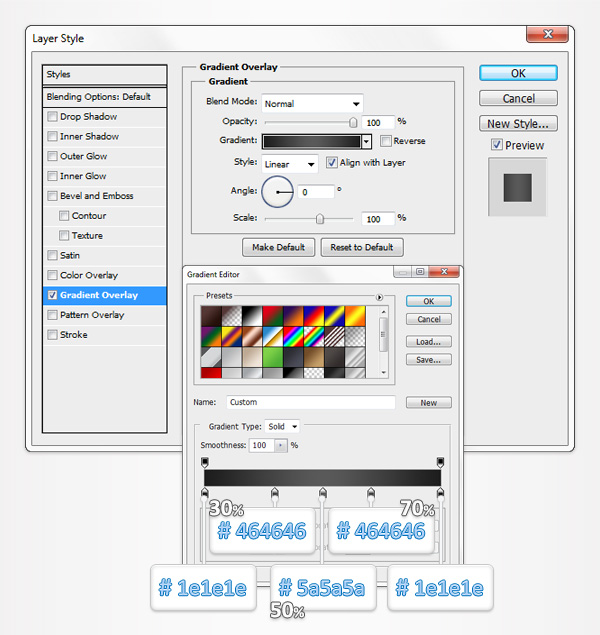
Gradient Overlay Blending Options Settings
Blend Mode: Normal
Opacity: 100%
Style: Linear
Angle: 0 degrees
Scale: 100%
Step 37
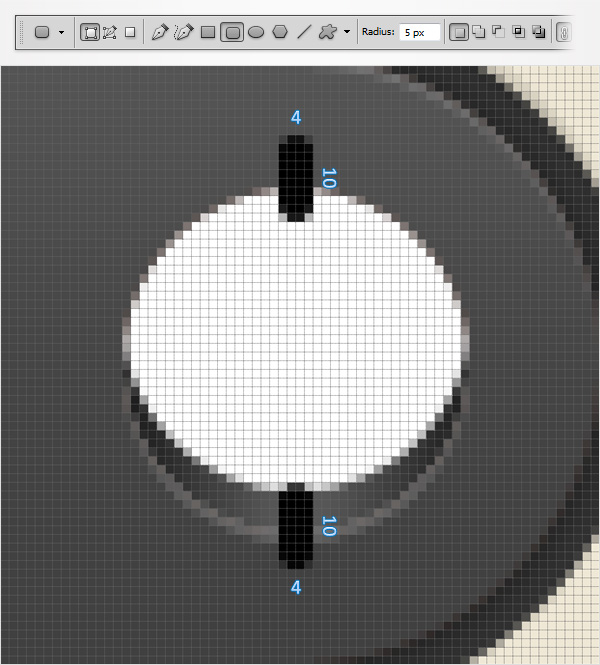
For the following steps you will need a grid every 1px. Go to Edit > Preferences > Guides, Grid & Slices and enter 1 in the Gridline Every box. Set the foreground color at black, grab the Rounded Rectangle Tool and set the radius at 5px. Create two, 4 by 10px vector shapes and place them as shown in the following image.
Step 38
Reselect the vector shapes created in the previous step and duplicate them. Select both copies, hit Control + T and rotate them 90 degrees. Now, duplicate all four shapes. Select these new copies and rotate them 45 degrees.
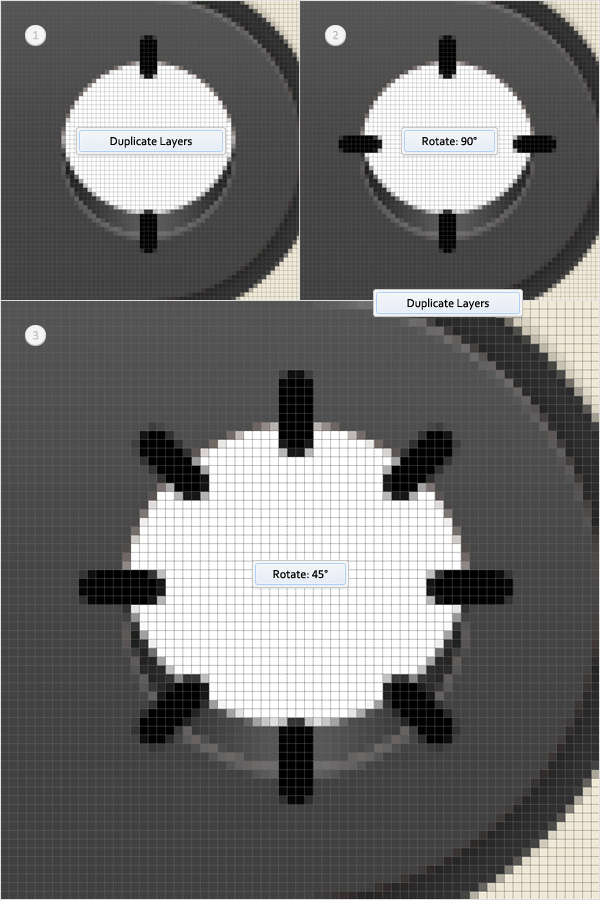
Step 39
Reselect all the vector shapes made in the previous step and group them (Control + G). Move to the Layers panel, select this new group and drag it in the bottom of the Layers panel, right above the smart object made in step #36. Open the Layers Style window for each of these shapes and enter the properties shown in the following images.
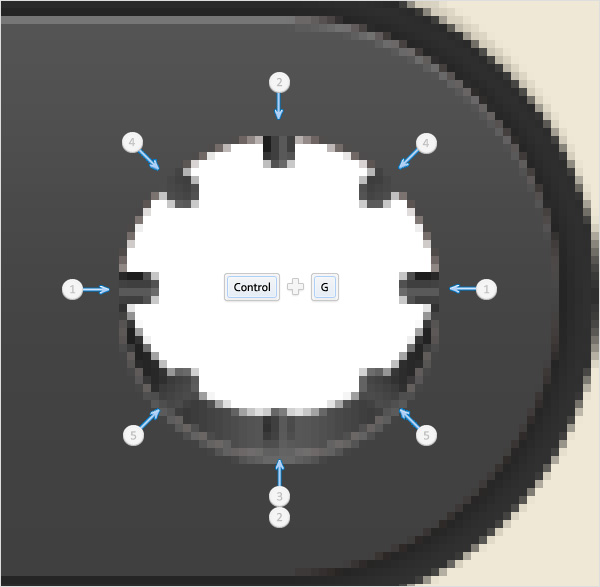
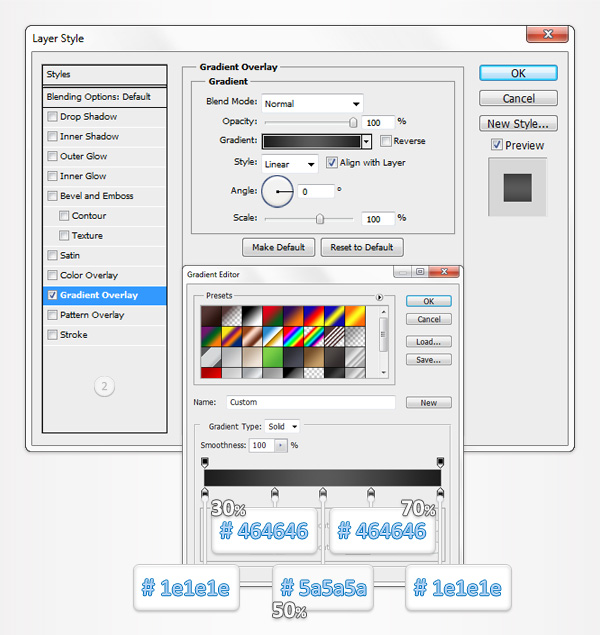
Gradient Overlay Blending Options Settings
Blend Mode: Normal
Opacity: 100%
Style: Linear
Angle: -90 degrees
Scale: 100%

Gradient Overlay Blending Options Settings
Blend Mode: Normal
Opacity: 100%
Style: Linear
Angle: 0 degrees
Scale: 100%
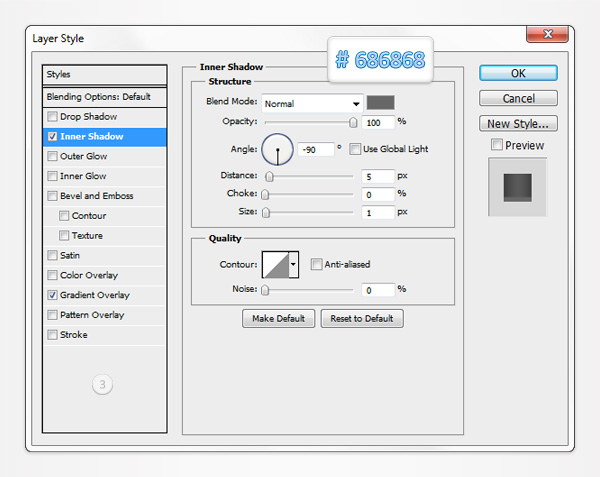
Inner Shadow Blending Options Settings
Blend Mode: Normal
Opacity: 100%
Angle: -90 degrees
Distance: 5px
Choke: 0%
Size: 1px
Gradient Overlay Blending Options Settings
Blend Mode: Normal
Opacity: 100%
Style: Linear
Angle: -135 degrees
Scale: 100%

Gradient Overlay Blending Options Settings
Blend Mode: Normal
Opacity: 100%
Style: Linear
Angle: -45 degrees
Scale: 100%
Step 40
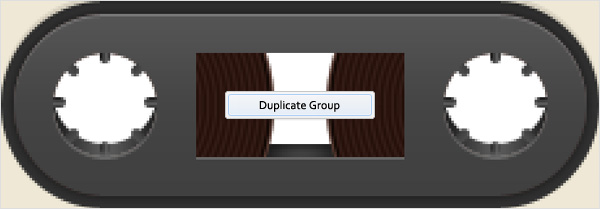
Duplicate the group made in the previous step. Select this new group, drag it to the left and place it as shown in the following image.
Step 41
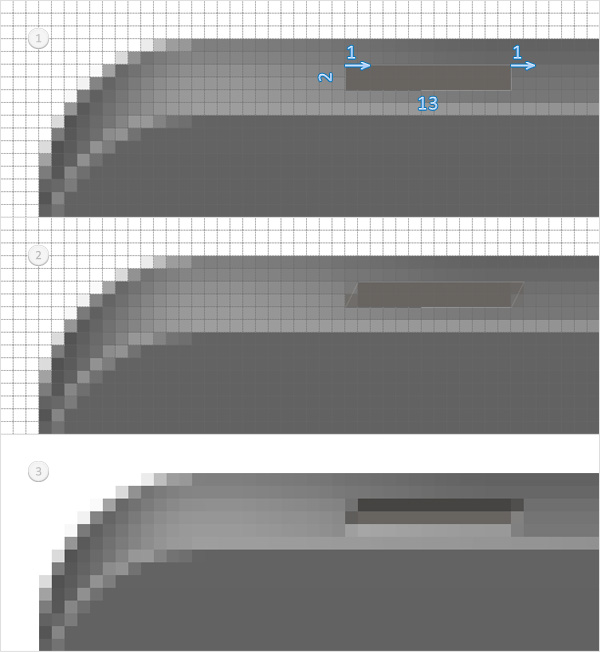
Focus on the top, left corner of your cassette illustration. Set the foreground color at #696561, create a 13 by 2px vector path and place it as shown in the first image. Switch to the Direct Selection Tool, select the top anchor points and drag them 1px to the right. Open the Layer Style window for this thin shape and enter the properties shown in the following image.
Drop Shadow Blending Options Settings
Blend Mode: Normal
Opacity: 25%
Angle: 90 degrees
Distance: 1px
Spread: 0px
Size: 0px

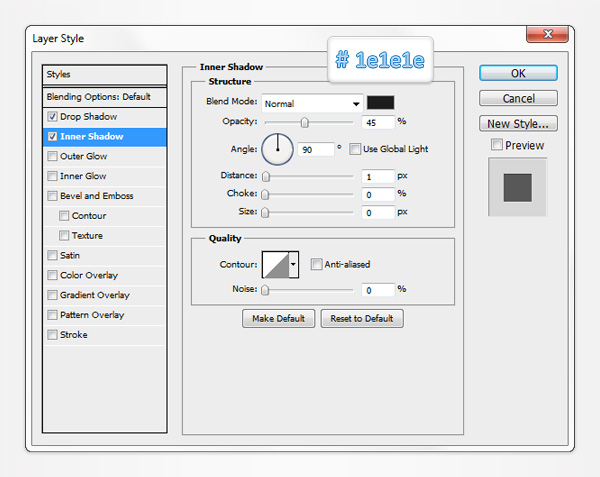
Inner Shadow Blending Options Settings
Blend Mode: Normal
Opacity: 45%
Angle: 90 degrees
Distance: 1px
Choke: 0%
Size: 0px
Step 42
Duplicate the vector path made in the previous step (Control + J). Select this copy, flip it horizontally (Edit > Transform Path > Flip Horizontal) and drag it to the right corner as shown in the following image.

Step 43
Set the foreground color at white, grab the Ellipse Tool, create an 11px circle and place it as shown in the following image.

Step 44
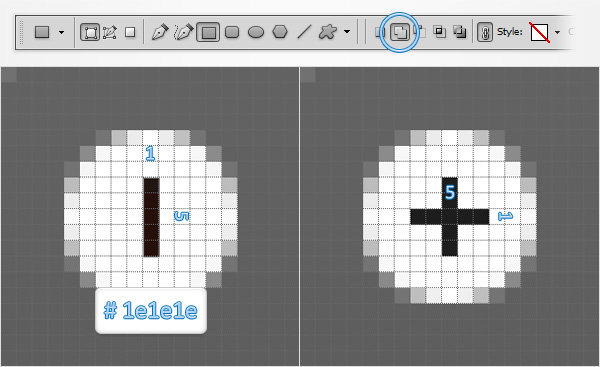
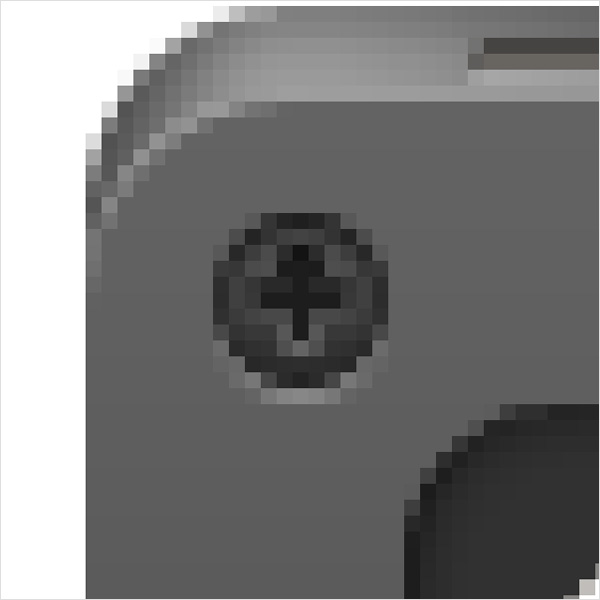
Set the foreground color at #1e1e1e, grab the Rectangle Tool and focus on the shape made in the previous step. Make a 1 by 5px shape and place it as shown in the first image. Select it and continue with the Rectangle Tool. Check the "Add to shape area" button and add a 5 by 1px vector path as shown in the second image.
Step 45
Open the Layer Stye window for the white circle made in step #43 and enter the properties shown in the following image.

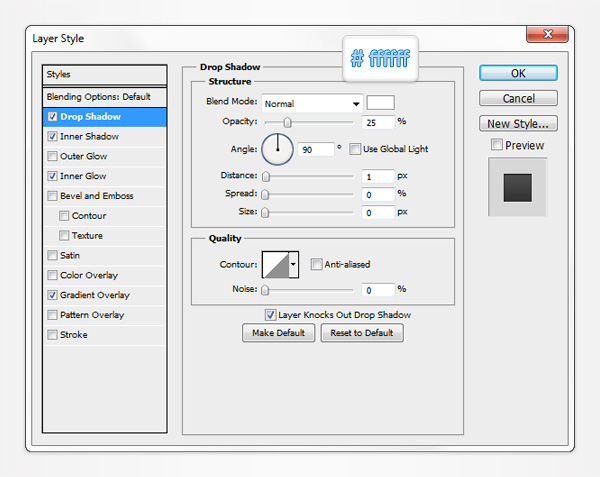
Drop Shadow Blending Options Settings
Blend Mode: Normal
Opacity: 25%
Angle: 90 degrees
Distance: 1px
Spread: 0px
Size: 0px
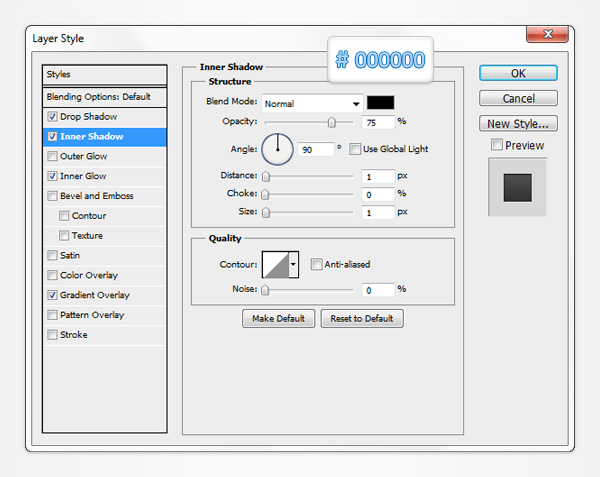
Inner Shadow Blending Options Settings
Blend Mode: Normal
Opacity: 75%
Angle: 90 degrees
Distance: 1px
Choke: 0%
Size: 1px
Inner Glow Blending Options Settings
Blending Mode: Normal
Opacity: 30%
Choke: 0%
Size: 1

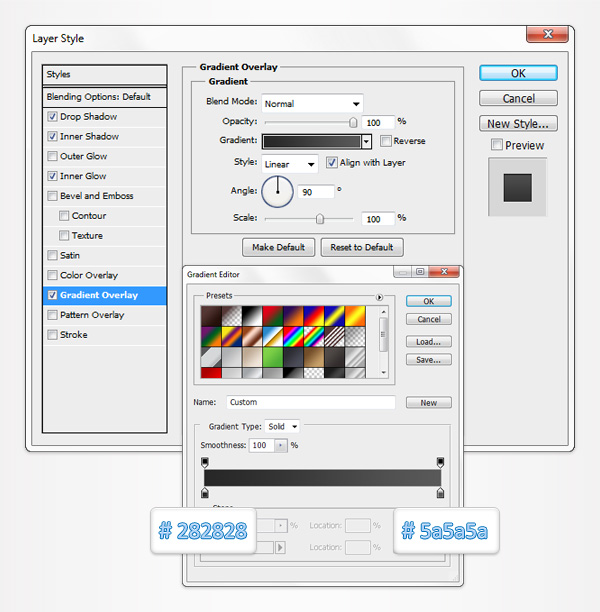
Gradient Overlay Blending Options Settings
Blend Mode: Normal
Opacity: 100%
Style: Linear
Angle: 90 degrees
Scale: 100%
Step 46
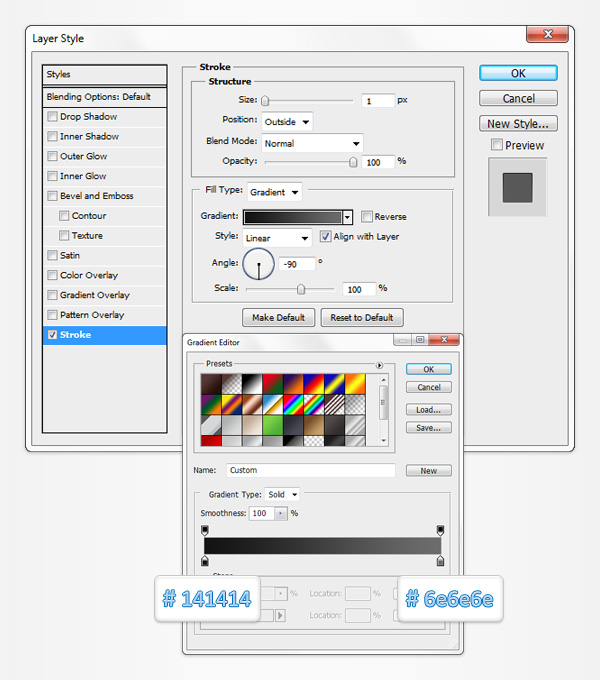
Open the Layer Stye window for the path made in step #44 and enter the properties shown in the following image.
Stroke Blending Options Settings
Size: 1px
Position: Outside
Blend Mode: Normal
Opacity: 100%
Fill Type: Gradient
Style: Linear
Angle: -90 degrees
Scale: 100%
Step 47
Reselect the two vector paths edited in the last two steps and group them (Control + G). Make three copies of this new group and place them as shown in the following image.

Step 48
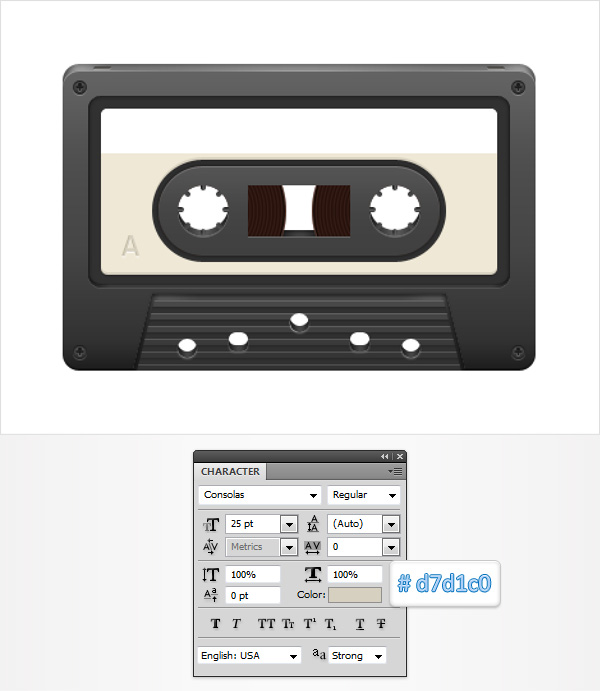
Grab the Type Tool and add a capital "A" as shown int he following image. Set its color at #d7d1c0 and use the Consolas font with the size set at 25pt.
Step 49
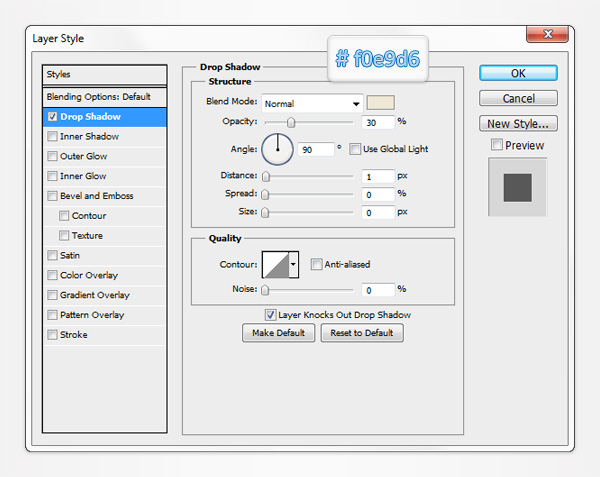
Set the foreground color at #f0e9d6, grab the Rectangle Tool, create a 310 by 1px vector path and place it as shown in the following image. Open the Layer Style window for this new path and enter the properties shown in the following image.
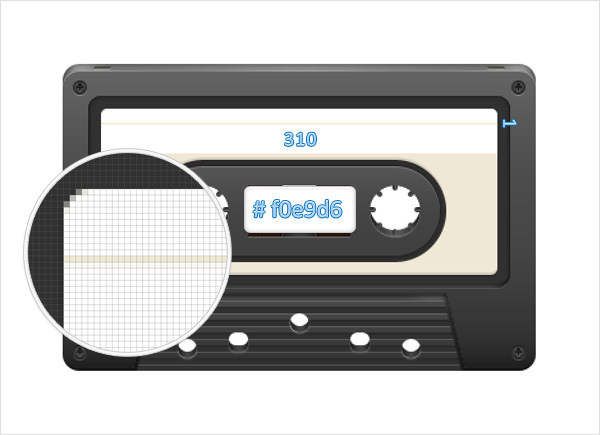
Drop Shadow Blending Options Settings
Blend Mode: Normal
Opacity: 30%
Angle: 90 degrees
Distance: 1px
Spread: 0px
Size: 0px
Step 50
Duplicate the vector path made in the previous step (Control + J). Select this copy and drag it down as shown in the following image.

Step 51
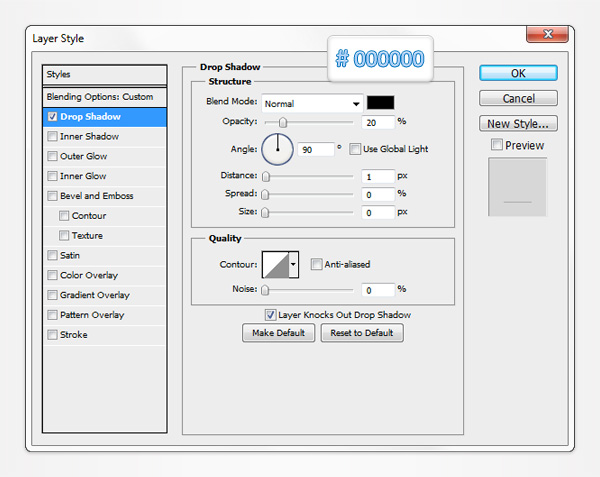
Reselect all the shapes created so far and duplicate them. Select all these copies and convert them to a smart object. Send it to back, lower its Fill to 0% and open the Layer Style window. Enter the properties shown in the following image and click OK.
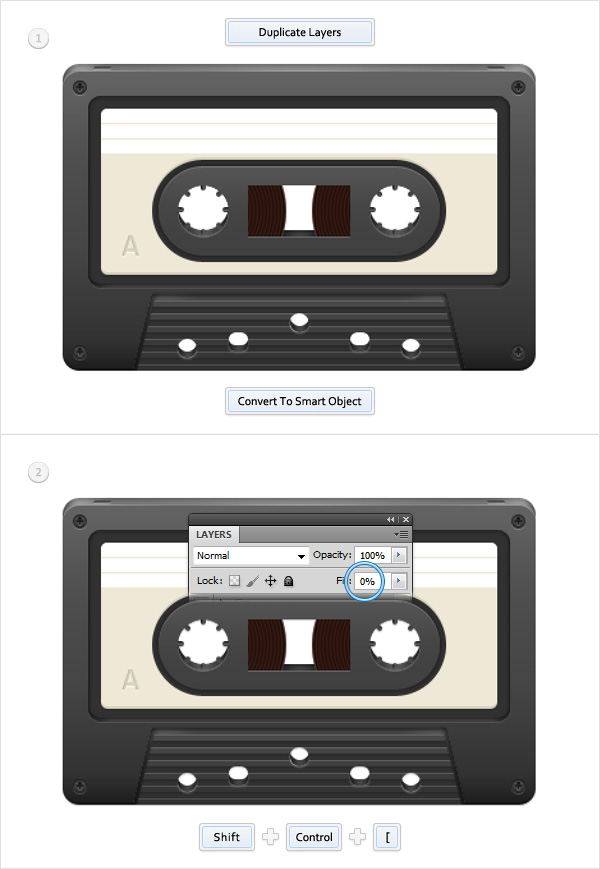
Drop Shadow Blending Options Settings
Blend Mode: Normal
Opacity: 20%
Angle: 90 degrees
Distance: 1px
Spread: 0px
Size: 0px
Step 52
Reselect the smart object made in the previous step and duplicate it (Control + J). Focus on this new copy, open the Layer Style window and enter the properties shown in the following image.
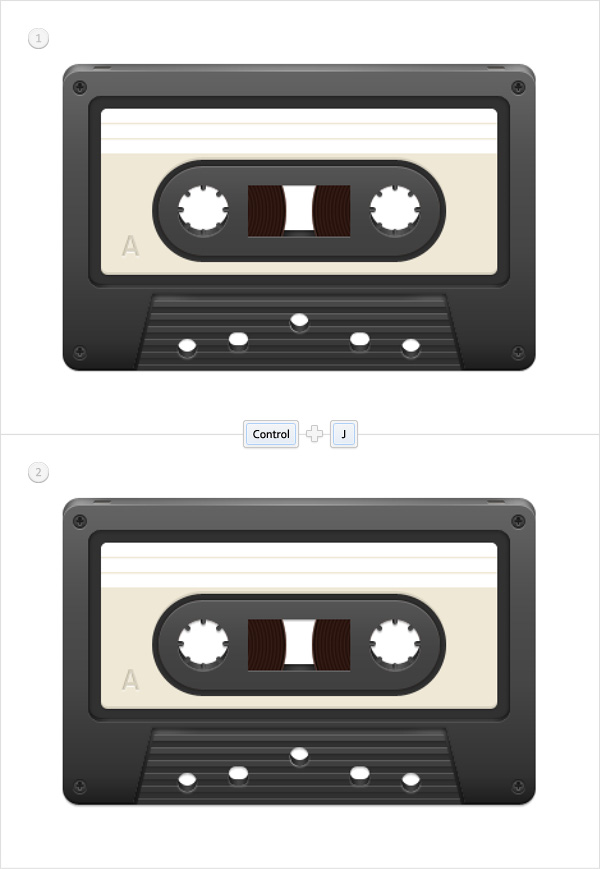
Drop Shadow Blending Options Settings
Blend Mode: Normal
Opacity: 10%
Angle: 90 degrees
Distance: 2px
Spread: 0px
Size: 0px

Step 53
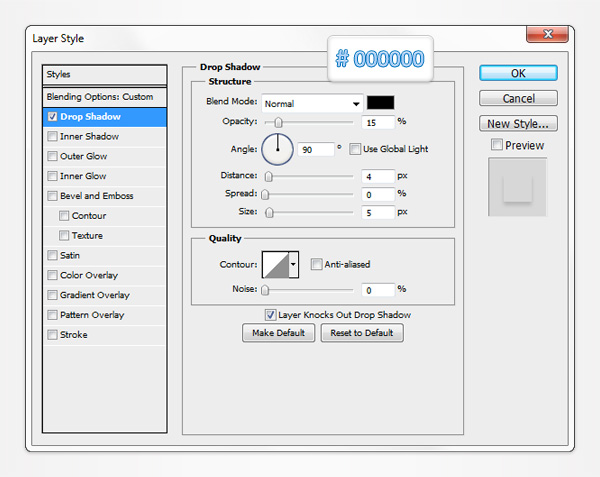
Reselect the smart object made in the previous step and duplicate it (Control + J). Focus on this new copy, open the Layer Style window and enter the properties shown in the following image.
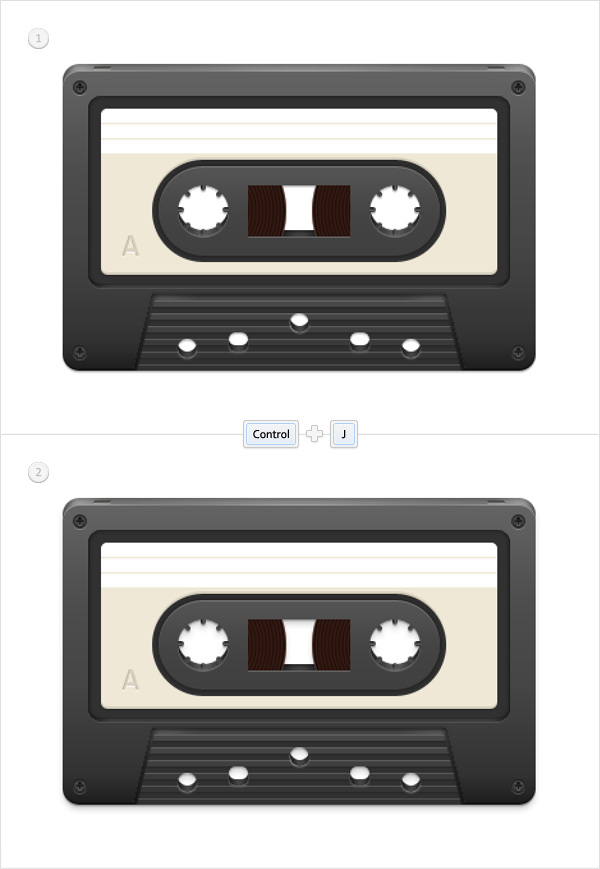
Drop Shadow Blending Options Settings
Blend Mode: Normal
Opacity: 15%
Angle: 90 degrees
Distance: 4px
Spread: 0px
Size: 5px
Step 54
Reselect the smart object made in the previous step and duplicate it (Control + J). Focus on this new copy, open the Layer Style window and enter the properties shown in the following image.

Step 55
Reselect the smart object made in the previous step and duplicate it (Control + J). Focus on this new copy, Clear the Layer Style, lower its Fill to 0% then open the Layer Style window and enter the properties shown in the following image.
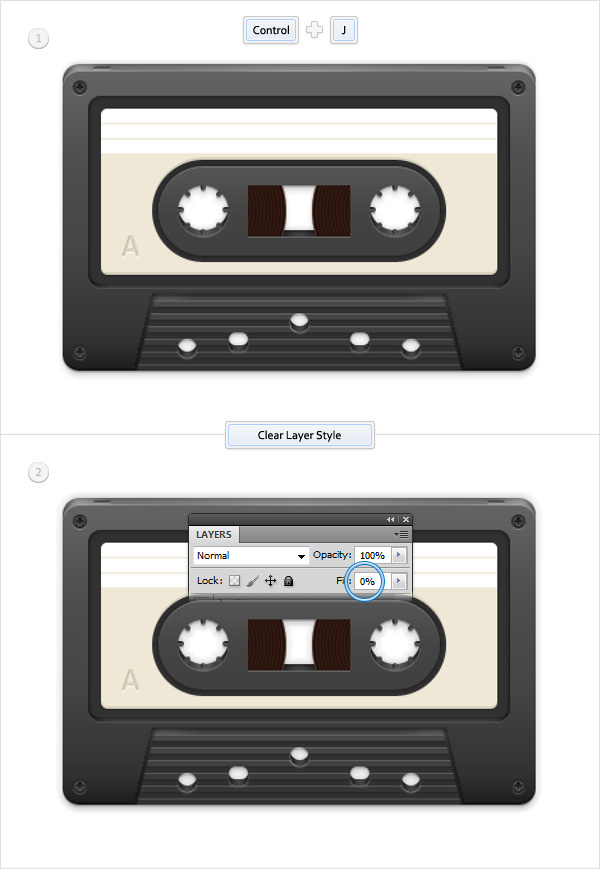
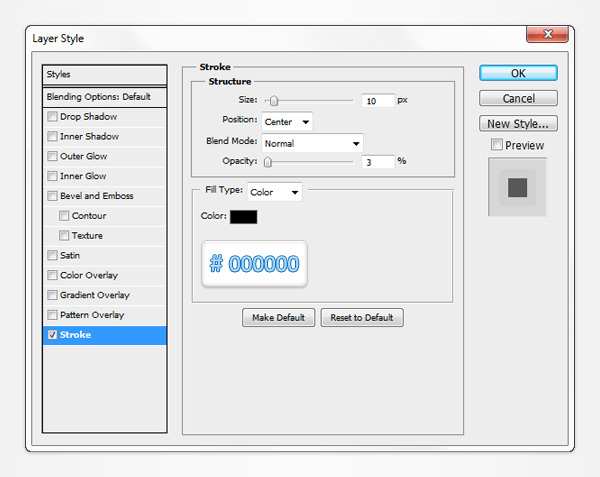
Stroke Blending Options Settings
Size: 10px
Position: Center
Blend Mode: Normal
Opacity: 3%
Fill Type: Color
Step 56
Reselect the smart object made in the previous step and duplicate it (Control + J). Focus on this new copy, open the Layer Style window and enter the properties shown in the following image.
Stroke Blending Options Settings
Size: 6px
Position: Center
Blend Mode: Normal
Opacity: 10%
Fill Type: Color

Step 57
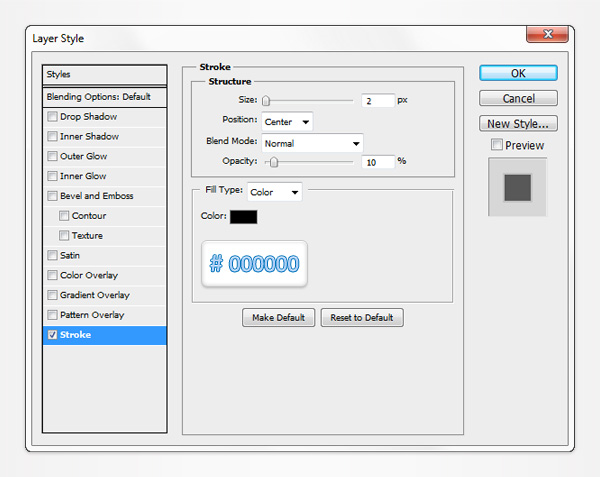
Reselect the smart object made in the previous step and duplicate it (Control + J). Focus on this new copy, open the Layer Style window and enter the properties shown in the following image. Select this smart object along with the other six smart objects made in the last six steps and group them (Control > G). Drag this new group in the bottom of the Layers panel.
Stroke Blending Options Settings
Size: 2px
Position: Center
Blend Mode: Normal
Opacity: 10%
Fill Type: Color
Step 58
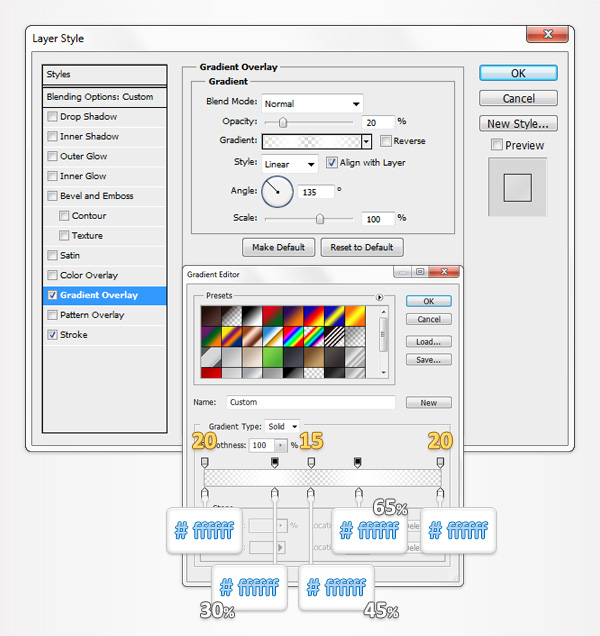
Return to " gridline every 5px". So, go to Edit > Preferences > Guides, Grid & Slices and enter 5 in the Gridline Every box. Grab the Rectangle Tool, create an 80 by 40px vector path and place it as shown in the following image. Select its, lower the Fill to 0% then open the Layer Style window and enter the properties shown in the following images.
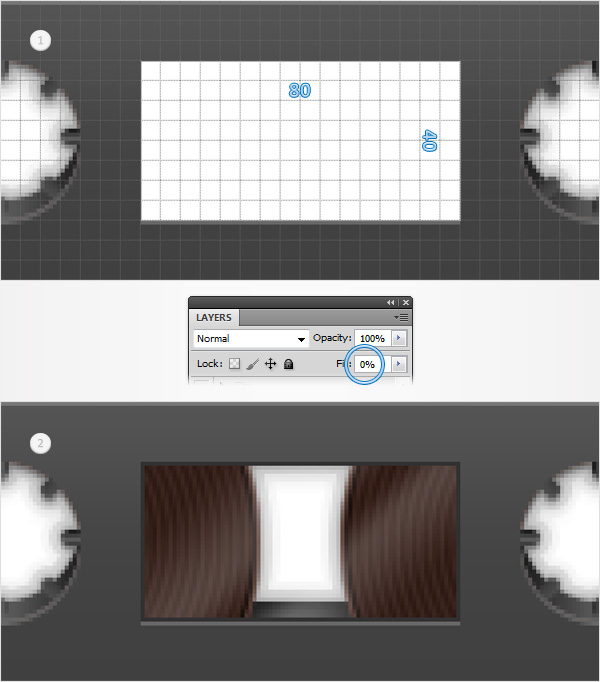
Gradient Overlay Blending Options Settings
Blend Mode: Normal
Opacity: 20%
Style: Linear
Angle: 135 degrees
Scale: 100%
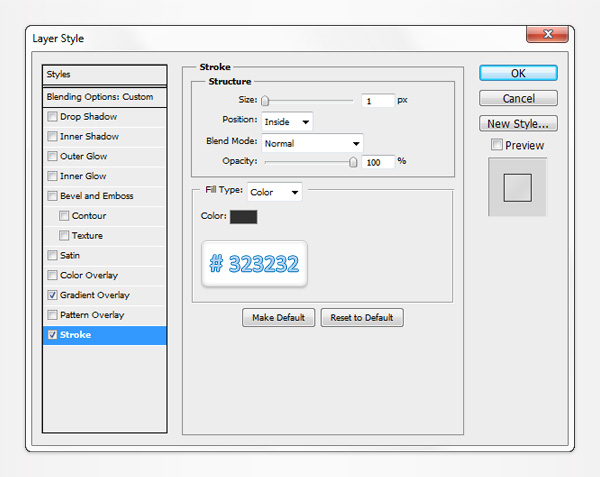
Stroke Blending Options Settings
Size: 1px
Position: Inside
Blend Mode: Normal
Opacity: 100%
Fill Type: Color
Step 59
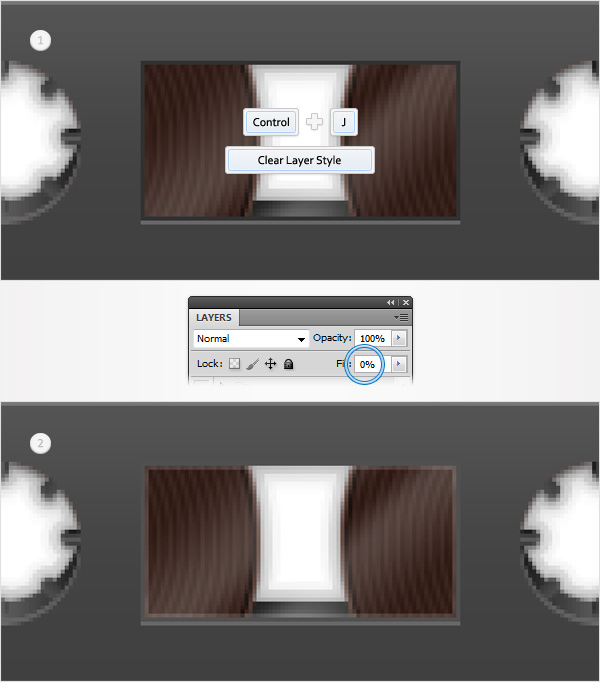
Reselect the smart object made in the previous step and duplicate it (Control + J). Focus on this copy, Clear the Layer Style, lower its Fill to 0% then open the Layer Style window and enter the properties shown in the following image.
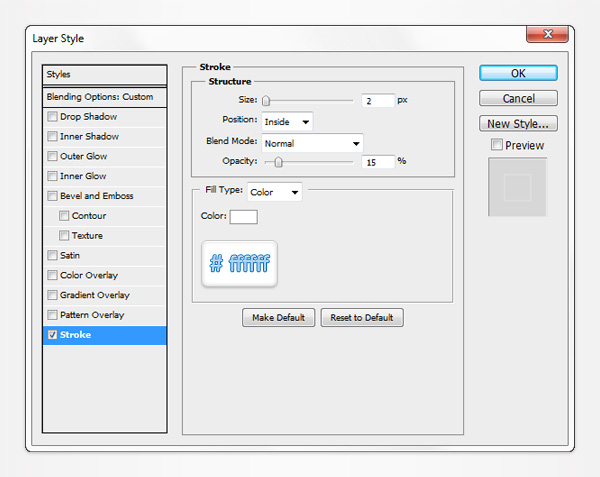
Stroke Blending Options Settings
Size: 2px
Position: Inside
Blend Mode: Normal
Opacity: 15%
Fill Type: Color
Step 60
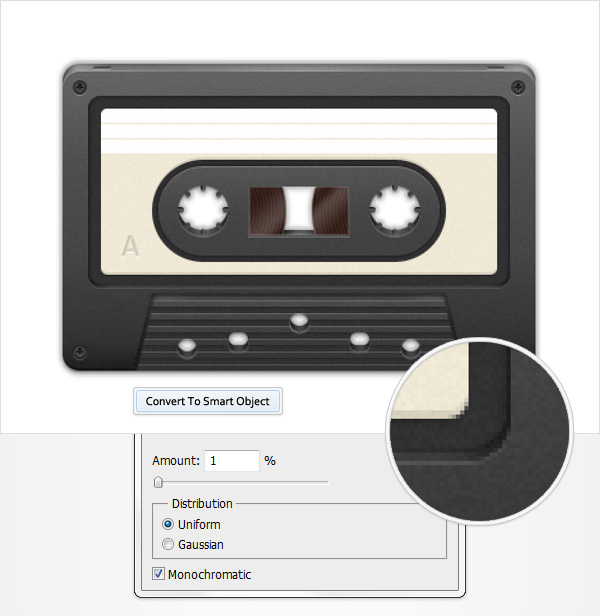
Select all the shapes created so far (except the group of smart objects made in step #57) and turn them into a smart object. Select it and go to Filter > Noise > Add Noise. Enter the data shown in the following image and click OK.
Step 61
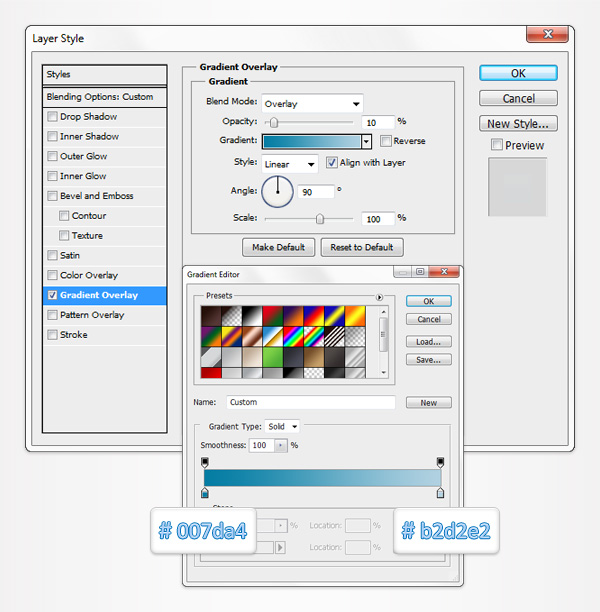
Reselect the smart object made in the previous step and duplicate it (Control + J). Focus on this copy, Clear the Smart Filters, lower its Fill to 0% then open the Layer Style window and enter the properties shown in the following image.
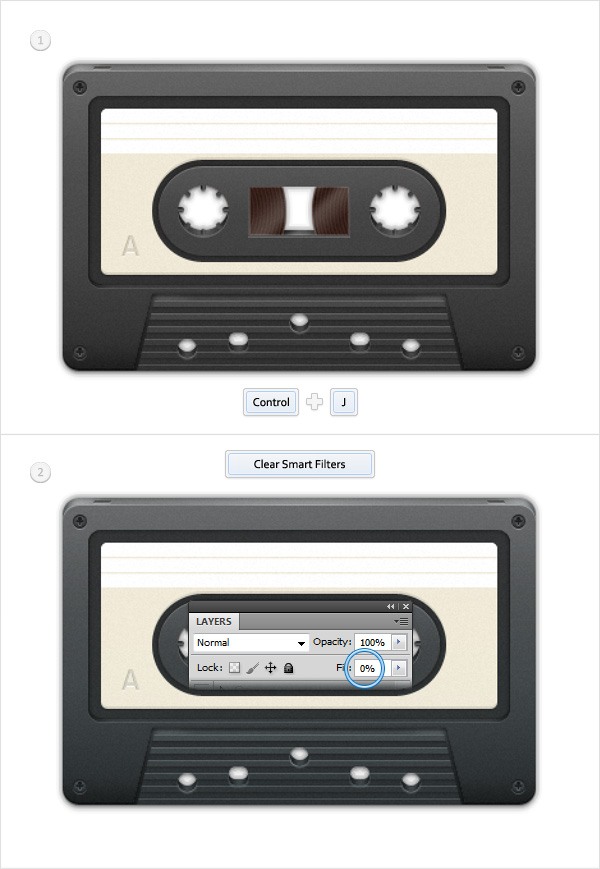
Gradient Overlay Blending Options Settings
Blend Mode: Overlay
Opacity: 10%
Style: Linear
Angle: 90 degrees
Scale: 100%
Step 62
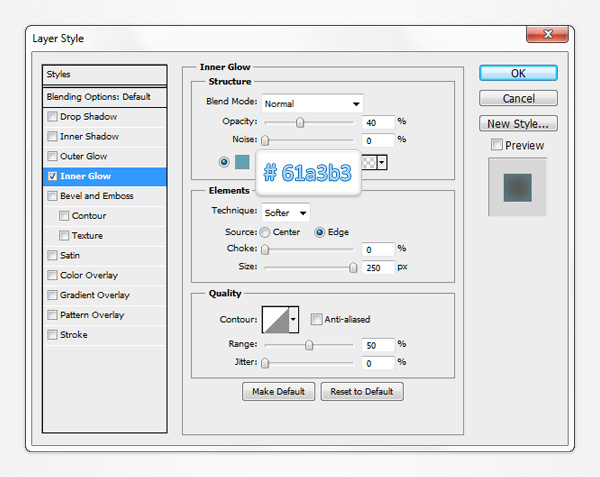
Finally, let's add a simple background. Set the foreground color at #ebf5fa and grab the Rectangle Tool. Create a shape the size of your document (600 by 600px) and send it to back (Shift + Control + [ ). Open the Layer Style window for this rectangle, enter the properties shown in the following image, click OK and you're done.

Inner Glow Blending Options Settings
Blending Mode: Normal
Opacity: 40%
Choke: 0%
Size: 250
And We're Done!
Here is how your final result should look.

About the author
Copyright © . All Rights Reserved
