Draw a Binoculars Illustration in Photoshop
Draw a Binoculars Illustration in Photoshop
In today's advanced drawing tutorial you will learn how to draw a pair of binoculars from scratch using Photoshop. This tutorial is perfect if you're interested in icon or illustration design and walks you through each step of the illustration process. You'll learn about Photoshop's advanced drawing capabilities and texturing/lighting techniques.
Final Image
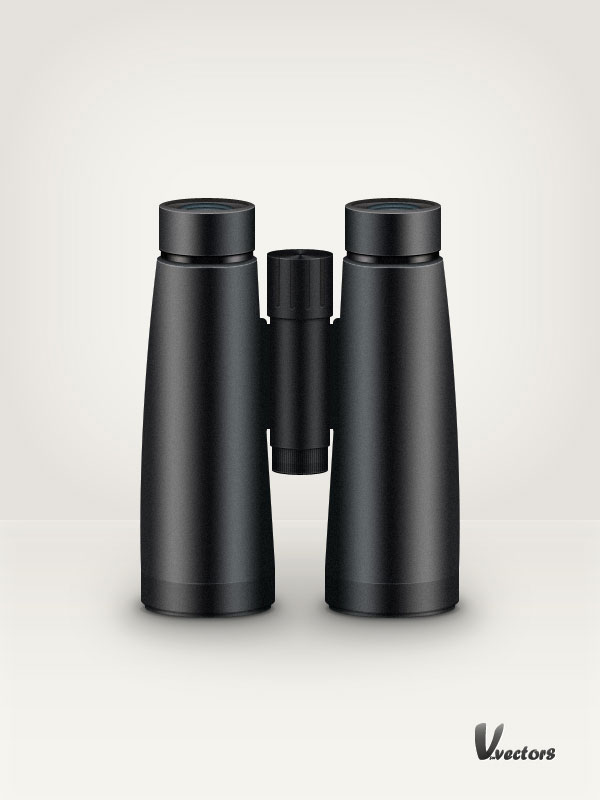
As always, this is the final image that we'll be creating:
Step 1
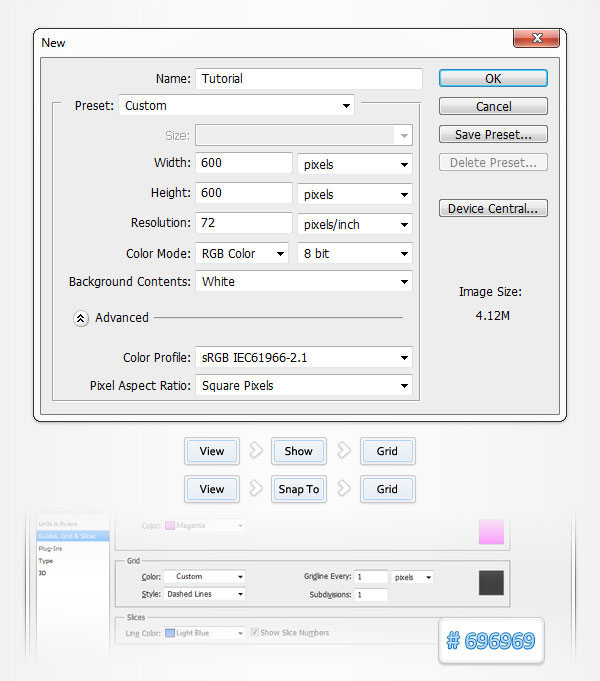
Open Photoshop and hit Control + N to create a new document. Enter all the data shown in the following image and click OK. Enable the Grid (View > Show > Grid) and the Snap to Grid (View > Snap To > Grid). For the moment you need a grid every 1px. Go to Edit > Preferences > Guides, Grid & Slices and focus on the Grid section. Enter 1 in the Gridline Every box and 1 in the Subdivision box. Also, set the color of the grid at #696969. Once you set all these properties click OK. Don't get discouraged by all that grid. It will ease your work later. You should also open the Info panel (Window > Info) for a live preview with the size and position of your shapes.
Step 2
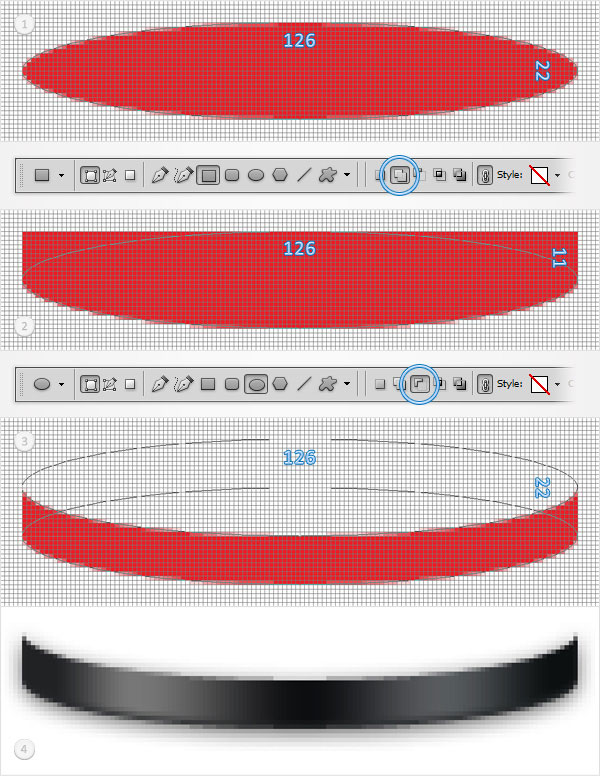
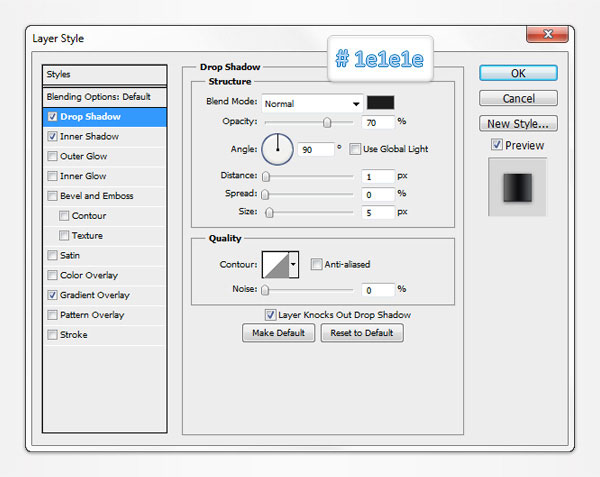
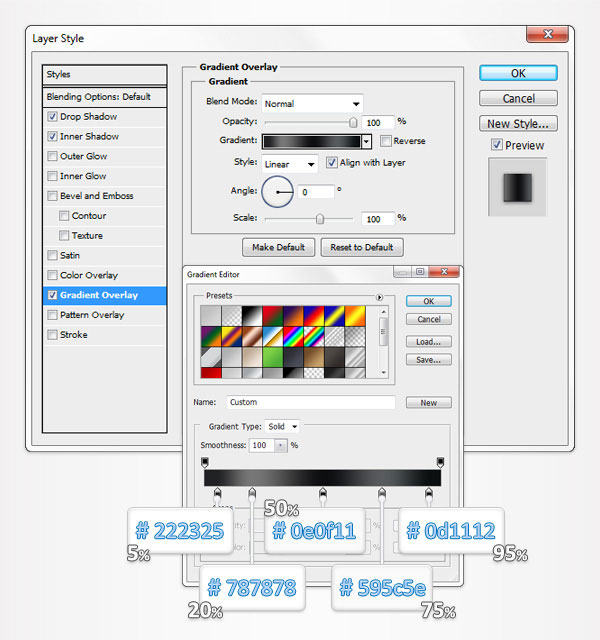
Pick a simple red for the foreground color, grab the Ellipse Tool and create a 126 by 22px vector path. Select it and switch to the Rectangle Tool. Check the "Add" button from the top bar and draw a 126 by 11px vector path as shown in the second image. Make sure that this red vector path is still selected and grab the Ellipse Tool. Check the "Subtract" button and draw an 126 by 22px vector path as shown in the third image. Move to the Layers panel and double click on your vector path to open the Layer Style window. Enter the properties shown in the following images then click OK.

Step 3
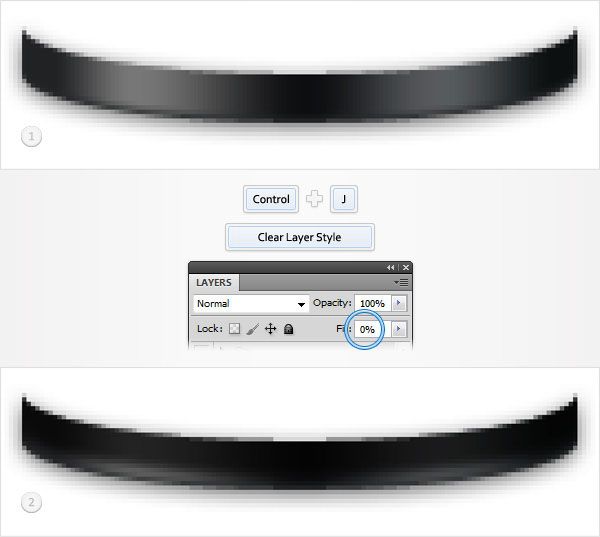
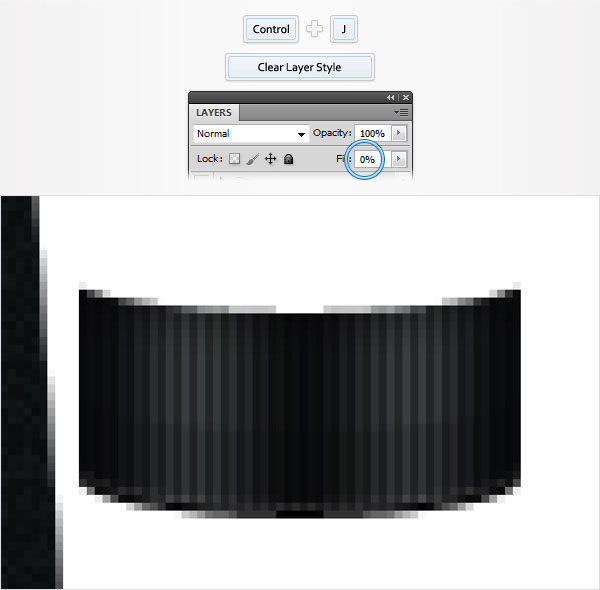
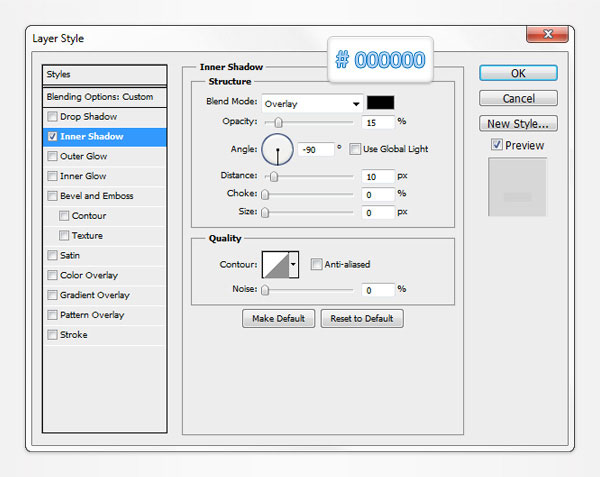
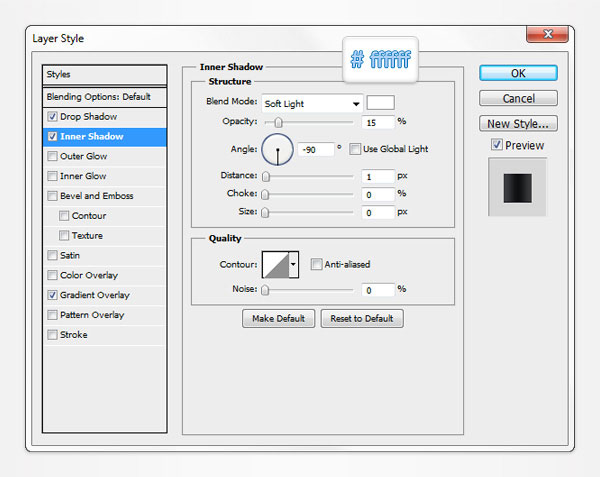
Reselect the vector path made in the previous step and duplicate it (Control + J). Move to the Layers panel, right click on this copy and click on Clear Layer Style. Select the copy, lower its Fill to 0% then open the Layer Style window and enter the properties shown in the following image.

Step 4
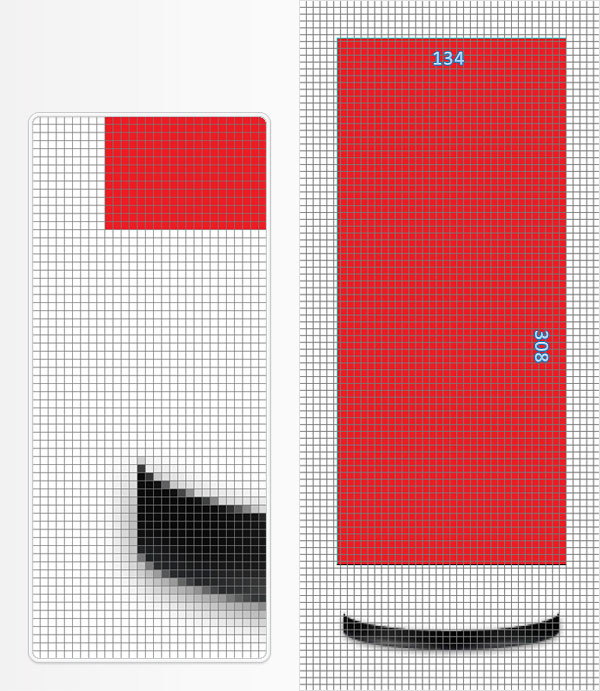
Grab the Rectangle Tool, create a 134 by 308 vector path and place it as shown in the following image.
Step 5
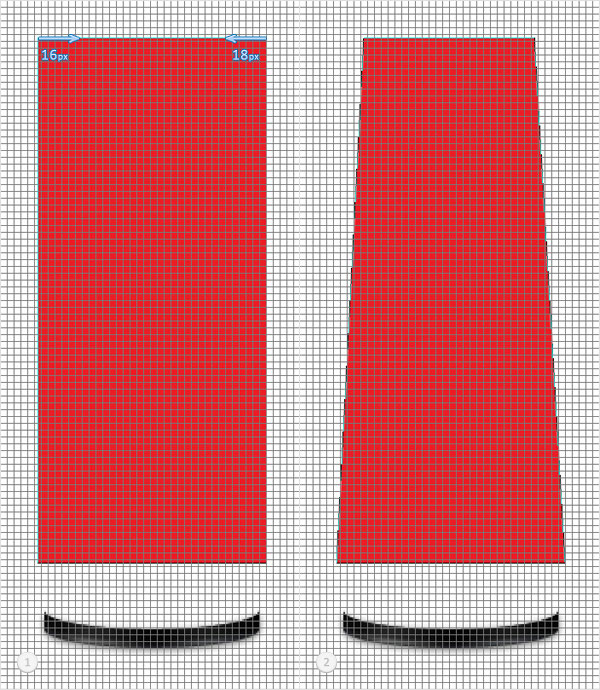
Pick the Direct Selection Tool and focus on the top side of the rectangle made in the previous step. Select the left anchor point and move it 16px to the right then select the right anchor point and move it 18px to the left.
Step 6
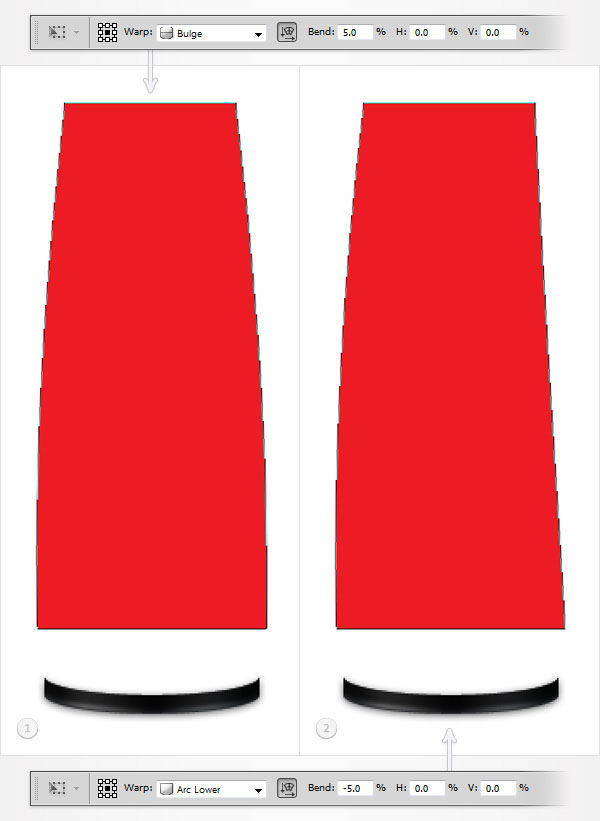
Reselect the vector path made in the previous step and go to Edit > Transform > Warp. Select Bulge from the Warp drop-down menu, check the Orientation button, enter 5 in the Bend box and hit Enter. Make sure that your red vector path is still selected and go again to Edit > Transform > Warp. Select Arc Lower from the Warp drop-down menu, check the Orientation button, enter -5 in the Bend box and hit Enter.
Step 7
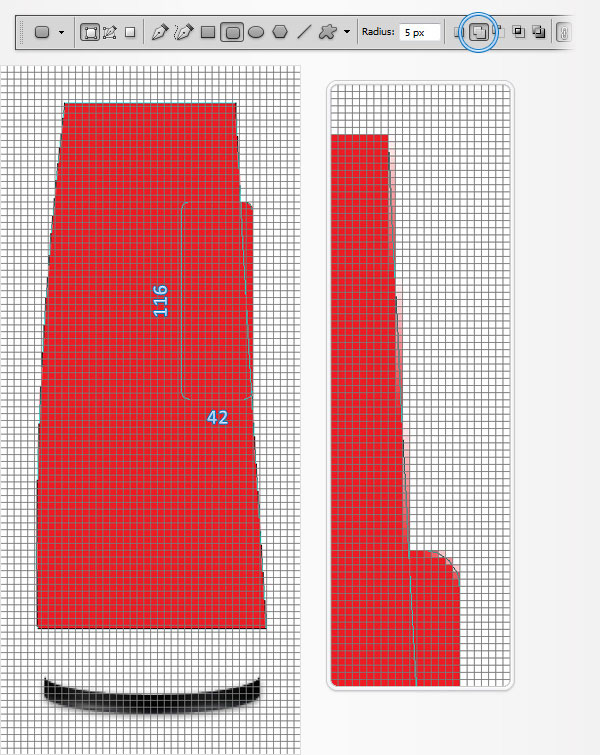
Reselect the vector path edited in the previous step and grab the Rounded Rectangle Tool. Set the radius at 5px, check the "Add" button from the top bar and draw a 42 by 116px vector path as shown in the following image.
Step 8
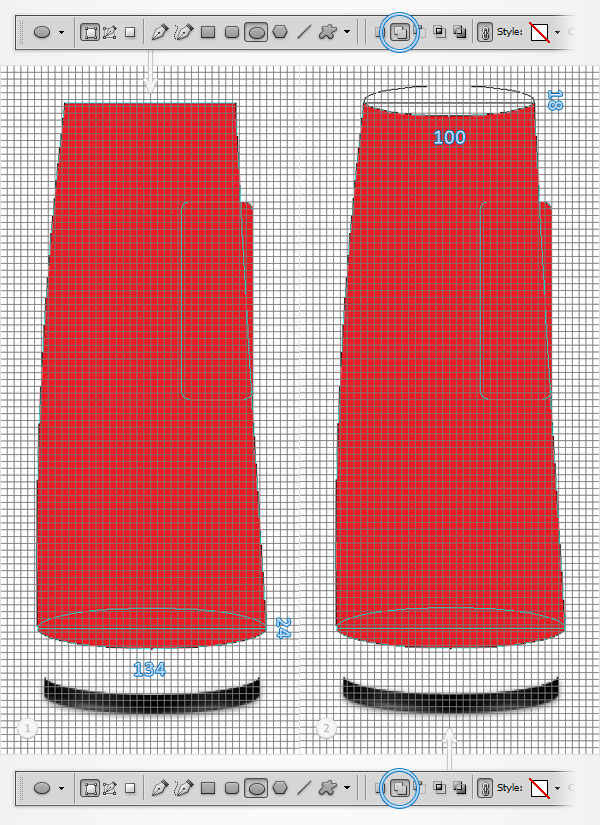
Reselect the vector path edited in the previous step and grab the Ellipse Tool. Check the "Add" button from the top bar and draw a 134 by 24px vector path as shown in the first image. Make sure that your red vector path is still selected, check the "Subtract" button from the top bar and draw a 100 by 18px vector path as shown in the second image.
Step 9
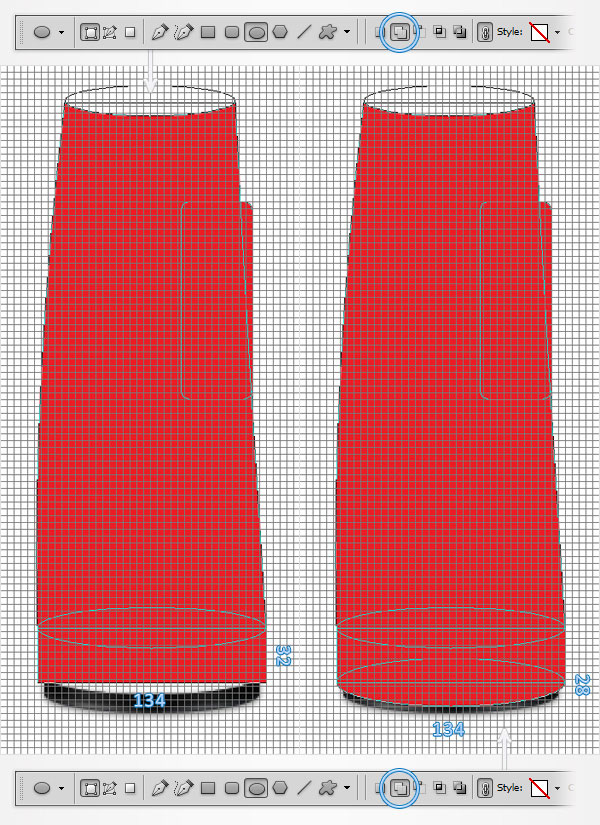
Reselect the vector path edited in the previous step and grab the Rectangle Tool. Check the "Add" button from the top bar and draw a 134 by 32px vector path as shown in the first image. Switch to the Ellipse Tool, check the "Add" button from the top bar and draw a 134 by 28px vector path as shown in the second image.
Step 10
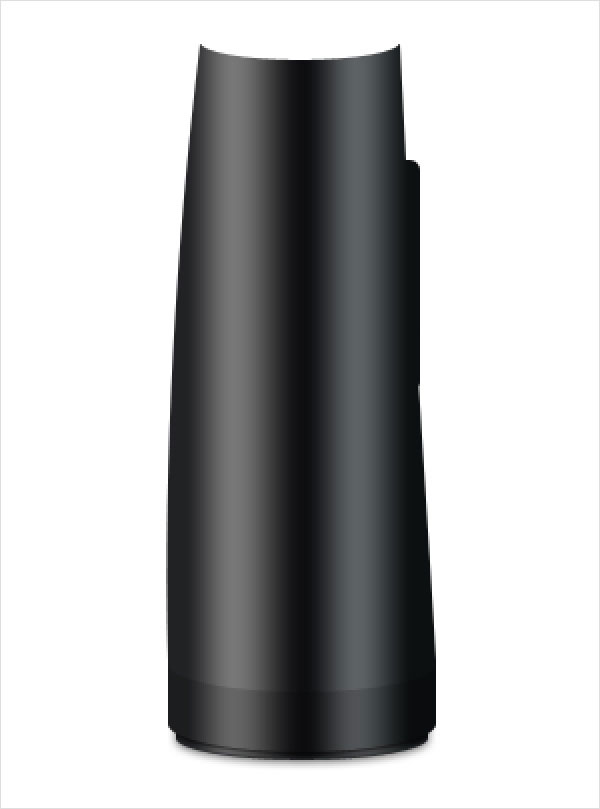
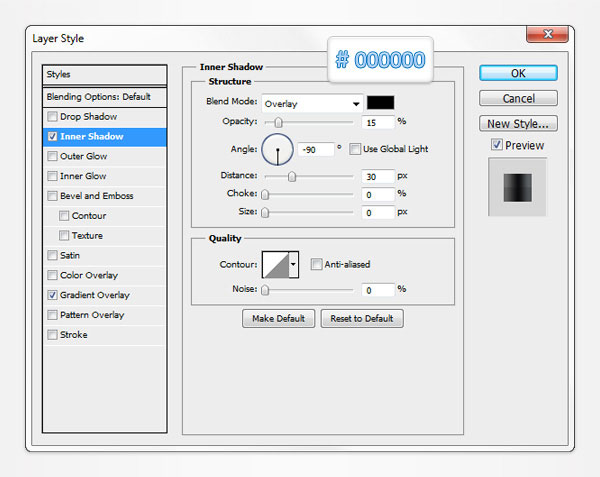
Open the Layer Style window for the red vector path made in the previous steps and enter the properties shown in the following images.

Step 11
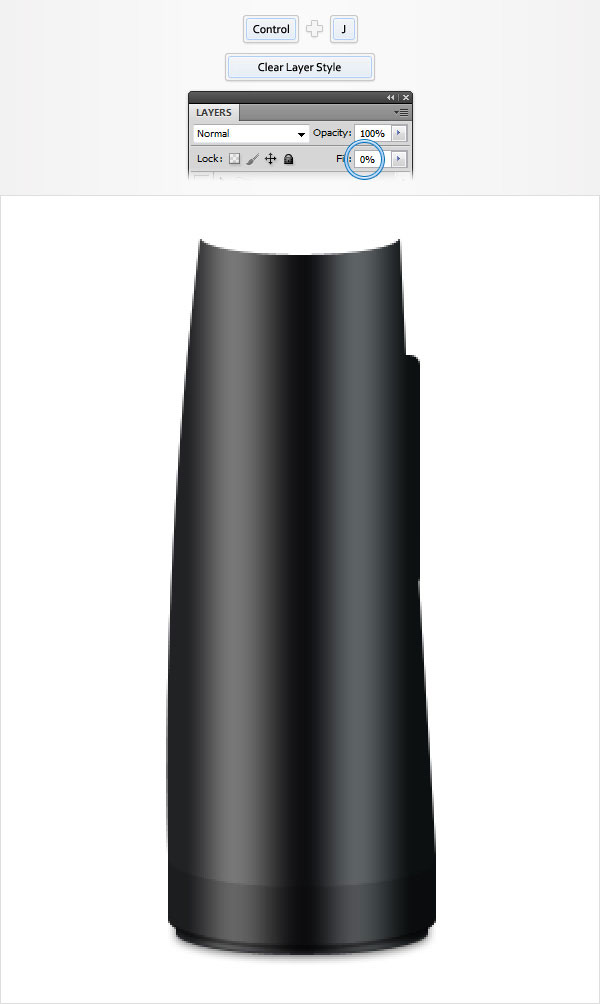
Reselect the vector path made in the previous step and duplicate it (Control + J). Focus on this copy, Clear the Layer Style, lower its Fill to 0% then open the Layer Style window and enter the properties shown in the following image.

Step 12
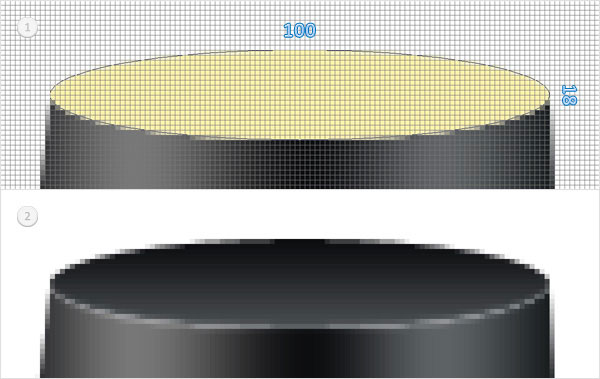
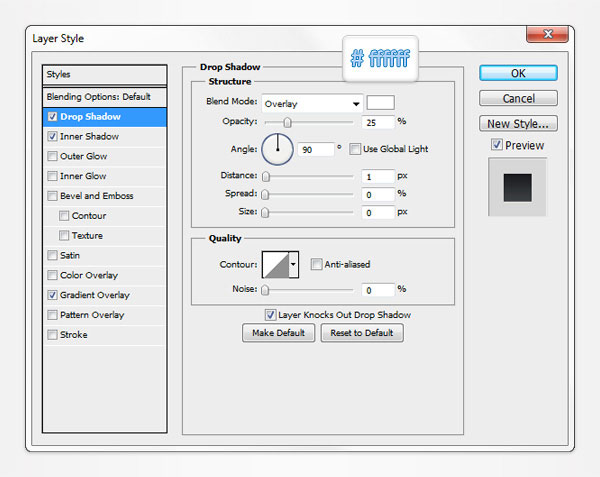
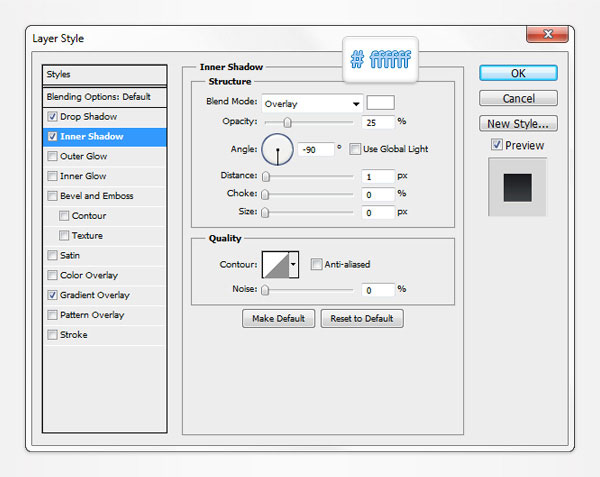
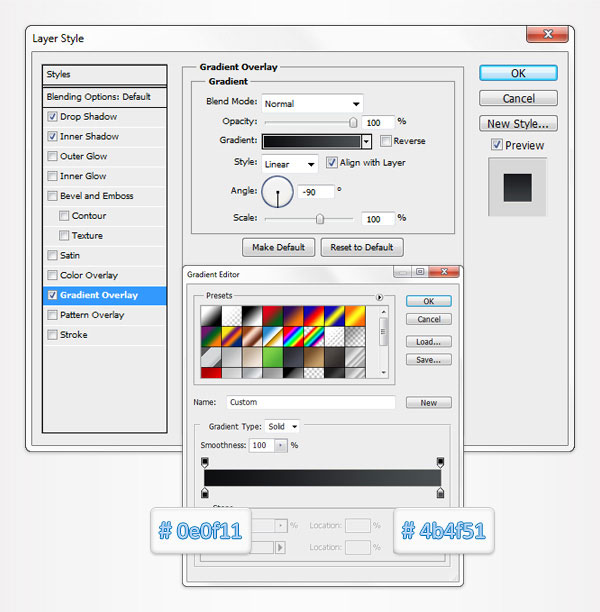
Pick a pale yellow for the foreground color, grab the Ellipse Tool, create a 100 by 18px vector path and place it as shown in the first image. Open the Layer Style window for this new vector path and enter the properties shown in the following images.
Step 13
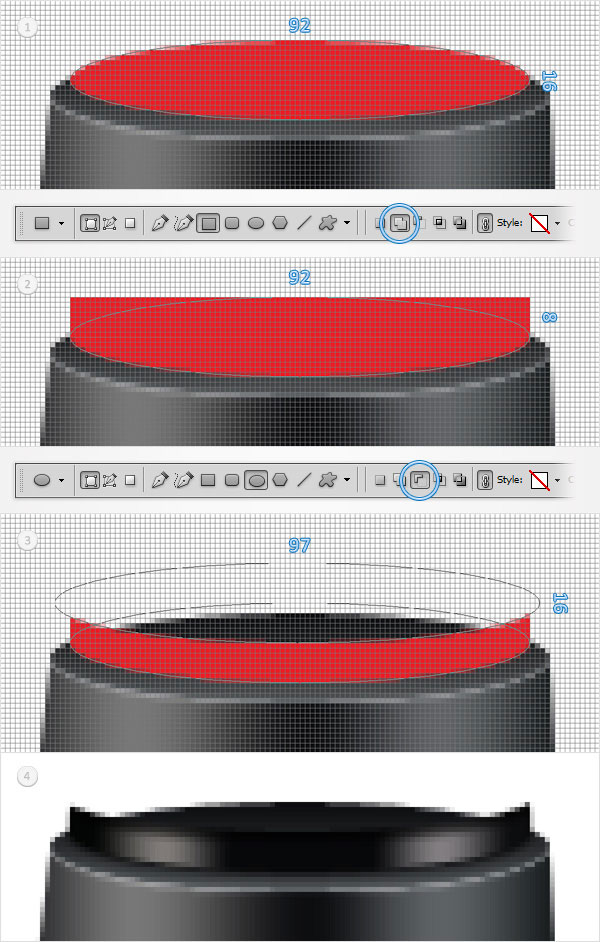
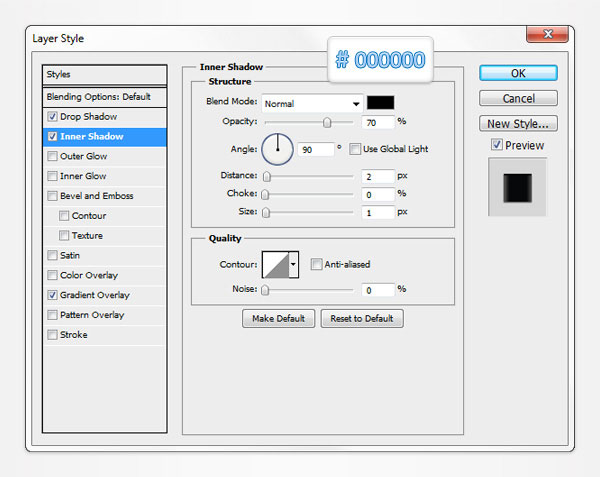
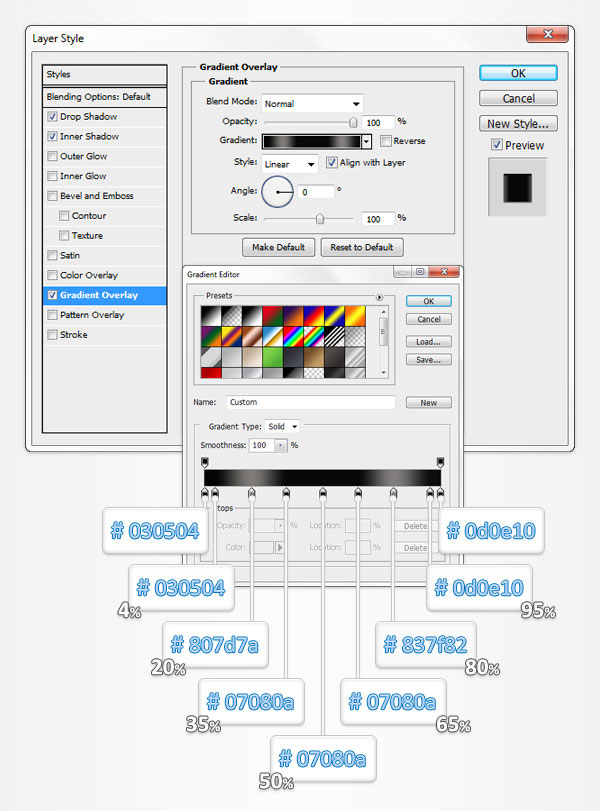
Pick a simple red for the foreground color, grab the Ellipse Tool, create a 92 by 16px vector path and place it as shown in the first image. Select it and switch to the Rectangle Tool. Check the "Add" button from the top bar and draw a 92 by 8px vector path as shown in the second image. Make sure that this red vector path is still selected and grab the Ellipse Tool. Check the "Subtract" button and draw a 97 by 16px vector path as shown in the third image. Move to the Layers panel, open the Layer Style window for this new vector path and enter the properties shown in the following images.

Step 14
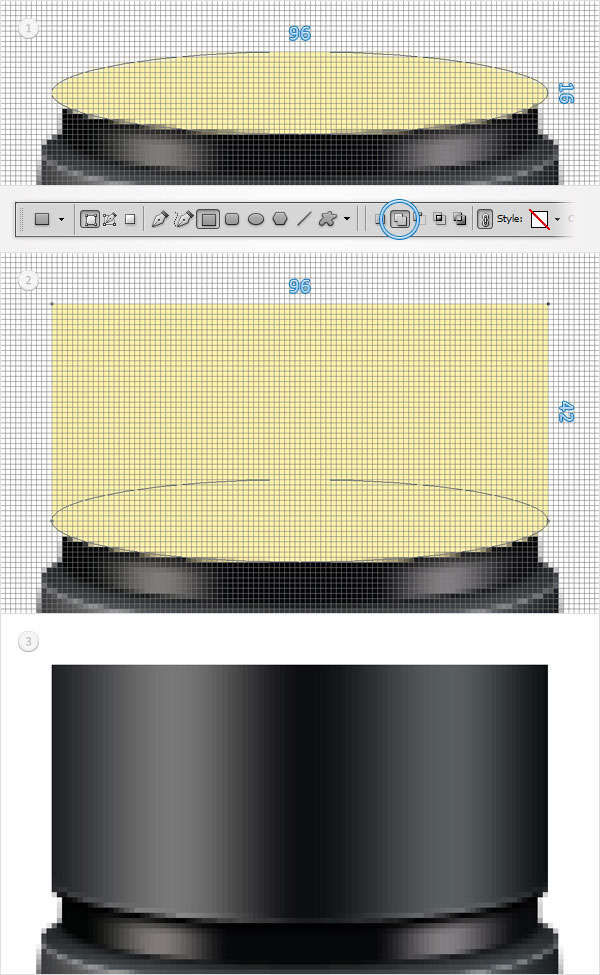
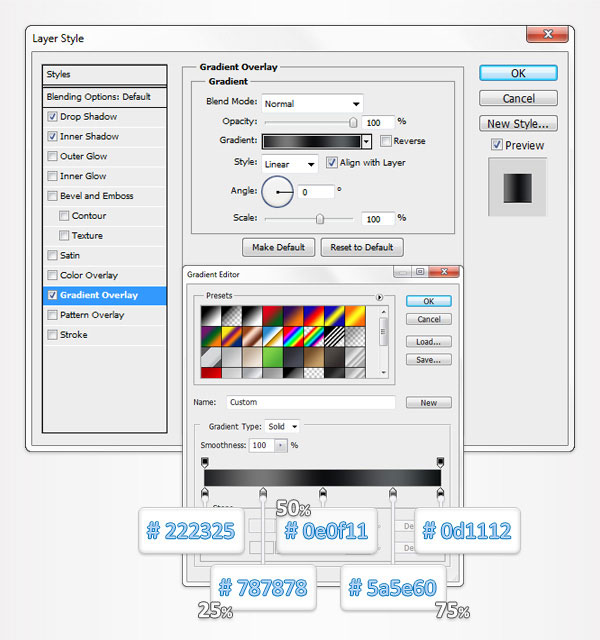
Pick a pale yellow for the foreground color, grab the Ellipse Tool, create a 96 by 16px vector path and place it as shown in the first image. Select it and switch to the Rectangle Tool. Check the "Add" button from the top bar and draw a 96 by 42px vector path as shown in the second image. Open the Layer Style window for this new vector path and enter the properties shown in the following images.


Step 15
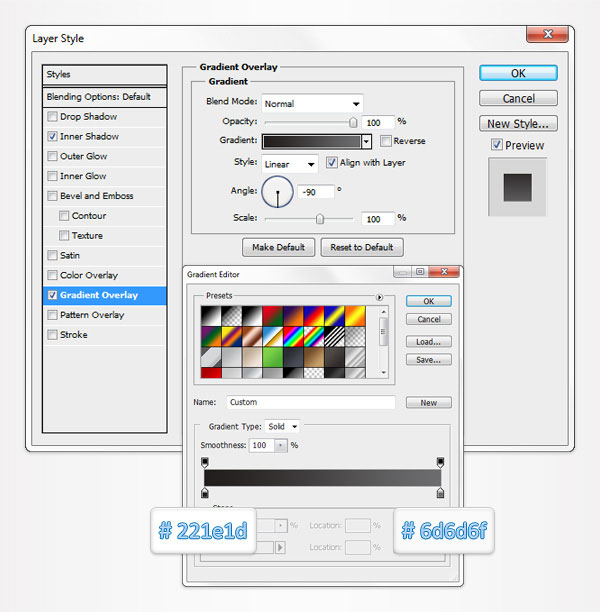
Pick a simple red for the foreground color, grab the Ellipse Tool, create a 96 by 16px vector path and place it as shown in the first image. Open the Layer Style window for this new path and enter the properties shown in the following images.
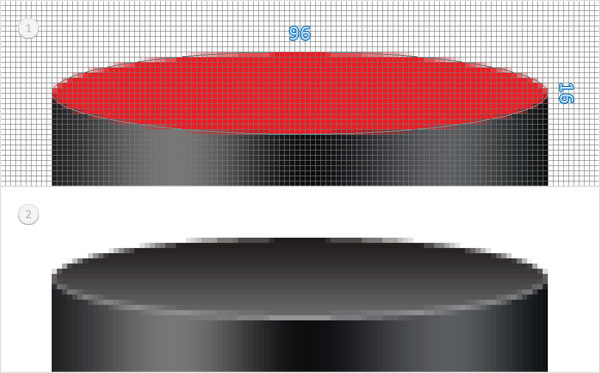

Step 16
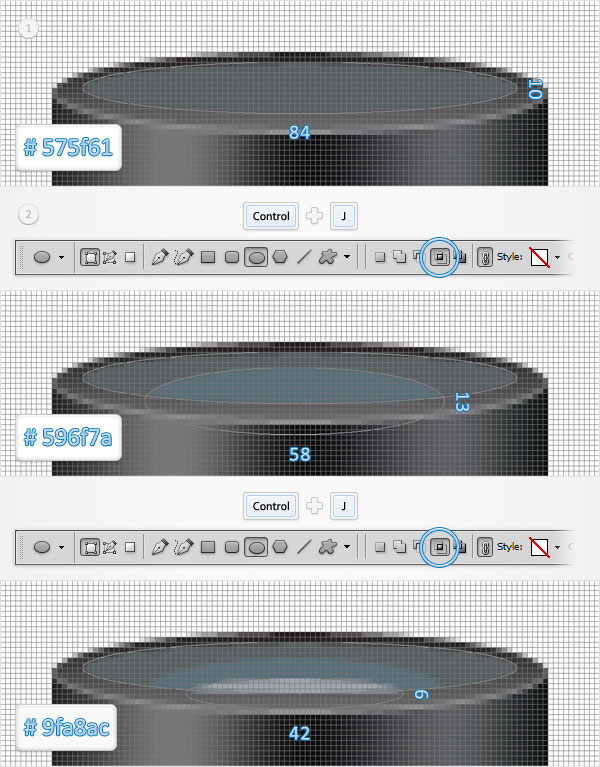
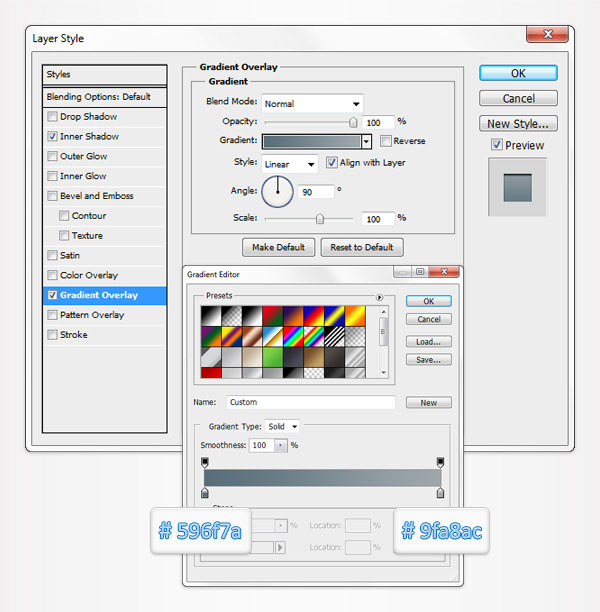
Set the foreground color at #575f61, grab the Ellipse Tool, create an 84 by 10px vector path, place it as shown in the first image then duplicate it (Control + J). Select this copy and replace the existing fill color with #596f7a. Continue with the Ellipse Tool, check the "Intersect" button from the top bar and draw a 58 by 13px vector path as shown in the second image. Duplicate this vector path (Control + J). Select the copy and replace the existing fill color with #9fa8ac. Make sure that the Ellipse Tool is still selected, check the "Intersect" button from the top bar and draw a 42 by 6px vector path as shown in the third image.
Step 17
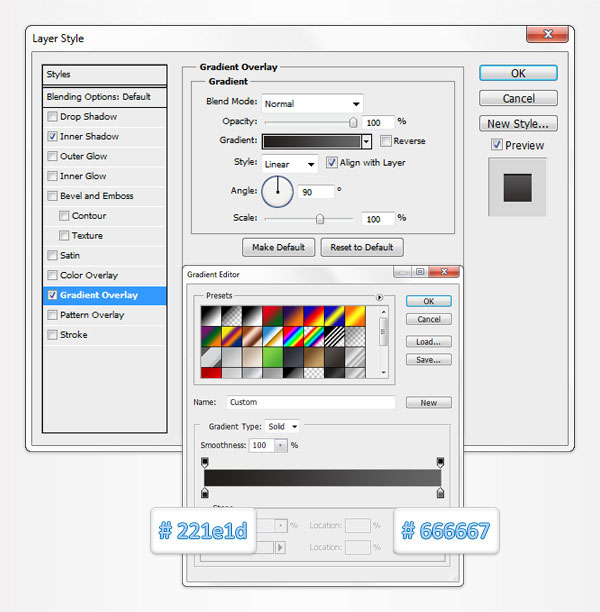
Open the Layer Style window for the first vector path made in the previous step and enter the properties shown in the following images.

Step 18
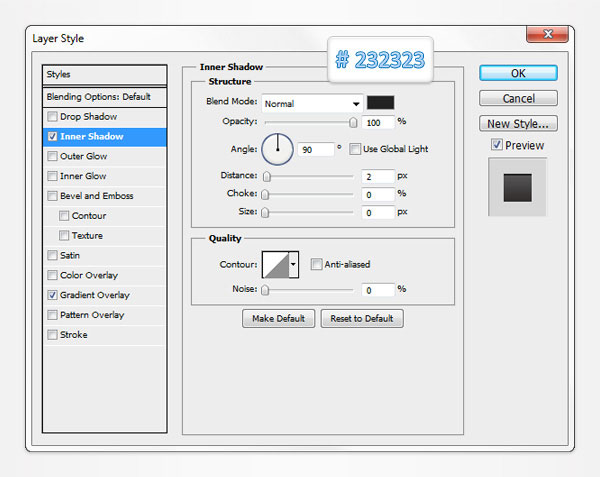
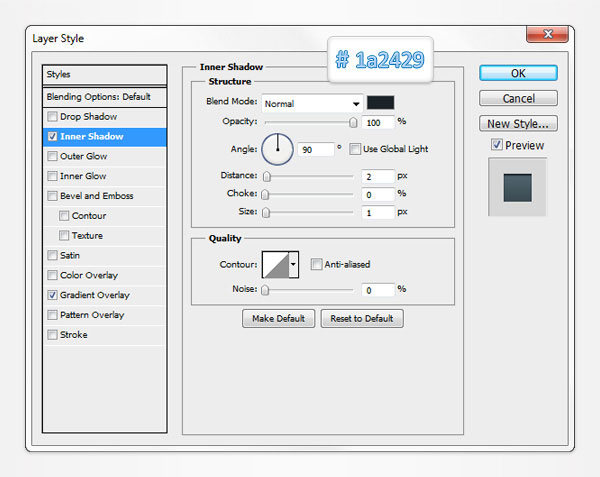
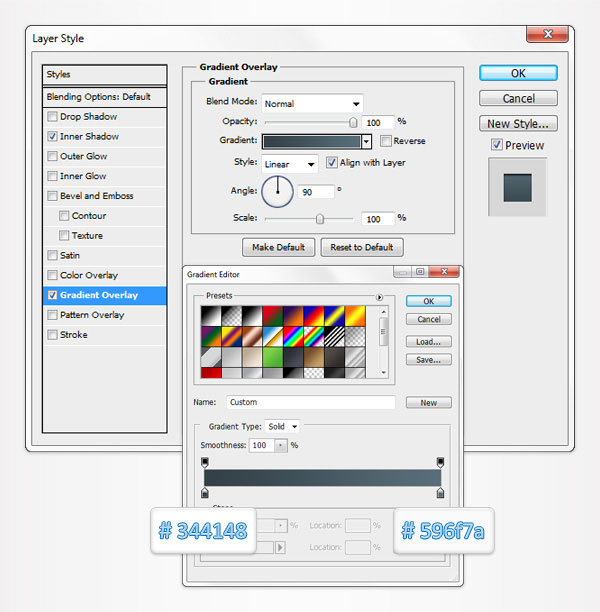
Open the Layer Style window for the second vector path made in the sixteenth step and enter the properties shown in the following images.

Step 19
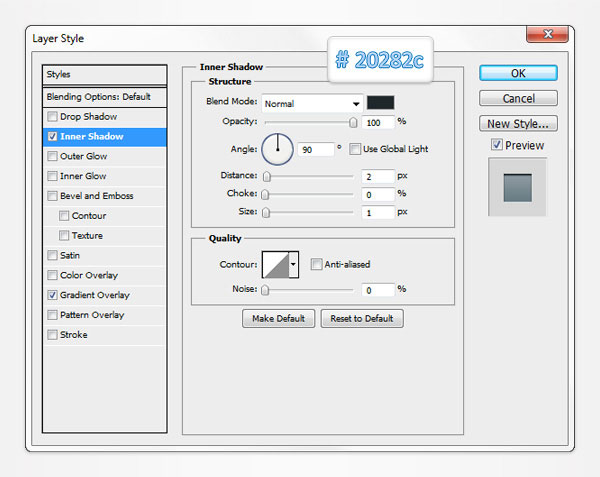
Open the Layer Style window for the third vector path made in the sixteenth step and enter the properties shown in the following images.

Step 20
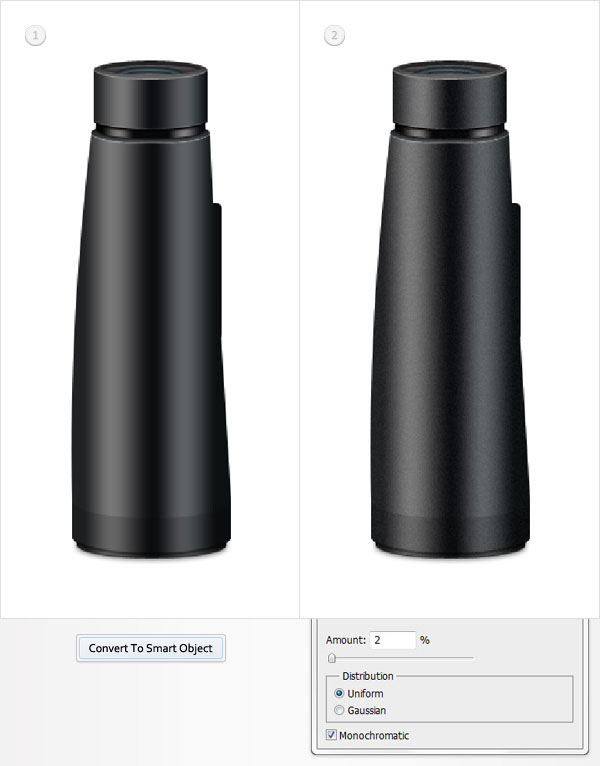
Move to the Layers panel, select all the shapes created so far and covert them to a smart object. Select it and go to Filter > Noise > Add Noise. Enter the data shown in the following image then click OK.
Step 21
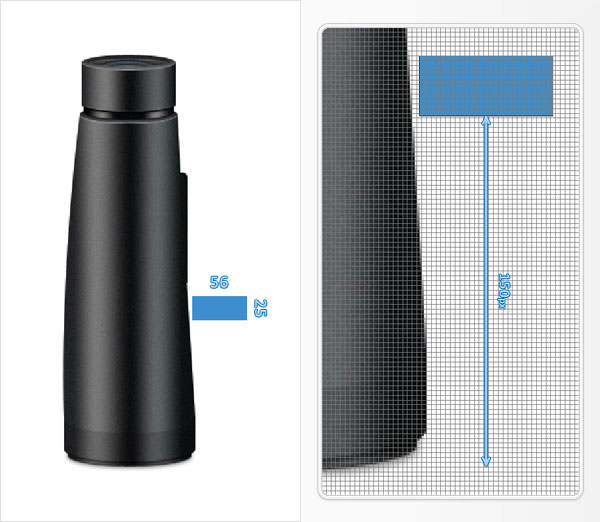
Pick a simple blue for the foreground color, grab the Rectangle Tool, create a 56 by 25px vector path and place it as shown in the following image.
Step 22
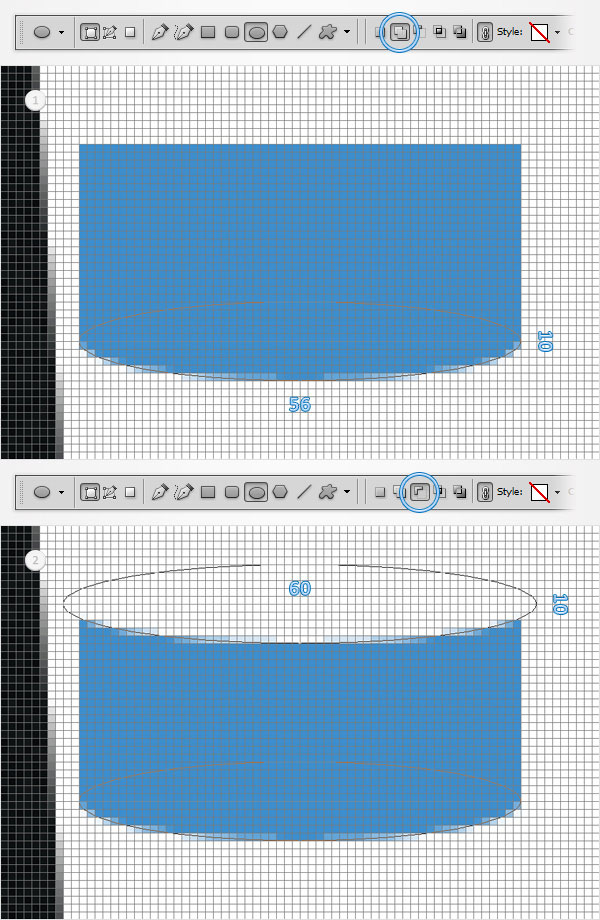
Reselect the vector path made in the previous step and grab the Ellipse Tool. Check the "Add" button from the top bar and draw a 56 by 10px vector path as shown in the first image. Continue with the Ellipse Tool, check the "Subtract" button and draw a 60 by 10px vector path as shown in the second image.
Step 23
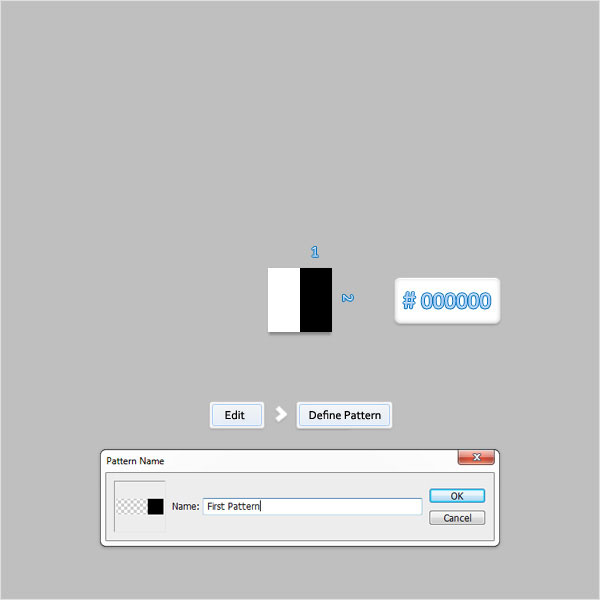
Hit Control + N to create a new document. Enter 2 in the width and height boxes and click OK. Move to the Layers panel and remove the default "Background" layer. Set the foreground color at black, grab the Rectangle Tool, create a 1 by 2px vector path and place it as shown in the following image. Next, you need to turn this tiny document into a pattern. Simply go to Edit > Define Pattern, pick a name for your pattern and click OK. Close this document (you don't need to save it) and return to your first document.
Step 24
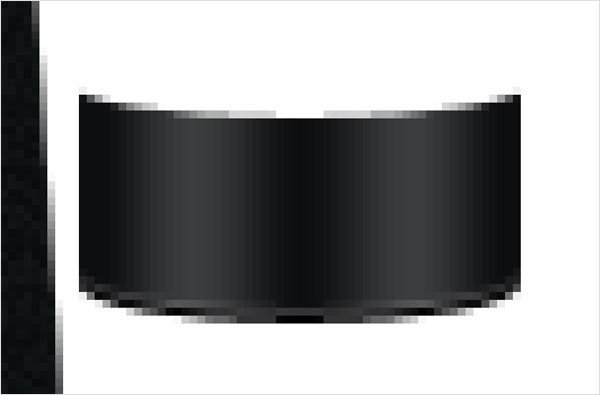
Reselect the vector path made in the the twenty-second step, open the Layer Style window and enter the properties shown in the following images.


Step 25
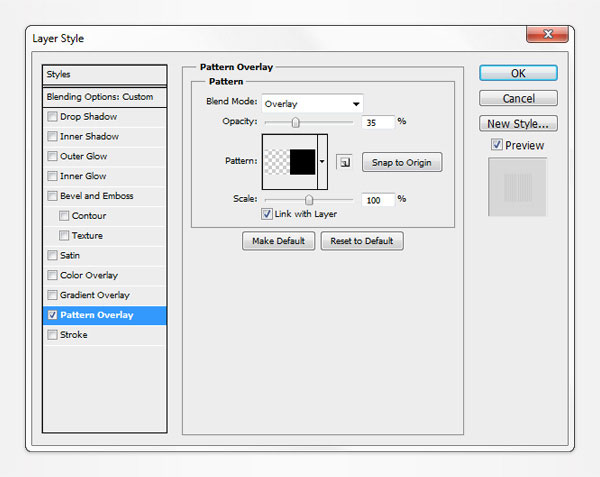
Reselect the vector path edited in the previous step and duplicate it (Control + J). Focus on this copy, Clear the Layer Style, lower its Fill to 0% then open the Layer Style window and enter the properties shown in the following image. Use the pattern made in the twenty-third step.

Step 26
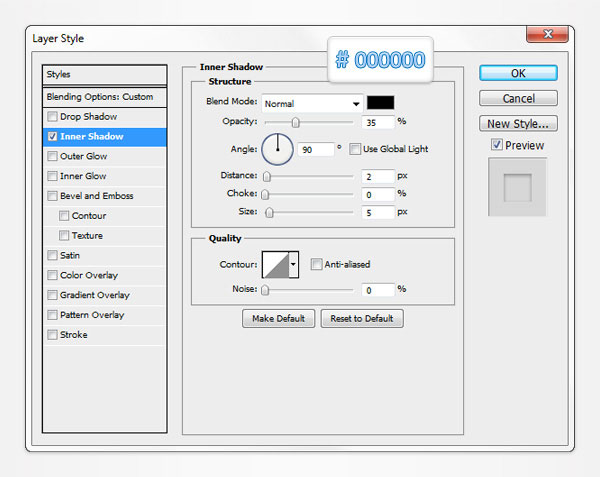
Reselect the vector path edited in the previous step and duplicate it (Control + J). Focus on this copy, Clear the Layer Style, lower its Fill to 0% then open the Layer Style window and enter the properties shown in the following image.

Step 27
Reselect the vector path edited in the previous step and duplicate it (Control + J). Focus on this copy, Clear the Layer Style, lower its Fill to 0% then open the Layer Style window and enter the properties shown in the following image.
Step 28
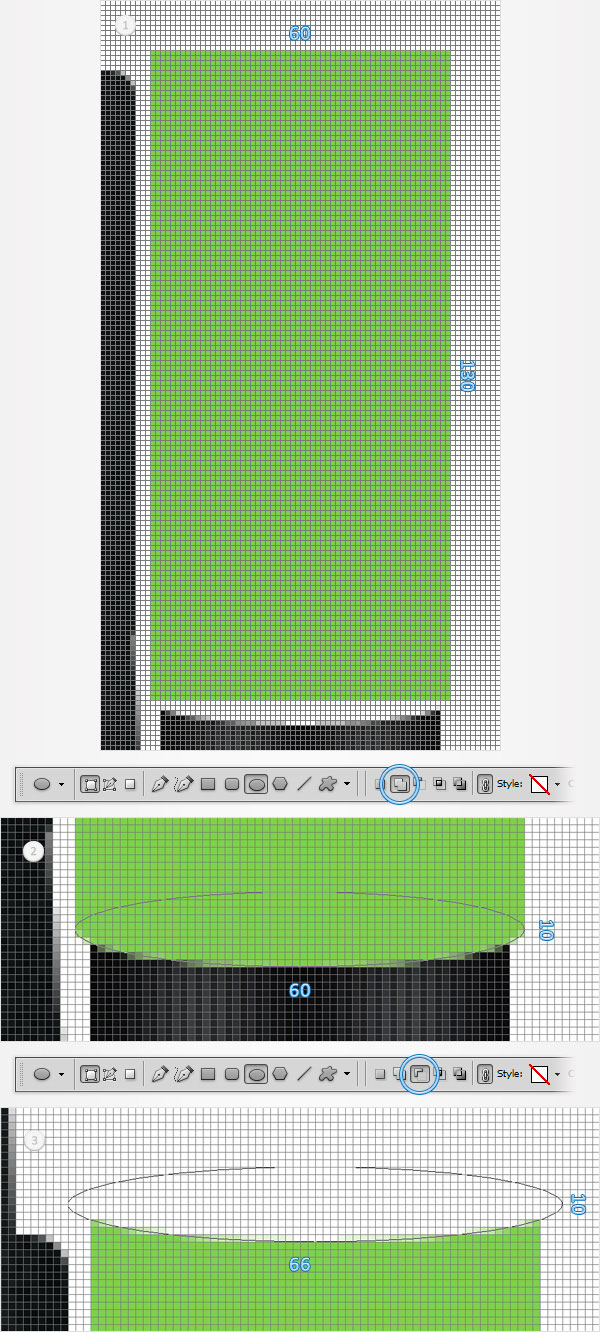
Pick a simple green for the foreground color, grab the Rectangle Tool, create a 60 by 130px vector path and place it as shown in the first image. Select it, grab the Ellipse Tool and focus on the bottom side of your green vector path. Check the "Add" button and draw a 60 by 10px vector path as shown in the second image. Continue with the Ellipse Tool, check the "Subtract" button, focus on the top side of your green vector path and draw a 66 by 10px vector path as shown in the third image.
Step 29
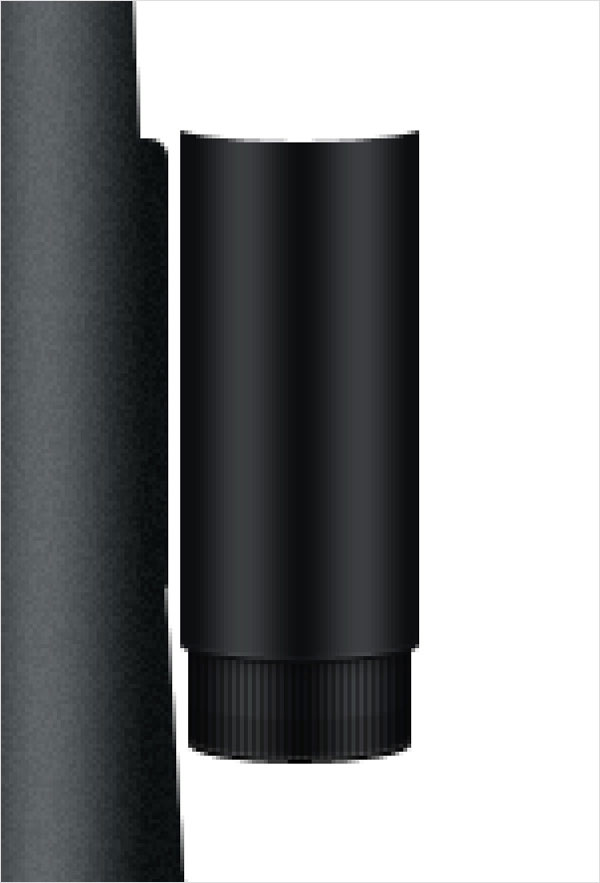
Reselect the vector path made in the the previous step, open the Layer Style window and enter the properties shown in the following images.


Step 30
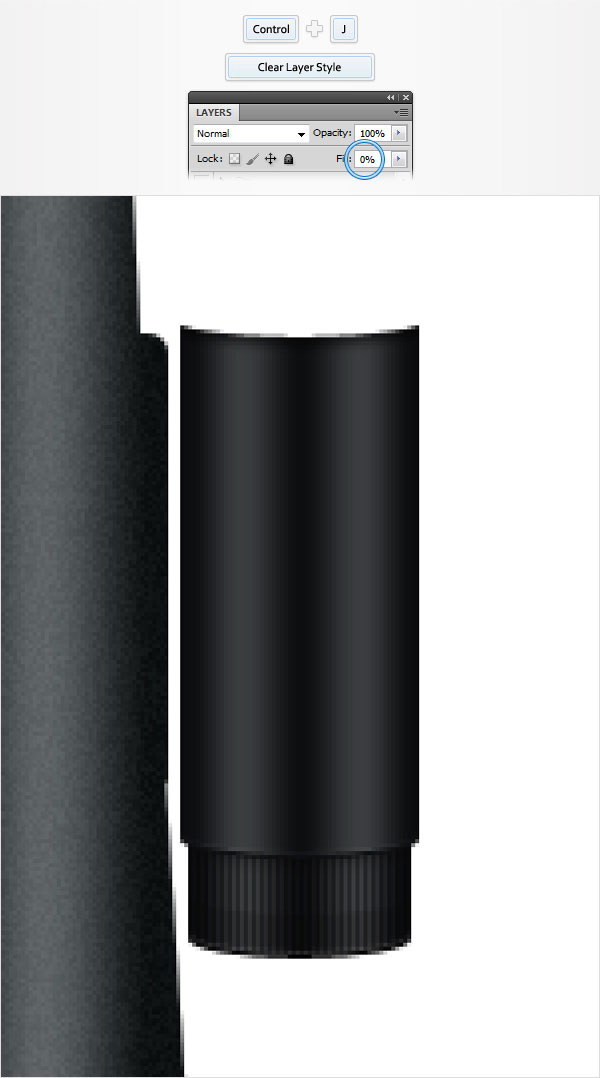
Reselect the vector path edited in the previous step and duplicate it (Control + J). Focus on this copy, Clear the Layer Style, lower its Fill to 0% then open the Layer Style window and enter the properties shown in the following image.

Step 31
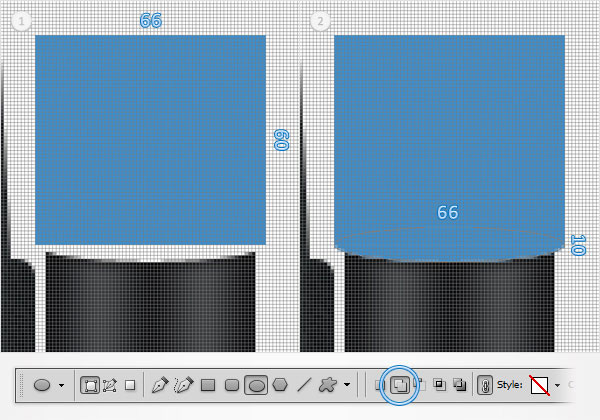
Pick a simple blue for the foreground color, grab the Rectangle Tool, create a 66 by 60px vector path and place it as shown in the first image. Select it, grab the Ellipse Tool and focus on the bottom side of your blue vector path. Check the "Add" button and draw a 66 by 10px vector path as shown in the second image.
Step 32
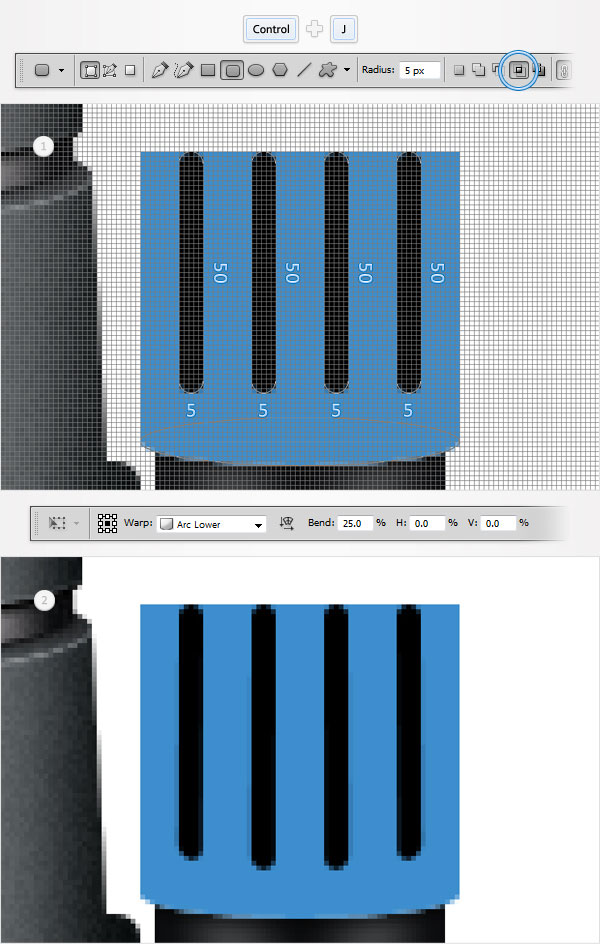
Reselect the vector path made in the previous step and duplicate it (Control + J). Select this copy, replace the blue with black and grab the Rounded Rectangle Tool. Set the radius at 5px, check the "Intersect" button and draw four, 5 by 50px vector paths as shown in the first image. Make sure that this new vector path is still selected and go to Edit > Transform > Warp. Select Arc Lower from the Warp drop-down menu, enter 25 in the Bend box and hit Enter.
Step 33
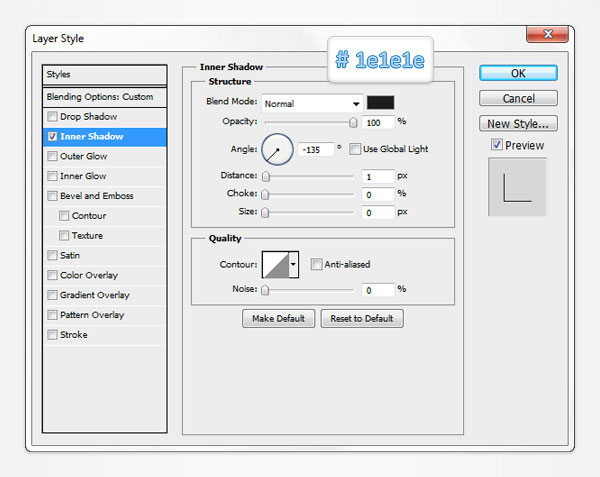
Reselect the vector path made in the the previous step, open the Layer Style window and enter the properties shown in the following images.

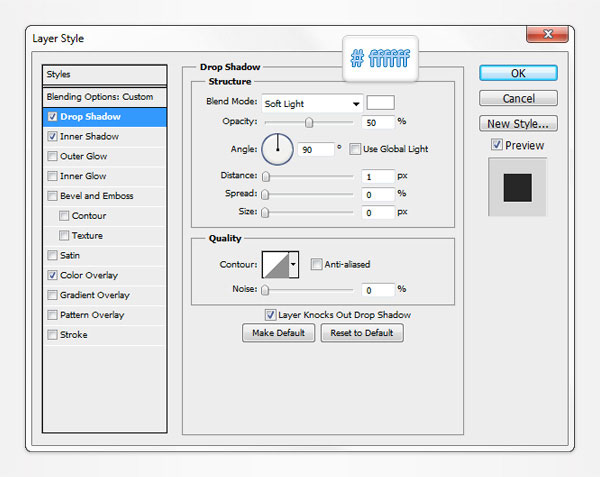
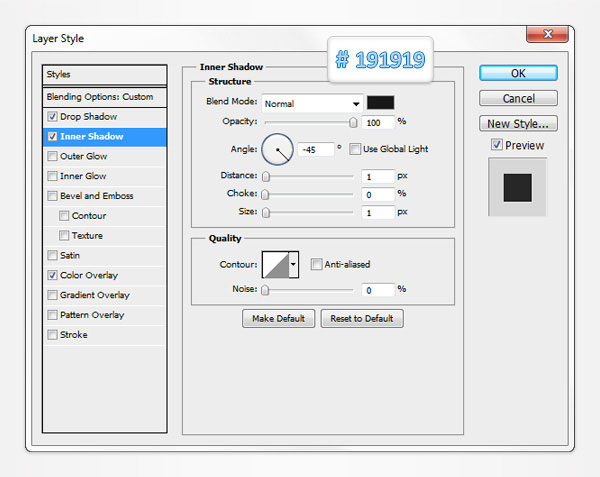
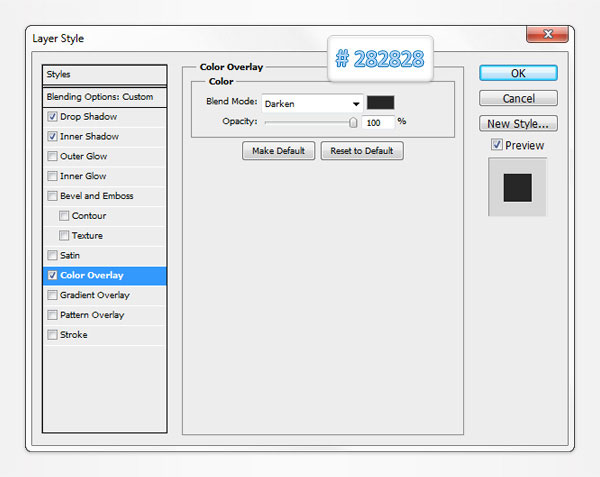
Step 34
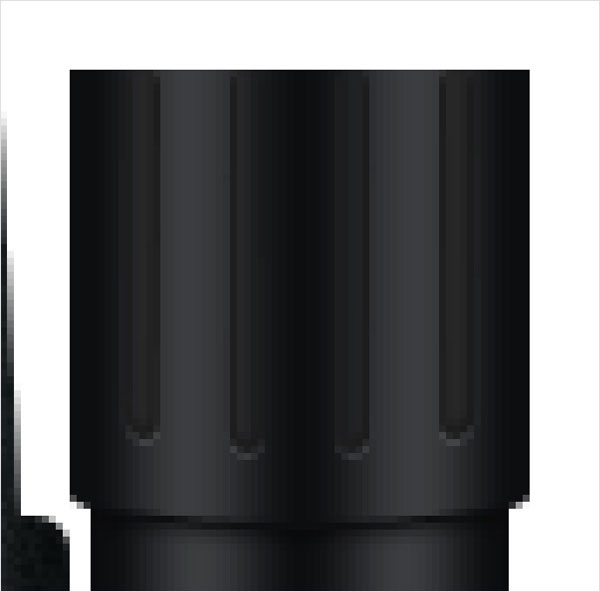
Reselect the vector path edited in the previous step and duplicate it (Control + J). Focus on this copy, Clear the Layer Style, lower its Fill to 0% then open the Layer Style window and enter the properties shown in the following image.
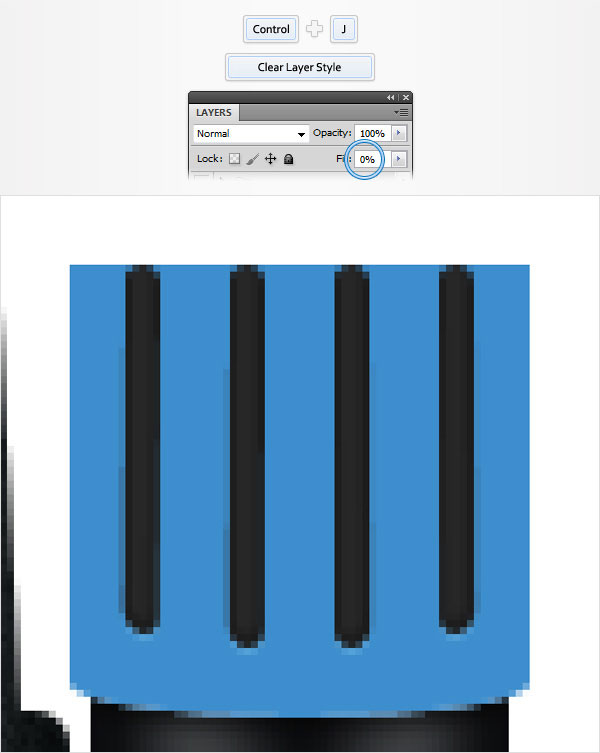
Step 35
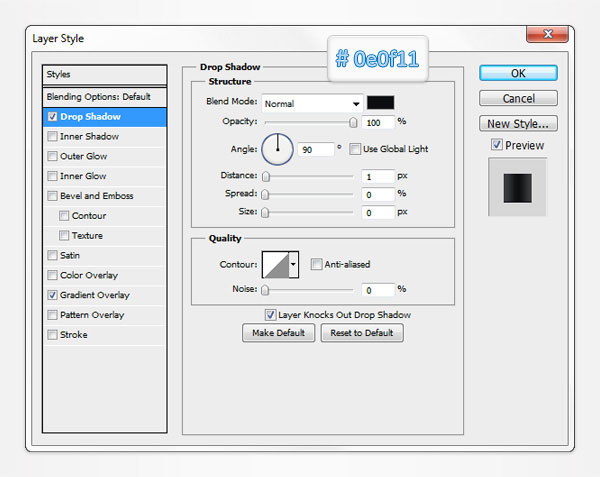
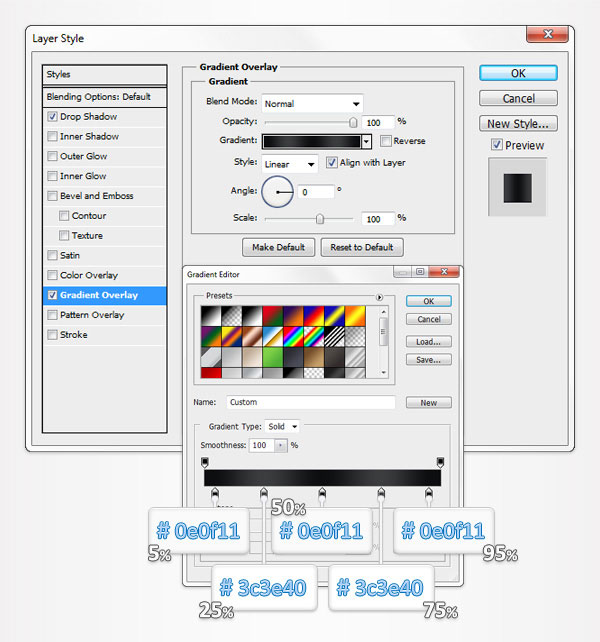
Reselect the blue vector path made in the the thirty-first step, open the Layer Style window and enter the properties shown in the following images.
Step 36
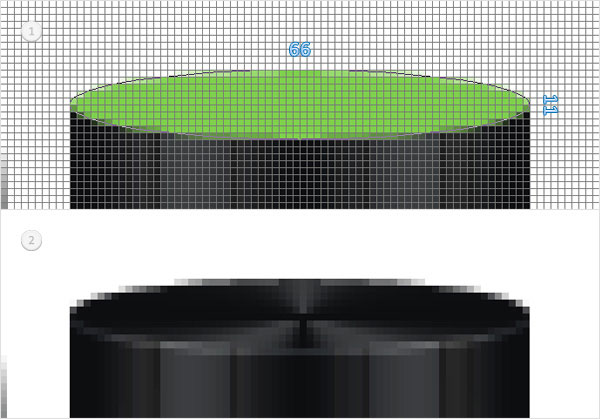
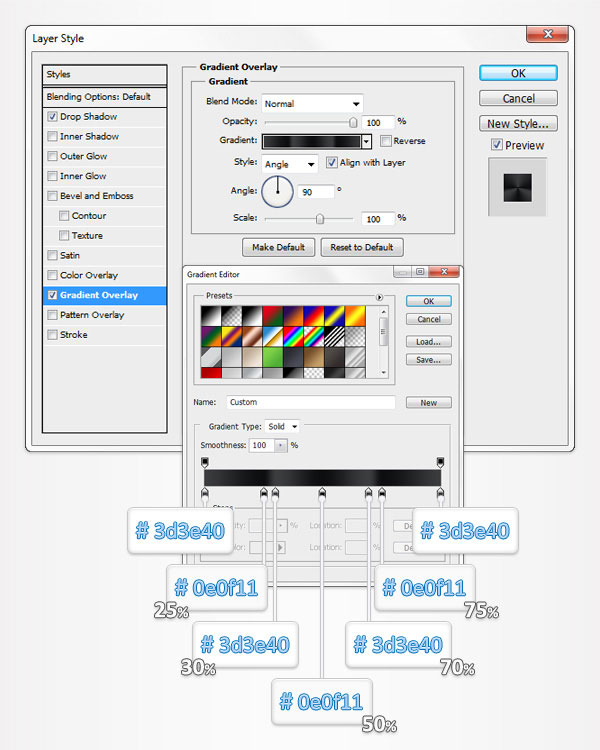
Set the foreground color at green, grab the Ellipse Tool, create a 66 by 11px vector path and place it as shown in the first image. Open the Layer Style window for this new path and enter the properties shown in the following images.

Step 37
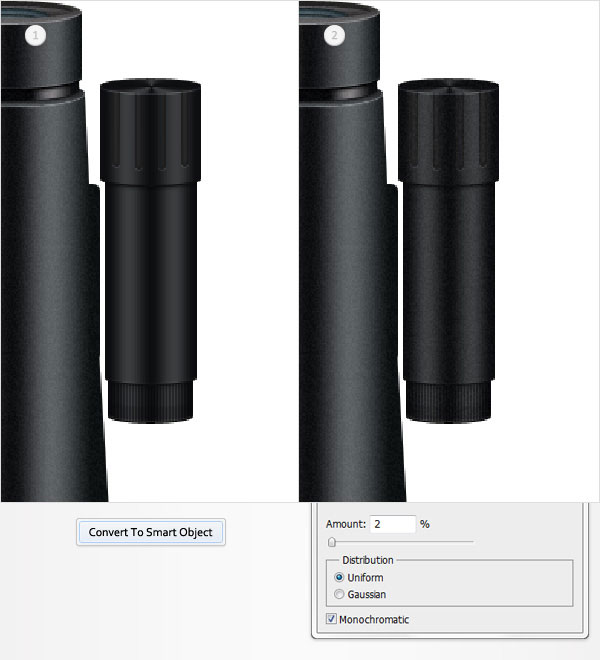
Reselect all the shapes created in the last sixteen steps and turn them into a smart object. Select it and go to Filter > Noise > Add Noise. Enter the data shown in the following image then click OK.
Step 38
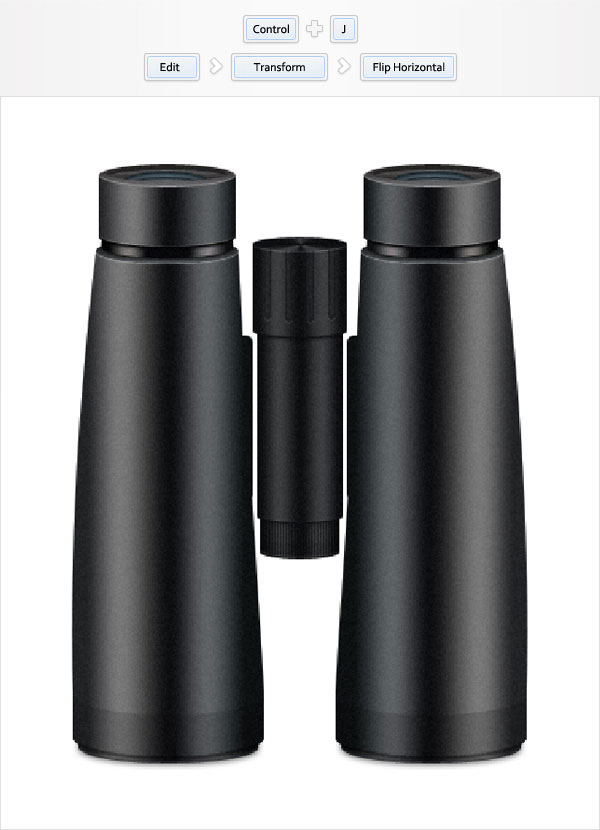
Reselect the smart object made in the twentieth step and duplicate it (Control + J). Select this copy, flip it horizontally (Edit > Transform > Flip Horizontal), drag it to the right and place it as shown in the following image.
Step 39
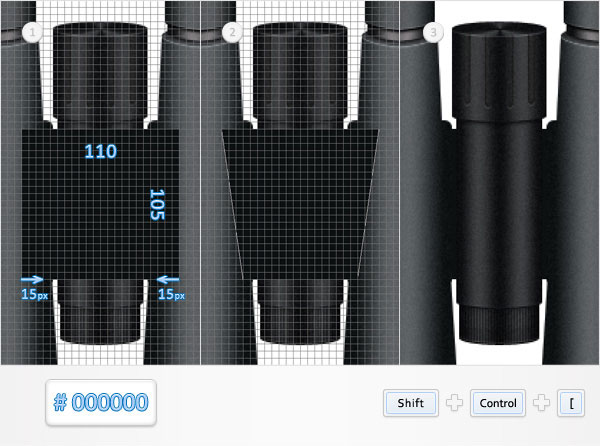
For the final steps you'll need a grid every 5px. So, go to Edit > Preferences > Guides, Grid & Slices and enter 5 in the Gridline Every box. Set the foreground color at black, grab the Rectangle Tool, create a 110 by 105px vector path and place it as shown in the first image. Switch to the Direct Selection Tool and focus on the bottom side of this black rectangle. Select the left anchor point and move it 15px to the right then select the right anchor point and move it 15px to the left. Make sure that this black vector path is still selected and send it to back (Shift + Control + [ ).
Step 40
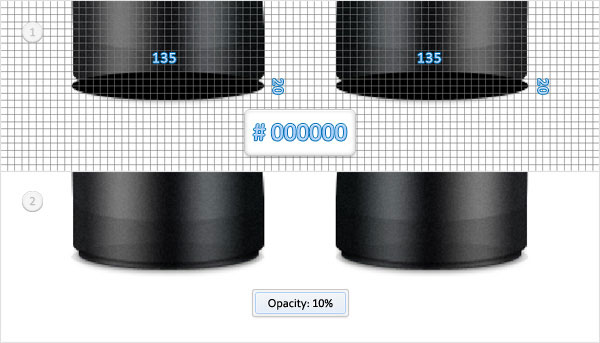
Grab the Ellipse Tool and create two, 135 by 20px vector paths. Place these new shapes as shown in the first image then lower their opacity to 10%.
Step 41
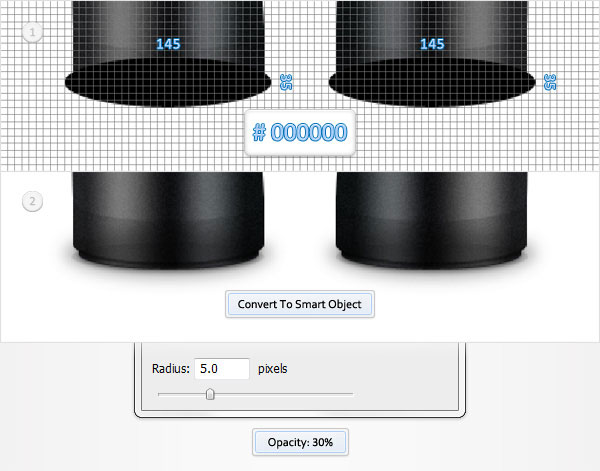
Grab the Ellipse Tool and create two, 145 by 35px vector paths. Place these new shapes as shown in the first image then convert them to a smart object. Select it, lower the opacity to 30% then go to Filter > Blur > Gaussian Blur. Enter a 5px radius and click OK.
Step 42
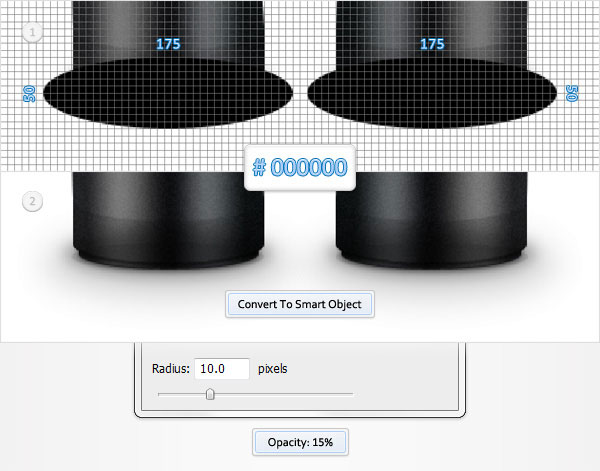
Grab the Ellipse Tool and create two, 175 by 50px vector paths. Place these new shapes as shown in the first image then convert them to a smart object. Select it, lower the opacity to 15% then go to Filter > Blur > Gaussian Blur. Enter a 10px radius and click OK.
Step 43
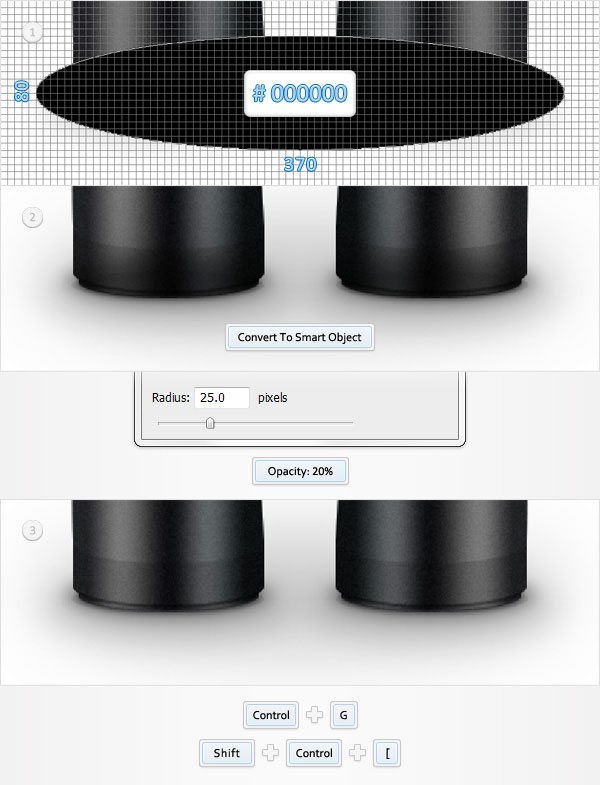
Grab the Ellipse Tool, create a 370 by 80px vector paths, place it as shown in the first image then convert it to a smart object. Select it, lower its opacity to 20% then go to Filter > Blur > Gaussian Blur. Enter a 25px radius and click OK. Select this smart object along with the vector shapes and the smart objects created in the last three steps and group them (Control + G). Select this new group and send it to back (Shift + Control + [ ).
Step 44
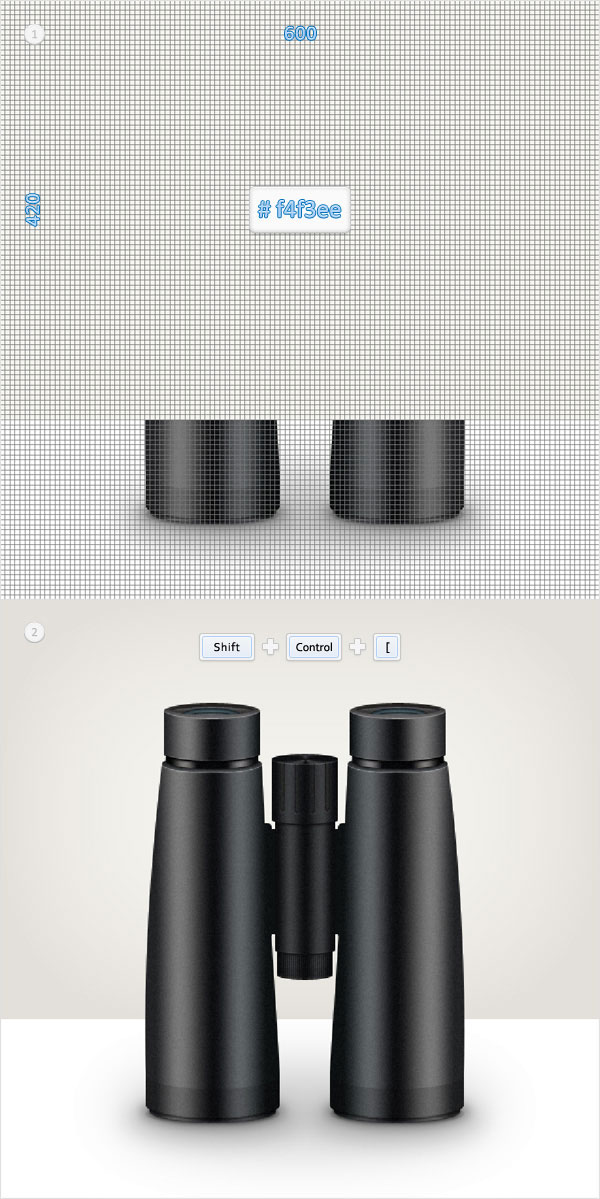
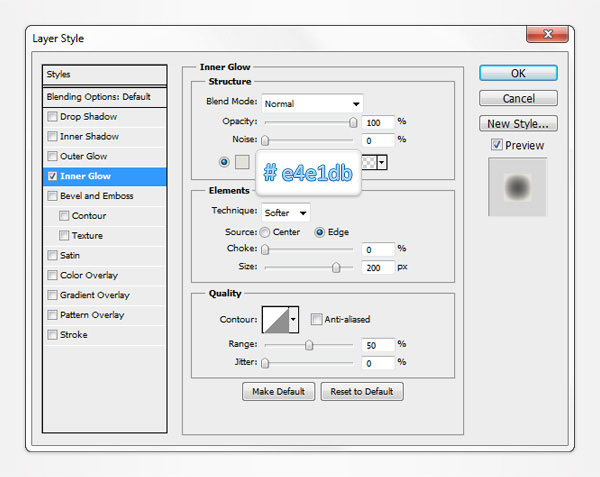
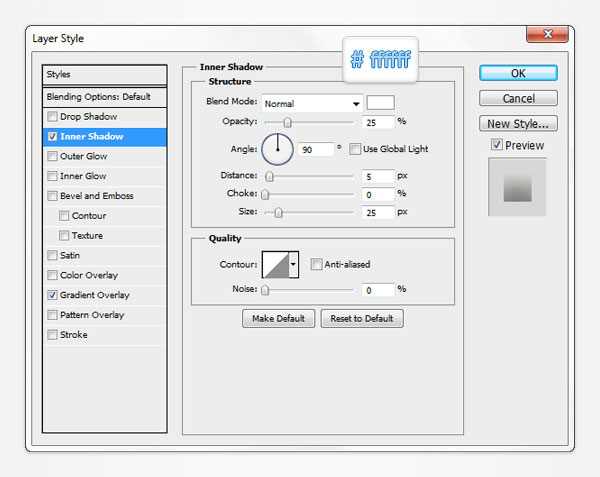
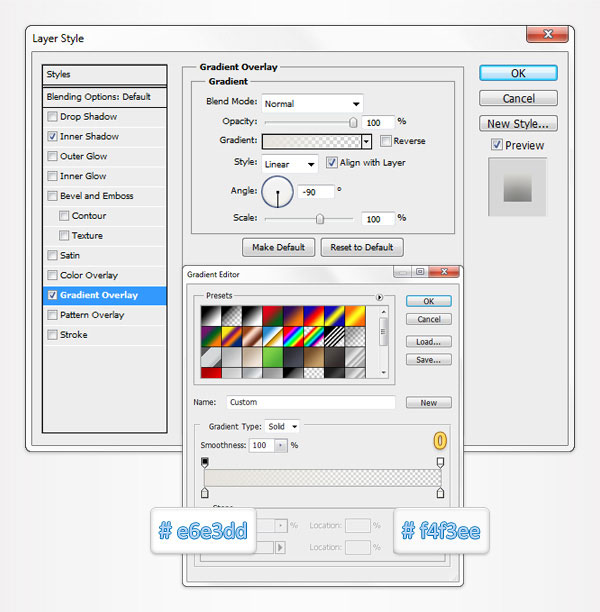
Set the foreground color at #f4f3ee, grab the Rectangle Tool, create a 600 by 420px vector path and place it as show in the first image. Select it, send it to back (Shift + Control + [ ) then open the Layer Style window and enter the properties shown in the following image.
Step 45
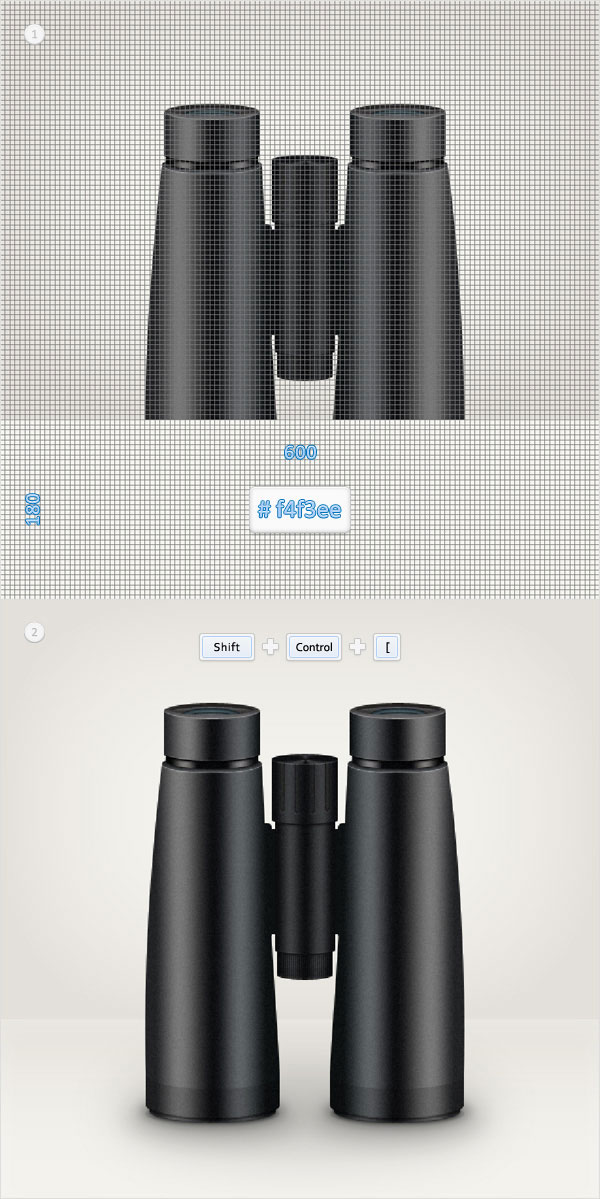
Grab the Rectangle Tool, create a 600 by 180px vector path and place it as show in the first image. Select it, send it to back (Shift + Control + [ ) then open the Layer Style window and enter the properties shown in the following image.
Step 46
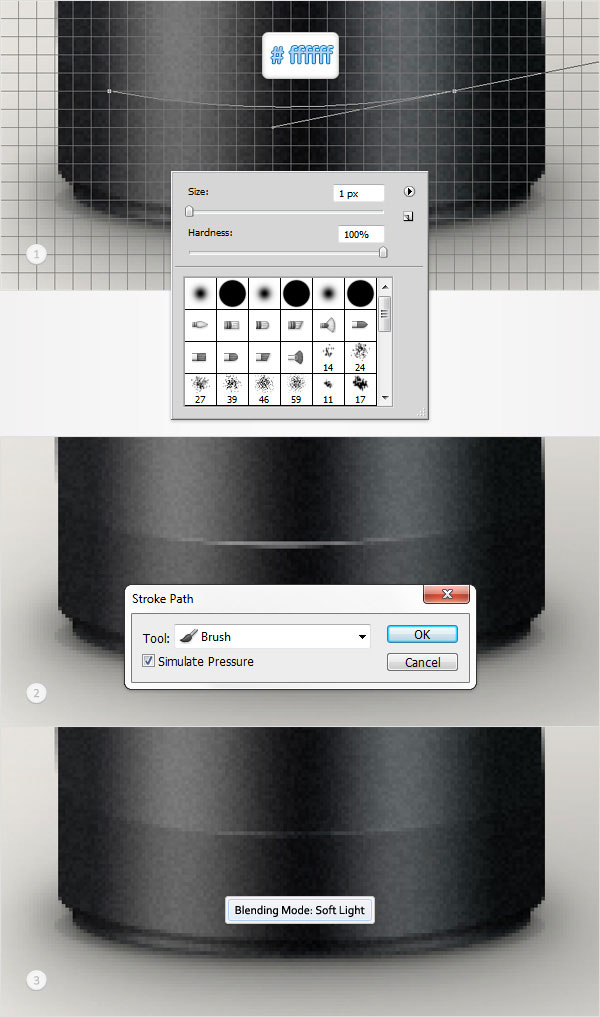
Set the foreground color at white. Grab the Brush Tool, pick the Hard Round brush and set the size at 1px. Create a new layer (Shift + Control + Alt + N), select it, switch to the Pen Tool and draw an arched path as shown in the first image. Right click on this path and click on Stroke Path. Select Brush from the Tools drop-down menu, check the "Simulate Pressure" box and click OK. In the end your path should look like in the second image. Select it and change the blending mode to Soft Light.
Step 47
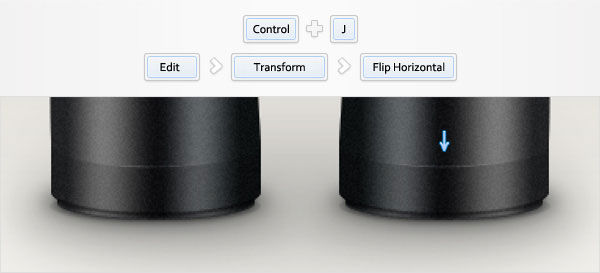
Reselect the layer made in the previous step and duplicate it (Control + J). Select this copy, flip it horizontally (Edit > Transform > Flip Horizontal), drag it to the right, place it as shown in the following image and you're done.
And We're Done!
Here is how your final result should look.

About the author
Copyright © 2025. All Rights Reserved
