How to make a folder icon
In this tutorial you will learn how to create a nice folder for your desktop or a website.
1. First of all create a new document which is 128 x 128 pixels large and has a transparent background.
2. Make a new layer, choose the Pen Tool and draw a shape wich is similar to this one:

3. Now use the following settings:
Gradient Overlay
#FFd27A -> #FFB912
Stroke
Size: 1px
Position: Outside
Color: #C07C33
Inner Glow
Blend Mode: Normal
Color: #FFFFFF
Choke: 100%
Size: 1px
After that it should look something like this:

4. Then you duplicate the layer with the shape. Now you have to perspectively distort the new layer as shown on the picture:
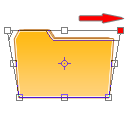
And now scale it down a little bit, so that it looks like an 3d opened folder:
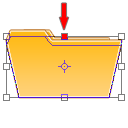
The result of step 4:

5. In this step we're going to add a piece of paper. So make a new layer and draw a shape like the one on the picture:

6. Now go to the layers palette and use the following settings:
Gradient Overlay:
Opacity: 10%
#000000 -> #FFFFFF
Angle: 50°
Stroke
Size: 1px
Position: Outside
Color: #D6D6D6
It should now look similar to this one:

7. Next you turn the piece of paper to the left a little bit and put this layer under the layer with the 3D folder thing from step 4.

8. That looks quite nice, but the thing wich makes it look like a really cool icon, is to set the opacity of the 3D folder part to about 50-60%.

That's it. You can add some details and use it for a website or make an .ico file and use it for your desktop.
Thats what I came up with in the end:
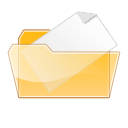
Two other things wich I made with exactly the same folder parts:


I hope you liked my first tutorial, and I'm looking forward to make another one soon!
Have fun!
Copyright © . All Rights Reserved